


Models
>
JGSP20GET1BB
JGSP20GET1BB General Electric Range
Jump to:
Find Part by Name
Keep searches simple, eg. "belt" or "pump".
Diagrams for JGSP20GET1BB
Viewing 6 of 6


Keep searches simple, eg. "belt" or "pump".

This authentic OEM part is an end cap for the door handle on your oven. It is black in color, made of plastic, can be used on either the left or right-hand side of the handle, and is sold individually...
No Longer Available

$43.92
This is a broiler pan for your range. It catches drippings from the cookware, when broiling in the oven. This assembly includes the grill/grate and the bottom pan. These parts are made of porcelain. T...
In Stock
Order now and your part arrives by Jul 24

This double drip pan can be used for either the left or right hand side of the stove top.
No Longer Available

In Stock
Order now and your part arrives by Jul 24


In Stock
Order now and your part arrives by Jul 24

 – Part Number: WB20K5037")
$110.22
This part sends enough current to the igniter to create a spark to the bottom of the burner cap.
Special Order


Special Order
 – Part Number: WB36K5379")
Common Problems and Symptoms for JGSP20GET1BB
Viewing 1 of 1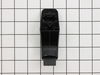

Keep searches simple. Use keywords, e.g. "leaking", "pump", "broken" or "fit".
- Customer:
- Harry from Thomasville, GA
- Parts Used:
- WB7X7183
- Difficulty Level:
- Easy
- Total Repair Time:
- 15 - 30 mins
- Tools:
- Screw drivers
The end caps broke on my oven door handle.
1st I opened the oven door and removed the 2 screws that hold the outside and inside of the door together. With the door separated I removed the 2 screws that hold the end caps in place, then removed the old end caps. I put the new end caps on the oven door handle, aligned the holes for the end cap screws and reinstalled the screws,then
... Read more
reinstalled the oven door screws,closed the oven door and started cooking.
Read less
Was this instruction helpful to you?
Thank you for voting!
- Customer:
- Nopadon from Arden, NC
- Parts Used:
- WB27K5187
- Difficulty Level:
- Really Easy
- Total Repair Time:
- 1- 2 hours
- Tools:
- Nutdriver, Screw drivers
Heat come up about 150 degrees and stop.
I removed the whole unit out by pulled the plug at the bottom and pulled the unit out, unplug the power cord , turn the gas line off, separate gas line from the stove. I pulled the unit out to have more room for me to work on it. I took the top part out and right hand side panel out. Now you can see the old clock/oven control (ERC II
... Read more
C). I wrote down the color of wire to the lettering on the controller board. I pulled the wires out from the old one. Then I put wires back to the new clock/oven control. I reinstalled and put the gas line back and plug in power cord. I test the unit. It is work very fine.
Read less
Was this instruction helpful to you?
Thank you for voting!
- Customer:
- Dorothy from Colchester, VT
- Parts Used:
- WB32X102
- Difficulty Level:
- Really Easy
- Total Repair Time:
- Less than 15 mins
worn out drip pans
I have tried to replace these drip pans for the last few years with no luck locally. The GE dealer said it was not possible to replace the pans. Nobody reworks stainless steel so on a lark I typed in drip pans and found this site. The actual replacement was very simple, remove and recycle old drip and replace with shiny new ones. They bri
... Read more
ng the stove back to nearly new. I have added this site to my favorites list plus told my friends about it. Thank you
Read less
Was this instruction helpful to you?
Thank you for voting!