



Models
>
QSS740RN2SS
QSS740RN2SS General Electric Range
Jump to:
Find Part by Name
Keep searches simple, eg. "belt" or "pump".
Diagrams for QSS740RN2SS
Viewing 4 of 4


Keep searches simple, eg. "belt" or "pump".
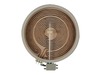
$121.38
This dual radiant element provides heat from beneath the cooktop and is 9 inches in diameter. It’s the larger burner and is ideal for bigger pots and pans. If your element isn’t heating, replacing it ...
In Stock
Order now and your part arrives by Sep 29

$79.12
This durable oven rack is built to support a variety of cookware while ensuring even heat circulation throughout the oven. With dimensions of roughly 23.75 inches by 16.25 inches, it fits securely in ...
In Stock
Order now and your part arrives by Sep 29
In Stock
Order now and your part arrives by Sep 29

$151.25
This kit includes the sensor as well as the connectors. NOTE This sensor is 2" long.
In Stock
Order now and your part arrives by Sep 29
In Stock
Order now and your part arrives by Sep 29
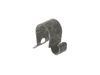
$15.26
This part is the replacement spring for the radiant element in your range. It is black in color, curved in shape, and is approximately 1 inch by 1/2 an inch. The radiant element spring is found beneat...
In Stock
Order now and your part arrives by Sep 29
Special Order

Special Order

On Order


In Stock
Order now and your part arrives by Sep 29

On Order
Common Problems and Symptoms for QSS740RN2SS
Viewing 5 of 5Element will not heat
Fixed by these parts

How to fix it
Little to no heat when baking
Fixed by these parts
How to fix it
Oven not heating evenly
Fixed by these parts
How to fix it
Oven is too hot
Fixed by these parts
How to fix it
Will Not Start
Fixed by these parts
How to fix it

Keep searches simple. Use keywords, e.g. "leaking", "pump", "broken" or "fit".
- Customer:
- Andrea from ORLANDO, FL
- Parts Used:
- WB30T10133
- Difficulty Level:
- Easy
- Total Repair Time:
- 30 - 60 mins
- Tools:
- Screw drivers
9" Radiant Element did not heat up.
I started by Unscrewing the range top. 2 small screws. I took off the old piece by unclipping the piece . Then I color coded each wire so that I would know exactly where I would place the wires for the new part. 30 min maximum time spent changing the part. Please don't forget to unplug the range before you start.
Was this instruction helpful to you?
Thank you for voting!
- Customer:
- CHARLA from NEW BRAUNFELS, TX
- Parts Used:
- WB23X5340
- Difficulty Level:
- Really Easy
- Total Repair Time:
- Less than 15 mins
- Tools:
- Nutdriver
Oven sensor was not holding temperature range.
Per the instructions included with part.
Was this instruction helpful to you?
Thank you for voting!
- Customer:
- Armand from COVENTRY, CT
- Parts Used:
- WB23X5340
- Difficulty Level:
- Easy
- Total Repair Time:
- 30 - 60 mins
- Tools:
- Screw drivers
defective temp. sensor
Removed oven from cabinet. unblug old sensor pluged in new and reinstalled oven. Esay repair though wish oven was designed so did not have to pull itout of cabinet which requires disconect electric cabel
Was this instruction helpful to you?
Thank you for voting!