


Models
>
MBC12GAZWW
MBC12GAZWW General Electric Range
Jump to:
Find Part by Name
Keep searches simple, eg. "belt" or "pump".
Diagrams for MBC12GAZWW
Viewing 7 of 7


Keep searches simple, eg. "belt" or "pump".

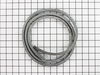
$30.85
If your dishwasher is leaking water while it is running, there may be an issue with the gasket. Also known as a door gasket, the tub gasket creates a watertight seal between the tub of the dishwasher ...
In Stock
Order now and your part arrives by Mar 19

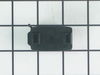
$14.65
This genuine GE drawer support is an original replacement part sourced from the manufacturer and is designed for use with electric ranges. Made of durable plastic, it attaches to the rear of the drawe...
In Stock
Order now and your part arrives by Mar 19

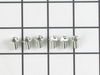
$36.00
This genuine OEM bracket is used to secure the dishwasher to your cabinetry. The mounting bracket measures approximately 3 inches in length and is made of metal. If you have a solid-surface countertop...
In Stock
Order now and your part arrives by Mar 19

In Stock
Order now and your part arrives by Mar 19

In Stock
Order now and your part arrives by Mar 19

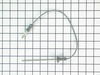
$58.09
This probe is used to check the internal temperature of the meat to ensure proper temperature is reached. Also known as a Meat Probe.
In Stock
Order now and your part arrives by Mar 19

In Stock
Order now and your part arrives by Mar 19

In Stock
Order now and your part arrives by Mar 19

$170.95
This 12-inch haliant surface element fits under the glass top of flat cooktops and ranges, providing heat to the cooking surface. It’s sold individually and replaces a non-heating burner. To install, ...
In Stock
Order now and your part arrives by Mar 19

$56.05
This light bulb is used in the interior oven. NOTE: This bulb has looped pins, not the straight pins.
In Stock
Order now and your part arrives by Mar 19

In Stock
Order now and your part arrives by Mar 19

In Stock
Order now and your part arrives by Mar 19
Questions and Answers
We're sorry, but our Q&A experts are temporarily unavailable.
Please check back later if you still haven't found the answer you need.
Common Problems and Symptoms for MBC12GAZWW
Viewing 11 of 11Leaking
Fixed by these parts


How to fix it
Element will not heat
Fixed by these parts


How to fix it
Little to no heat when baking
Fixed by these parts

How to fix it
Oven not heating evenly
Fixed by these parts

How to fix it
Door won’t close
Fixed by these parts

How to fix it
Little to no heat when broiling
Fixed by these parts
How to fix it
Oven is too hot
Fixed by these parts
How to fix it
Will Not Start
Fixed by these parts
How to fix it
Touchpad does not respond
Fixed by these parts

How to fix it
Will not program
Fixed by these parts
How to fix it
Not drying dishes properly
Fixed by these parts

How to fix it


Keep searches simple. Use keywords, e.g. "leaking", "pump", "broken" or "fit".
- Customer:
- Sean from Highlands Ranch, CO
- Parts Used:
- WB23T10015
- Difficulty Level:
- Really Easy
- Total Repair Time:
- 15 - 30 mins
- Tools:
- Nutdriver, Screw drivers
Oven was not coming up to temperature
I had to remove the oven from the wall because the sensor plug connction is behind the unit. Two screws hold the sensor inside the oven and then I disconnected the lead and pulled the sensor out from the front. I installed the new sensor, tightened the two screws holding it in and connected the lead. Then reinstalled the oven into the wal
... Read more
l. Overall, a very easy repair once you get the oven out.
Read less
Was this instruction helpful to you?
Thank you for voting!
- Customer:
- jonathan from willow springs, IL
- Parts Used:
- WB17T10011
- Difficulty Level:
- Easy
- Total Repair Time:
- Less than 15 mins
- Tools:
- Nutdriver, Screw drivers
terminal block melted
The existing terminal block on my Ge oven/Range had melted due to a loose wire causing sparking and starting the plastic casing of the terminal block on fire and melting it, Part select made the part easy to find and had it at my house in 2 days. All I had to do was remove six screws to take the back sheet metal cover off of the oven. U
... Read more
nscrew the terminal connections remove two mounting screws that held the terminal on to the oven body. This was a little trickier than it should have been because the melted plastic had reformed making it very hard to access the mounting screws. i then mounted the new piece and plugged the oven in, it took 15 minutes and was very easy. definitely saved me at-least a $100 for the service call i would have made if finding the part wasn't so convenient
Read less
Was this instruction helpful to you?
Thank you for voting!
- Customer:
- Jeff Troiano from Sayville, NY
- Parts Used:
- WB02X33180
- Difficulty Level:
- Really Easy
- Total Repair Time:
- Less than 15 mins
- Tools:
- Screw drivers
Plastic drawer support snapped off
The repair went very easy. The replacement part was designed differently than the original part. It installed on the rear of the drawer with a screw as the original snapped into the side. This was a bit confusing when researching and looking up the part online.
Was this instruction helpful to you?
Thank you for voting!