


Models
>
JBP30CB1CC
JBP30CB1CC General Electric Range
Jump to:
Find Part by Name
Keep searches simple, eg. "belt" or "pump".
Diagrams for JBP30CB1CC
Viewing 5 of 5


Keep searches simple, eg. "belt" or "pump".

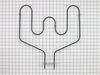
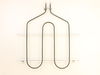
The bake element sits at the bottom of the oven to provide heat for cooking and baking. You may need to replace the element if you notice your oven is not coming up to temperature, has hot spots, or i...
In Stock
Order now and your part arrives by Aug 6

$22.91
This burner bowl, also known as a drip bowl, is an authentic OEM part for your electric range or cooktop. This part is black in color and designed to fit under the 8-inch coiled burner elements and is...
In Stock
Order now and your part arrives by Aug 6

$18.95
This genuine OEM burner bowl, also known as a drip tray, is black and color and measures 6 inches in diameter. It is designed to be used under the coiled elements on an electric stove or range, in ord...
In Stock
Order now and your part arrives by Aug 6

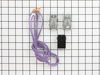
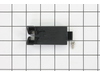
The terminal block is the socket for the coiled burner elements of your cooktop or range in order for the burners to heat up. If your element is not heating up or turning on, there may be an issue wit...
In Stock
Order now and your part arrives by Aug 6

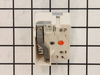
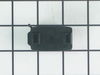
If your burner element is not turning on or heating up, it is possible there is an issue with the switch. The surface burner switch, also known as an infinite heat switch, is what turns your burner el...
In Stock
Order now and your part arrives by Aug 6

$33.95
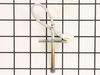
If your oven is running hot, not heating evenly, not coming up to temperature, or just not heating up at all, there may be an issue with the temperature sensor. This sensor is usually found in the bac...
In Stock
Order now and your part arrives by Aug 6

$21.95
This 40-Watt light bulb is sold individually.
It is specially designed to withstand extreme temperatures, so this bulb is compatible with a variety of appliance types including refrigerators, ranges,...
In Stock
Order now and your part arrives by Aug 6

$15.26
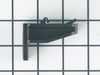
This genuine GE drawer support is an original replacement part sourced from the manufacturer and is designed for use with electric ranges. Made of durable plastic, it attaches to the rear of the drawe...
In Stock
Order now and your part arrives by Aug 6

In Stock
Order now and your part arrives by Aug 6

In Stock
Order now and your part arrives by Aug 6

This infinite switch controls the heat level of a 6-inch, 1560-watt surface element by regulating power flow. It operates at 240 volts and helps maintain consistent temperatures. Replacing it can fix ...
In Stock
Order now and your part arrives by Aug 6

In Stock
Order now and your part arrives by Aug 6
Common Problems and Symptoms for JBP30CB1CC
Viewing 7 of 7Element will not heat
Fixed by these parts
How to fix it
Little to no heat when baking
Fixed by these parts
How to fix it
Oven not heating evenly
Fixed by these parts
How to fix it
Little to no heat when broiling
Fixed by these parts
How to fix it
Oven is too hot
Fixed by these parts
How to fix it
Will Not Start
Fixed by these parts
How to fix it
Door won’t close
Fixed by these parts
How to fix it


Keep searches simple. Use keywords, e.g. "leaking", "pump", "broken" or "fit".
- Customer:
- Dennis from Bondville, VT
- Parts Used:
- WB44T10011
- Difficulty Level:
- Really Easy
- Total Repair Time:
- 15 - 30 mins
- Tools:
- Screw drivers, Socket set
oven element burned itself up
Turned off circuit breaker to range.
Removed the 2 oven racks. Removed two screws in back of oven compartment. Pulled element forward and the terminal connections get exposed.
The right terminal clip disconnected by itself and the wire went back into the stove and could not be retrieved.
Removed range draw under the oven an ... Read more d pulled entire range out from wall about 4 feet.. Removed metal backing with a socket wrench and exposed the oven element wires and terminals.
Reinstalled new element and metal backing.
Since range was out from wall, cleaned and vacuumed before pushing stove back in place.
Since range draw was out re-leveled by setting adjustable feet.
Reinstalled drawer and racks.
Turned on circuit breaker.
Tested element by setting bake cycle on.
Read less
Was this instruction helpful to you?
Thank you for voting!
- Customer:
- Theresa from Sherman, TX
- Parts Used:
- WB44T10011
- Difficulty Level:
- Easy
- Total Repair Time:
- 15 - 30 mins
- Tools:
- Nutdriver, Pliers
The baking assembly in the oven burst into flames one day, then broke apart.
After the element cooled down, I pulled the racks out of the oven, turned off the oven at the breaker box, then, using a nut driver, loosened the screws that held the baking assembly in the back of the oven, and pulled the connecting wires off. I bent the wires to make sure they would stay out, because if they get back in the insulation,
... Read more
they are hard to find. I would recommend getting a pair of locking pliers and putting them on the ends of the wires just to keep them from getting back into the insulation. Then I attached the left connection wire and then the right one, pushed them back into the insulation, tightened the baking assembly to the back wall of the oven, turned it back on at the breaker box, then tested the oven to see if it heated up. It did. Total repair time 15 -20 minutes. Would have been less if I didn't have to chase one of the wires back in the insulation. Shamless plug for the company ...By paying extra for 2-day shipping to receive the part, I saved just over $20 from buying it at Sears, which would have had to order the part anyway.
Read less
Was this instruction helpful to you?
Thank you for voting!
- Customer:
- Peter from stamford, CT
- Parts Used:
- WB21X22134
- Difficulty Level:
- Really Easy
- Total Repair Time:
- 15 - 30 mins
- Tools:
- Nutdriver
Oven would go in to a F2 Error
Removed six 1/4" hex nuts on rear of oven. Then through front/inside removed a single 1/4" hex nut to actually remove sensor. Unplug sensor connector, remove. Reversed steps, push oven back in place and plugged in. Tested oven function.
Was this instruction helpful to you?
Thank you for voting!