


Models
>
JP340CJC
JP340CJC General Electric Range
Jump to:
Find Part by Name
Keep searches simple, eg. "belt" or "pump".
Keep searches simple, eg. "belt" or "pump".

In Stock
Order now and your part arrives by Aug 2

In Stock
Order now and your part arrives by Aug 2

In Stock
Order now and your part arrives by Aug 2

In Stock
Order now and your part arrives by Aug 2

In Stock
Order now and your part arrives by Aug 2

This part goes between the infinite switch (under the cooktop) and the knob.
No Longer Available

In Stock
Order now and your part arrives by Aug 2

In Stock
Order now and your part arrives by Aug 2

In Stock
Order now and your part arrives by Aug 2

Special Order

In Stock
Order now and your part arrives by Aug 2

In Stock
Order now and your part arrives by Aug 2
Common Problems and Symptoms for JP340CJC
Viewing 1 of 1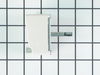
Keep searches simple. Use keywords, e.g. "leaking", "pump", "broken" or "fit".
- Customer:
- Larry from Mattawa, WA
- Parts Used:
- WB23M9
- Difficulty Level:
- Really Easy
- Total Repair Time:
- Less than 15 mins
- Tools:
- Screw drivers
Intermitently the switch would stick on high.
Pulled unit from the counter top, removed all side screws holding the top on and set the top off. Removed switch mount section, Identified the terminal wire locations. I then removed the old switch and connected the wires per my diagram. Returned all screws, tested the burner for opeation and reset the cooktop back into the counter hol
... Read more
e and secured.
Read less
Was this instruction helpful to you?
Thank you for voting!
- Customer:
- William from Perryton, TX
- Parts Used:
- WB30T10043
- Difficulty Level:
- Easy
- Total Repair Time:
- 15 - 30 mins
- Tools:
- Screw drivers
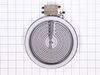
Stove Top Element Heat Varies
Removed stove top from counter, removed glass top by removing 10 phillps screws, removed control bracked, unplugged connectors(wires) on old control and plugged into the correct position on the new control, replace control on the bracket then reinstalled the stove top and placed the stove top back into counter.
Was this instruction helpful to you?
Thank you for voting!
- Customer:
- Gary from Manchester, MD
- Parts Used:
- WB30T10043
- Difficulty Level:
- Easy
- Total Repair Time:
- 15 - 30 mins
- Tools:
- Pliers, Screw drivers
Small Element on cook top fails to function
Turned of the electric at the circuit breaker. Removed the cable clamps for the electric feed cable to enable free movement of cooktop. Lifted cooktop from the counter and propped up on counter ledge. Removed control knobs. Removed perimeter screws, 8 phillips, from around the edge of the cook top surface where it attaches to the sheet me
... Read more
tal housing and lifted glass top off. Removed the failed burner and disconnected the four electrical leads. Removed the mounting tabs from the old burner and installed them on the new burner. Attached the electrical leads to the new burner and tightened with pliers. Reattached glass top and knobs, reinstalled in counter, clamped the electrical cable, flipped the breaker and tested. All good.
Read less
Was this instruction helpful to you?
Thank you for voting!