


Models
>
CFEF210CS5
CFEF210CS5 Frigidaire Range
Jump to:
Find Part by Name
Keep searches simple, eg. "belt" or "pump".
Diagrams for CFEF210CS5
Viewing 6 of 6


Manuals & Guides for CFEF210CS5
Click to downloadManual
Owner's Manuals
(4.94MB)
Specs
Product Specifications Sheet
(0.46MB)
Wiring
Wiring Diagram
(0.38MB)
Keep searches simple, eg. "belt" or "pump".

$14.25
This OEM drip bowl fits under 8-inch burner elements and has a diameter of approximately 10-inches. Drip bowls catch any spills, and are a quick, easy, and cheap way to improve your cooktop aesthetic....
In Stock
Order now and your part arrives by Jul 31

$13.15
This drip bowl is an OEM approved replacement part designed for use with various electric ranges and cooktops. This part is located underneath the burner to contain any spills while cooking. It fits ...
In Stock
Order now and your part arrives by Jul 31

$15.35
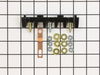
This kit comes with the necessary components to replace your burner terminal block. It includes interchangeable mounting brackets, a terminal box, ceramic wire nuts, heat shrink protective tubing, and...
In Stock
Order now and your part arrives by Jul 31

$27.45
This 40-watt light bulb has a standard screw-in base and is used in many different appliances. If your current bulb is burnt out or broken you will need to replace it. This light bulb is a genuine OEM...
In Stock
Order now and your part arrives by Jul 31

$57.70
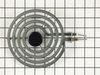
This element has looped terminal ends and comes with a black medallion center. This element is a genuine OEM replacement part, has looped terminal ends, comes with a black medallion center, and fits m...
In Stock
Order now and your part arrives by Jul 31

$41.29
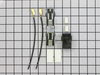
Terminal blocks (also called terminal boards or strips) provide a convenient means of connecting individual electrical wires.
In Stock
Order now and your part arrives by Jul 31

$152.72
This broil element is found on the roof of the oven and heats food. The most common reasons you would need to replace this part is due to the oven not giving off enough heat, not turning on, or not ba...
In Stock
Order now and your part arrives by Jul 31

In Stock
Order now and your part arrives by Jul 31

Special Order

$30.95
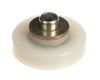
This storage drawer roller allows the drawer to slide in and out smoothly while maintaining proper alignment. Designed for reliable movement and stability, it is an effective replacement when drawers ...
Special Order

$8.75
This is an authentic mounting screw, which works with ranges, wall ovens, cooktops and warming drawers.
In Stock
Order now and your part arrives by Jul 31

On Order
Common Problems and Symptoms for CFEF210CS5
Viewing 6 of 6Element will not heat
Fixed by these parts

How to fix it
Little to no heat when baking
Fixed by these parts

How to fix it
Will Not Start
Fixed by these parts
How to fix it
Little to no heat when broiling
Fixed by these parts
How to fix it
Oven not heating evenly
Fixed by these parts
How to fix it
Door won’t close
Fixed by these parts
How to fix it


Keep searches simple. Use keywords, e.g. "leaking", "pump", "broken" or "fit".
- Customer:
- Timothy from Spring Valley, AL
- Parts Used:
- 5304409888
- Difficulty Level:
- Really Easy
- Total Repair Time:
- 15 - 30 mins
- Tools:
- Screw drivers, Socket set
Cord was not tightened enough by delivery crew.
PF alarm appeared on display. Noticed clicking when cord was moved. Had arced for some time and melted original block. New part slightly different. Only has 3 lugs, old one had six. Stack using washers provided. Take note of colors before disassembly. Use caution while working through access opening. The edges are sharp. Only tools neede
... Read more
d are phillips screwdriver, deep socket for lug nuts. Nut driver optional. Hope this is helpful.
Read less
Was this instruction helpful to you?
Thank you for voting!
- Customer:
- Kevin from Alexandria, VA
- Parts Used:
- 318255605
- Difficulty Level:
- Really Easy
- Total Repair Time:
- Less than 15 mins
- Tools:
- Screw drivers
Broil element wasn't working...
I pulled my unit out of the wall and noticed that the insulation around the top broiler element was a bit brown. Closer inspection revealed that the element had shorted somehow to the oven itself and caused the element to become non-functional. I tried measuring the resistance first, and it was within typical values for the other elemen
... Read more
ts, but I decided to replace the element anyway.
I ordered from PD and the part arrived just a few days letter by regular shipping. I undid the screws holding in the element, undid the wire connectors and replaced the broken element with the new one. The element worked like a charm and I was back in business for cooking.
I ordered from PD and the part arrived just a few days letter by regular shipping. I undid the screws holding in the element, undid the wire connectors and replaced the broken element with the new one. The element worked like a charm and I was back in business for cooking.
Read less
Was this instruction helpful to you?
Thank you for voting!
- Customer:
- Paul from Spokane Valley, WA
- Parts Used:
- 316116400
- Difficulty Level:
- Easy
- Total Repair Time:
- 30 - 60 mins
- Tools:
- Screw drivers
Oven light receptacle broken - bulb base broke off
Turned power off at electrical panel. Pulled oven away from wall. Removed back cover (6 screws), then unplugged wires from old receptacle. I had to pull the squeeze clips backwards & break them to remove the old receptacle - couldn't squeeze them enough to remove them otherwise. The old receptacle came out through the inside of the oven,
... Read more
and the new one snapped in easily from inside the oven as well. Replaced wiring, installed new bulb, restored power & tested. Replaced back cover. Good time to vacuum under/behind where the oven usually lives before sliding it back to the wall.
Read less
Was this instruction helpful to you?
Thank you for voting!