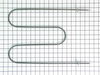
This genuine OEM bake element is located on the bottom of the oven cavity to supply heat for baking. The approximate size is 19-1/2 inches wide by 18-1/2 inches long and has 3-1/2 inch inserts. The el...
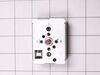
The infinite burner switch is used to control the temperature of the burner element on your stove top. This model is for the larger, eight-inch element. If your burner is not heating up or has uneven ...
This 40-watt light bulb has a standard screw-in base and is used in many different appliances. If your current bulb is burnt out or broken you will need to replace it. This light bulb is a genuine OEM...
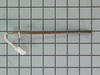
If your oven has little to no heat, is not heating evenly, or is reaching too high a temperature, there may be a problem with your oven probe. This probe, also known as an oven temperature sensor or a...
This surface burner switch controls the temperature of the stove top 6-inch surface burner. This switch is 240-volt, 1250-1500 watt, and 5.2-6.25 amp. If your element will not heat and is not defectiv...
This is a light bulb lens, and it is made for your oven. This part protects the light bulb inside your oven by covering it. The lens is made of glass, and has a 3-inch diameter. Before making this rep...
This part is the heatsource. This surface element is for ranges.
Surface element supplies the heat to a cooking area on top of the range.
Unplug the range or shut off the house circuit breaker ...
This dual radiant surface element features both 9-inch and 6-inch heating zones, making it versatile for different cookware sizes. It provides fast, even heating and includes a sturdy metal temperatur...
Ask our experts a question about this part and we'll get back to you as soon as possible!
1 question answered by our experts.
< Prev
1
Next >
Sort by:
Search filter:
Clear Filter
Your search term must have 3 or more characters.
Keep searches simple. Use keywords, e.g. "leaking", "pump", "broken" or "fit".
Sorry, we couldn't find any existing answers that matched. Try using some different or simpler keywords, or submit your new question by using the "Ask a Question" button above!
John
July 23, 2022
Top oven element will not heat. Already have new element and it test good with oms meter. Also test 120v to each side but when test both together 0volts. Bottom test same but when turned on bottom shows 240v. Bottom works.
For model number FEFL67GCA
Hi John,
Thank you for your question. If the broil element will not heat, the issue may be with the oven sensor. The oven temperature sensor is the part that monitors the oven temperature and signals the electronic control board to turn the elements on and off. Before removing this part from the oven and testing it with a multimeter for continuity, unplug the oven from the electrical outlet. A normal reading should be 1100 ohms, but as readings vary from model to model, you will need to reference your owner’s manual to determine what the correct reading should be. To test it for continuity, use a multimeter on the Rx1 setting and touch the terminals with the probes. This test needs to be done with the sensor at room temperature to produce accurate results. If your test results do not meet the manufacturer’s guidelines, you need a replacement temperature sensor. If the sensor is fine, you will need to check the electronic control board and the wiring between the parts to see which one is causing the issue. If you have any questions, please let us know. We are open 7 days a week. We look forward to hearing from you!
Was this helpful?
Thank you for voting!
Ask a Question
Ask our experts a question on this part and we'll respond as soon as we can.
1. Removed two screws, pulled out the element, voltage tested the element and determined it was an open circuit (bad element). 2. Ordered the part from partselect.com 3. Disconnected element, connected the new one, and screwed it back in.
1298 of 1510 peoplefound this instruction helpful.
Shut off circuit breaker to stove and collected the tool from the basement. Turned on flashlight. Unscrewed the two hex nuts from the old element/back of the oven. Slid the old element prongs out of the back, exposing the connecting wires. Pulled the connecting wires off of the old element, carefully, so that the connections wouldn
... Read more't come off of the wires. Threw the old element pieces in the garbage. Connected the new element to the connecting wires and re-fastened the hex nuts. My husband had wanted to call the repair man, but it didn't look too difficult, so I decided to try it on my own. Boy was he surprised when I fixed it, and for a fraction of the cost of hiring a repairman! Ladies, we can do this ourselves!!! :) Thank you for being there for us to order our part from, Parts Select, we had our new part in less than 24 hours, so the shipping was blazing fast!!! Keep up the good work!!! :)