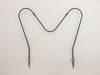
This genuine OEM bake element is located on the bottom of the oven cavity to supply heat for baking. The approximate size is 19-1/2 inches wide by 18-1/2 inches long and has 3-1/2 inch inserts. The el...
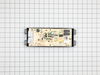
The infinite burner switch is used to control the temperature of the burner element on your stove top. This model is for the larger, eight-inch element. If your burner is not heating up or has uneven ...
This 40-watt light bulb has a standard screw-in base and is used in many different appliances. If your current bulb is burnt out or broken you will need to replace it. This light bulb is a genuine OEM...
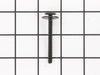
This genuine OEM mounting screw is used to bolt the door handle to your range. The screw measures approximately 2 inches long and is sold individually. If your oven door handle has come loose or falle...
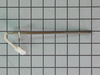
If your oven has little to no heat, is not heating evenly, or is reaching too high a temperature, there may be a problem with your oven probe. This probe, also known as an oven temperature sensor or a...
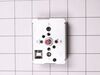
This surface burner switch controls the temperature of the stove top 6-inch surface burner. This switch is 240-volt, 1250-1500 watt, and 5.2-6.25 amp. If your element will not heat and is not defectiv...
This is a replacement rack for your oven. The oven rack fits into grooves on the side of the oven wall, and acts as a shelf that you can place food items on when you want to cook them in the oven. Thi...
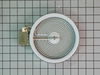
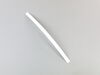
This is a light bulb lens, and it is made for your oven. This part protects the light bulb inside your oven by covering it. The lens is made of glass, and has a 3-inch diameter. Before making this rep...
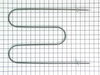
This oven broil element provides direct heat from the top of the oven, supporting both broiling and some baking functions. It measures approximately 12 ½" x 18 ½" and is rated for 3000 watts at 240 vo...
The 6” radiant cooking element with limiter fits under the glass cooktop and supplies heat to the cooking area. If your element is not heating, you can test the element for continuity with a multimete...
In Stock
Order now and your part arrives by Aug 1
Questions and Answers
Ask our experts a question about this part and we'll get back to you as soon as possible!
1 question answered by our experts.
< Prev
1
Next >
Sort by:
Search filter:
Clear Filter
Your search term must have 3 or more characters.
Keep searches simple. Use keywords, e.g. "leaking", "pump", "broken" or "fit".
Sorry, we couldn't find any existing answers that matched. Try using some different or simpler keywords, or submit your new question by using the "Ask a Question" button above!
Mike
December 19, 2024
Bottom left inside heating element doesn’t heat. Outer one does. I replaced the burner today but it still doesn’t work. Problem must be elsewhere.
For model number FFEF3054TBK
Hi Mike,
Thank you for your question. If the inner part of the front-left heating element will not heat, and you have already replaced the element, the burner switch that controls it may be malfunctioning and you will need to test it for continuity with a multimeter on the Rx1 setting to see if it is operating normally. Touch the L1 and H1 terminals with the probes. Once you have completed that test, touch the probes to the L2 & H2 terminals. If your test results indicate that there is no continuity between one or both sets of terminals, you need a replacement infinite switch. The part number for the front-left burner switch is PS12746358.We hope this helps!
1. Removed two screws, pulled out the element, voltage tested the element and determined it was an open circuit (bad element). 2. Ordered the part from partselect.com 3. Disconnected element, connected the new one, and screwed it back in.
1298 of 1510 peoplefound this instruction helpful.
Shut off circuit breaker to stove and collected the tool from the basement. Turned on flashlight. Unscrewed the two hex nuts from the old element/back of the oven. Slid the old element prongs out of the back, exposing the connecting wires. Pulled the connecting wires off of the old element, carefully, so that the connections wouldn
... Read more't come off of the wires. Threw the old element pieces in the garbage. Connected the new element to the connecting wires and re-fastened the hex nuts. My husband had wanted to call the repair man, but it didn't look too difficult, so I decided to try it on my own. Boy was he surprised when I fixed it, and for a fraction of the cost of hiring a repairman! Ladies, we can do this ourselves!!! :) Thank you for being there for us to order our part from, Parts Select, we had our new part in less than 24 hours, so the shipping was blazing fast!!! Keep up the good work!!! :)