


Models
>
KF340ADD-2
KF340ADD-2 Frigidaire Range
Jump to:
Find Part by Name
Keep searches simple, eg. "belt" or "pump".
Keep searches simple, eg. "belt" or "pump".

$14.16
This kit comes with the necessary components to replace your burner terminal block. It includes interchangeable mounting brackets, a terminal box, ceramic wire nuts, heat shrink protective tubing, and...
In Stock
Order now and your part arrives by Apr 12

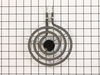
The surface elements provide heat for cooking on the top your range, typically in a smaller and larger size to fit your various pots and pans. If an element is not heating up, it is a sign that it sho...
In Stock
Order now and your part arrives by Apr 12

$36.80
This is a genuine OEM 6-inch burner element for your electric range or cooktop. If the element is no longer heating up, it may be time for a replacement. When you remove the old element, inspect the t...
In Stock
Order now and your part arrives by Apr 12

In Stock
Order now and your part arrives by Apr 12

On Order

$16.35
This six inch chrome drip bowl is used for some Frigidaire/WCI brand White-Westinghouse style electric ranges.
In Stock
Order now and your part arrives by Apr 12

$16.35
The lip of this six inch chrome trim ring is 3/4 inch deep. Use it for your Frigidaire/WCI brand White-Westinghouse style electric range.
Special Order

The lip of this eight inch chrome trim ring is 3/4 inch deep. Use it for your Frigidaire/WCI brand White-Westinghouse style electric range.
No Longer Available

Special Order


Special Order

Special Order
Questions and Answers
We're sorry, but our Q&A experts are temporarily unavailable.
Please check back later if you still haven't found the answer you need.
Common Problems and Symptoms for KF340ADD-2
Viewing 3 of 3Element will not heat
Fixed by these parts


How to fix it
Will Not Start
Fixed by these parts
How to fix it
Oven not heating evenly
Fixed by these parts
How to fix it


Keep searches simple. Use keywords, e.g. "leaking", "pump", "broken" or "fit".
- Customer:
- David from Encinitas, CA
- Parts Used:
- 5303935058, 316442301
- Difficulty Level:
- Easy
- Total Repair Time:
- 15 - 30 mins
- Tools:
- Pliers, Screw drivers
burner shorted out
I followed the directions by clipping wires to old burner socket, splicing the wires to new terminal block, screwing down new "block bracket," and plugging in new burner.
Was this instruction helpful to you?
Thank you for voting!
- Customer:
- George from New Port Richey, FL
- Parts Used:
- 5303935086
- Difficulty Level:
- Easy
- Total Repair Time:
- 15 - 30 mins
- Tools:
- Nutdriver, Pliers, Screw drivers
High heat reluctant to turn down.
Most of the job is simple fastener mechanics.
Use a nut driver or Phillips screwdriver. Remove rear panel.
Pull out control knob. If it is stuck, wrap a small rag around the back of it and pull the rag steadily.
Carefully match marked terminals on the replacement switch with those on original. Switch terminals ... Read more may not be in the same location. Replace wires one for one, one at a time.
Carefully select the correct knob filler for the switch post. Several are supplied. Proceed with logic and measure the shaft length and the filler length and type to match.
Read less
Was this instruction helpful to you?
Thank you for voting!
- Customer:
- Melvin from Attica, MI
- Parts Used:
- 5303935086
- Difficulty Level:
- Really Easy
- Total Repair Time:
- 15 - 30 mins
- Tools:
- Nutdriver, Screw drivers
Right front burner would over-heat
First of all I removed the top panel then removed the switch. I then took pictures of the switch & drew a sketch with all the info. Then I went to your web site, matched up the switch & ordered.
When the switch arrived I went thru the above replacing the bad switch.
When the switch arrived I went thru the above replacing the bad switch.
Was this instruction helpful to you?
Thank you for voting!