


Models
>
TES400PXHQ0
TES400PXHQ0 Estate Range
Jump to:
Find Part by Name
Keep searches simple, eg. "belt" or "pump".
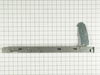
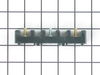
Diagrams for TES400PXHQ0
Viewing 5 of 5


Manuals & Guides for TES400PXHQ0
Click to downloadInstall
Installation Instructions
(1.83MB)
Manual
Owner's Manuals
(2.55MB)
Specs
Product Specifications Sheet
(0.02MB)
Keep searches simple, eg. "belt" or "pump".

$19.75
This is a genuine OEM 40-Watt replacement light bulb that is compatible with various types of appliances. It has a frosted glass bulb with a standard metal socket base, making it easy to screw and uns...
In Stock
Order now and your part arrives by Jul 26

$24.15
This 18 ml bottle of white appliance touch-up paint is used to cover scratches or marks on your appliance. The white touch-up paint can be used on refrigerators, microwaves, ranges, clothes dryers, an...
In Stock
Order now and your part arrives by Jul 26

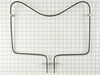
This bake element has push-on wire terminals and is found at the bottom of your oven cavity.
No Longer Available

$50.36
This broiler pan and roasting rack set features a two-piece design that allows fat to drain away for cleaner cooking and reduced splatter. Made with a durable, high-heat resistant porcelain finish, it...
In Stock
Order now and your part arrives by Jul 26

In Stock
Order now and your part arrives by Jul 26

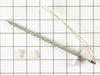
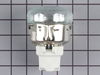
This temperature sensor is used with self cleaning ovens. Its 1000 ohm resistance increases with temperature. This sensor has male leads and comes with ceramic wire nuts.
No Longer Available

$67.93
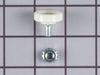
The light socket on your electric range connects the power source to the light bulb. If your oven light is malfunctioning, you may need to replace the light socket. The light socket is located in the ...
In Stock
Order now and your part arrives by Jul 26

In Stock
Order now and your part arrives by Jul 26

In Stock
Order now and your part arrives by Jul 26

In Stock
Order now and your part arrives by Jul 26

$145.73
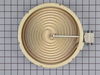
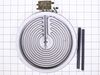
This surface element is for ranges.
The surface element supplies the heat to a cooking area on top of the range.
Unplug the range or shut off the house circuit breaker for the range before insta...
In Stock
Order now and your part arrives by Jul 26

In Stock
Order now and your part arrives by Jul 26
Common Problems and Symptoms for TES400PXHQ0
Viewing 7 of 7Element will not heat
Fixed by these parts
How to fix it
Little to no heat when baking
Fixed by these parts
How to fix it
Door won’t close
Fixed by these parts
How to fix it
Will Not Start
Fixed by these parts
How to fix it
Oven is too hot
Fixed by these parts
How to fix it
Oven not heating evenly
Fixed by these parts
How to fix it
Noisy
Fixed by these parts
How to fix it


Keep searches simple. Use keywords, e.g. "leaking", "pump", "broken" or "fit".
- Customer:
- Charles from Brecksville, OH
- Parts Used:
- 8053344
- Difficulty Level:
- Easy
- Total Repair Time:
- 15 - 30 mins
- Tools:
- Screw drivers
F3 Error message
Two screws remove the front of the sensor (put a pan under the sensor to catch the screws), One nut removes the rear cover to access the rear of the sensor. Separating the two halves of wiring harness takes a little dexterity. BIG TIP! Tie a string to the back of the sensor wire and pull the sensor out from the front making sure the strin
... Read more
g still shows thru the back. If you don't you have a 15 minute job trying to fish the wires at an angle thru the insulation (a very frustrating task). Untie the string from the old and tie it securely to the new. Pull the string from the back and Voila! your new sensor can be plugged in or wirer nutted to the old connection on the back of the stove. Replace the nut and the two screws and you're done!
Read less
Was this instruction helpful to you?
Thank you for voting!
- Customer:
- Wendy from Red Hook, NY
- Parts Used:
- WPW10208653
- Difficulty Level:
- Easy
- Total Repair Time:
- More than 2 hours
- Tools:
- Screw drivers
mice had made nests in the insulation wrap in the range
I numbered every part. ex: 1 L., for first part removed left side. I used a magic marker to circle the holes and wrote the number of screws used on the part, set the srews in a separete place, so that I new where these screws went to. The cleanup was pretty time consuming, but I was able to keep my stove, when every repairman I called to
... Read more
fix my stove told me I was better off buying a new stove. ($600.00 stove 2 years old)Please Note: The insulation blanket needed for the entire stove is two pieces, the sides and top are one part # and the bottom and back, are another part #. I did not know this. I just purchased the top and sides. I got lucky, the back and bottom were still in good shape. So I guess I should have read the description of the part more carefully to see what it covers, before I ordered it. It took two people two hours to do the work, it was really nice to have an extra set of eyes, to remember what direction pieces of metal from the stove went. I would do it all over in a heart beat instead of buying a new stove.
Read less
Was this instruction helpful to you?
Thank you for voting!
- Customer:
- Robert from Blackwood, NJ
- Parts Used:
- W10823696
- Difficulty Level:
- Easy
- Total Repair Time:
- 30 - 60 mins
- Tools:
- Screw drivers
Right Front Surface Element would not heat
Turn off the power to the Electric Oven.
Remove the 2 screws to the oven top at the front of the stove. Lift the oven top up. Have someone hold it for you. Label the wires that go to the element you are going to replace. Disconnect the wires from the Element. Remove the screw from the bracket that holds the front and rear element in ... Read more place. It is located at the back of the bracket behind the rear element and you will need small phillips head screw driver. Remove the bad element.. Unscrew the two pointed bracket holder pieces from the old element and screw them into the new element in the same location as the old. Put the new element back into the bracket and put the bracket mount screw back in. Attach the wires back to the new element. Close the oven top. Install the oven top screws at the front of the stove. Turn the power back on and test the element.
Remove the 2 screws to the oven top at the front of the stove. Lift the oven top up. Have someone hold it for you. Label the wires that go to the element you are going to replace. Disconnect the wires from the Element. Remove the screw from the bracket that holds the front and rear element in ... Read more place. It is located at the back of the bracket behind the rear element and you will need small phillips head screw driver. Remove the bad element.. Unscrew the two pointed bracket holder pieces from the old element and screw them into the new element in the same location as the old. Put the new element back into the bracket and put the bracket mount screw back in. Attach the wires back to the new element. Close the oven top. Install the oven top screws at the front of the stove. Turn the power back on and test the element.
Read less
Was this instruction helpful to you?
Thank you for voting!