


Models
>
EI30DS5CJS4
EI30DS5CJS4 Electrolux Range
Jump to:
Find Part by Name
Keep searches simple, eg. "belt" or "pump".
Diagrams for EI30DS5CJS4
Viewing 7 of 7


Manuals & Guides for EI30DS5CJS4
Click to downloadInstall
Installation Instructions
(10.82MB)
Specs
Product Specifications Sheet
(0.46MB)
Wiring
Wiring Diagram
(0.32MB)
Keep searches simple, eg. "belt" or "pump".

$41.29
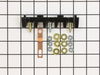
Terminal blocks (also called terminal boards or strips) provide a convenient means of connecting individual electrical wires.
In Stock
Order now and your part arrives by Aug 6

In Stock
Order now and your part arrives by Aug 6

$40.51
Sold individually. This part helps the flame to spread for even heat. Also protects your burner head from spills. The surface burner cap is located on the top of the burner head and is used in ranges ...
In Stock
Order now and your part arrives by Aug 6

$53.85
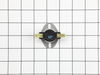
This is an authentic temperature sensor, which works with ranges, wall ovens, microwave oven combos, microwaves and warming drawers.
In Stock
Order now and your part arrives by Aug 6

$43.56
Sold individually. This part helps the flame to spread for even heat. Also protects your burner head from spills.
In Stock
Order now and your part arrives by Aug 6

This part is the igniter/orifice mounting screw for your cooktop or range. It is approximately ½ an inch in length and is made of metal. The mounting screw connects the orifice to the cooktop. If the ...
In Stock
Order now and your part arrives by Aug 6

$36.92
This orifice is a replacement fuel-delivery component designed to regulate gas flow to a burner. It plays a critical role in maintaining proper flame size and efficiency and is commonly replaced when ...
In Stock
Order now and your part arrives by Aug 6

In Stock
Order now and your part arrives by Aug 6

Special Order

In Stock
Order now and your part arrives by Aug 6

$79.33
The function of the ignitor in your range is to create the spark that ignites the gas on the burners. If your spark ignition system is not functioning properly, you may need to replace the ignitor. Th...
In Stock
Order now and your part arrives by Aug 6

In Stock
Order now and your part arrives by Aug 6
Common Problems and Symptoms for EI30DS5CJS4
Viewing 6 of 6Little to no heat when baking
Fixed by these parts

How to fix it
Element will not heat
Fixed by these parts
How to fix it
Will Not Start
Fixed by these parts

How to fix it
Oven is too hot
Fixed by these parts
How to fix it
Oven not heating evenly
Fixed by these parts
How to fix it
Little to no heat when broiling
Fixed by these parts
How to fix it


Keep searches simple. Use keywords, e.g. "leaking", "pump", "broken" or "fit".
- Customer:
- Timothy from Spring Valley, AL
- Parts Used:
- 5304409888
- Difficulty Level:
- Really Easy
- Total Repair Time:
- 15 - 30 mins
- Tools:
- Screw drivers, Socket set
Cord was not tightened enough by delivery crew.
PF alarm appeared on display. Noticed clicking when cord was moved. Had arced for some time and melted original block. New part slightly different. Only has 3 lugs, old one had six. Stack using washers provided. Take note of colors before disassembly. Use caution while working through access opening. The edges are sharp. Only tools neede
... Read more
d are phillips screwdriver, deep socket for lug nuts. Nut driver optional. Hope this is helpful.
Read less
Was this instruction helpful to you?
Thank you for voting!
- Customer:
- Mitch from Fernandina Beach, FL
- Parts Used:
- 5304503232
- Difficulty Level:
- Easy
- Total Repair Time:
- 15 - 30 mins
- Tools:
- Screw drivers
Cracked oven door inner glass
Repair was quite easy, as long as you have the instructions for removing the door. The screws that hold the bottom of the door to the fixed hinge are placed into the side of the hinge assembly after removal; this holds the door at a 45 degree angle for easy removal. After that, just place the door on a flat surface and dismantle the door
... Read more
from the inside. The inner glass is contained in a metal frame with another piece of glass; this frame comes apart easily using the clips in each side. The door assembles easily after the glass is replaced; just take your time and give yourself enough room to lay out the parts as you go. Good luck!
Read less
Was this instruction helpful to you?
Thank you for voting!
- Customer:
- stephen from garden grove, CA
- Parts Used:
- 5304503232
- Difficulty Level:
- Easy
- Total Repair Time:
- 30 - 60 mins
- Tools:
- Screw drivers
Broken glass interior oven door
Had to reference original owner's manual for instruction(s) on how to remove oven door. Used several "YouTube" videos to reference oven door design (Oven door glass is actually several layers of glass.) After completing about 30 mins of research and finding the right square drive bit, the repair went smoothly and without complications. Th
... Read more
e biggest challenge was researching and understanding what part(s) were needed and how to replace them. It seemed liked a lot of work doing the research however it sure beat a $350 repair bill. It cost me $90 and about 1 1/2 hours of total time. Oven works better than ever, thanks parts select for the part(s) and diagram(s) ...
Read less
Was this instruction helpful to you?
Thank you for voting!