


Models
>
EI30ES5CJSC
EI30ES5CJSC Electrolux Range
Jump to:
Find Part by Name
Keep searches simple, eg. "belt" or "pump".
Diagrams for EI30ES5CJSC
Viewing 6 of 6


Manuals & Guides for EI30ES5CJSC
Click to downloadInstall
Installation Instructions
(9.27MB)
Specs
Product Specifications Sheet
(0.83MB)
Wiring
Wiring Diagram
(0.35MB)
Keep searches simple, eg. "belt" or "pump".

In Stock
Order now and your part arrives by Aug 3

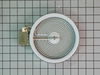
The 6” radiant cooking element with limiter fits under the glass cooktop and supplies heat to the cooking area. If your element is not heating, you can test the element for continuity with a multimete...
In Stock
Order now and your part arrives by Aug 3

$53.85
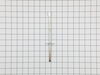
This is an authentic temperature sensor, which works with ranges, wall ovens, microwave oven combos, microwaves and warming drawers.
In Stock
Order now and your part arrives by Aug 3

In Stock
Order now and your part arrives by Aug 3

In Stock
Order now and your part arrives by Aug 3

$80.50
As per the factory, the original part was 19 3/4 inches and the new substituted part is 16 1/4 inches. According to the factory, this part will still work with your appliance.
On Order

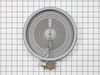
This dual radiant surface element is designed to deliver flexible heating for your electric range or cooktop, accommodating both small and large cookware with its two heat zones measuring 9 inches and...
In Stock
Order now and your part arrives by Aug 3

$41.88
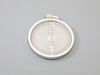
This convection fan blade is designed for use with various makes and models of range and oven and is sold as an individual part. Made of metal and measuring approximately 4.75-inches in diameter, this...
In Stock
Order now and your part arrives by Aug 3

In Stock
Order now and your part arrives by Aug 3

In Stock
Order now and your part arrives by Aug 3

$205.17
This cooling fan and motor assembly is designed to maintain safe operating temperatures in electric ranges and wall ovens. By circulating air around the control board and internal components, it preve...
In Stock
Order now and your part arrives by Aug 3

In Stock
Order now and your part arrives by Aug 3
Common Problems and Symptoms for EI30ES5CJSC
Viewing 5 of 5Element will not heat
Fixed by these parts
How to fix it
Oven is too hot
Fixed by these parts
How to fix it
Little to no heat when baking
Fixed by these parts

How to fix it
Oven not heating evenly
Fixed by these parts
How to fix it
Will Not Start
Fixed by these parts
How to fix it


Keep searches simple. Use keywords, e.g. "leaking", "pump", "broken" or "fit".
- Customer:
- Lori from Winter Haven, FL
- Parts Used:
- 318178110
- Difficulty Level:
- Easy
- Total Repair Time:
- Less than 15 mins
- Tools:
- Pliers, Screw drivers
burned out burner
First we removed two screws under the rim of the range top to open the lid. Lifted the lid and removed the screws from the bracket that holds the elements, Be careful with the clips that hold the element in, if you break them or bend them there aren't any more! Also note which holes they were in, they are marked according to the differ
... Read more
ent sizes of elements. Disconnected the wires, needed needlenose pliers to grip them...connected new element, popped it back in place, replaced bracket, closed top ...Easy peasy!!!
Read less
Was this instruction helpful to you?
Thank you for voting!
- Customer:
- Mitch from Fernandina Beach, FL
- Parts Used:
- 5304503232
- Difficulty Level:
- Easy
- Total Repair Time:
- 15 - 30 mins
- Tools:
- Screw drivers
Cracked oven door inner glass
Repair was quite easy, as long as you have the instructions for removing the door. The screws that hold the bottom of the door to the fixed hinge are placed into the side of the hinge assembly after removal; this holds the door at a 45 degree angle for easy removal. After that, just place the door on a flat surface and dismantle the door
... Read more
from the inside. The inner glass is contained in a metal frame with another piece of glass; this frame comes apart easily using the clips in each side. The door assembles easily after the glass is replaced; just take your time and give yourself enough room to lay out the parts as you go. Good luck!
Read less
Was this instruction helpful to you?
Thank you for voting!
- Customer:
- stephen from garden grove, CA
- Parts Used:
- 5304503232
- Difficulty Level:
- Easy
- Total Repair Time:
- 30 - 60 mins
- Tools:
- Screw drivers
Broken glass interior oven door
Had to reference original owner's manual for instruction(s) on how to remove oven door. Used several "YouTube" videos to reference oven door design (Oven door glass is actually several layers of glass.) After completing about 30 mins of research and finding the right square drive bit, the repair went smoothly and without complications. Th
... Read more
e biggest challenge was researching and understanding what part(s) were needed and how to replace them. It seemed liked a lot of work doing the research however it sure beat a $350 repair bill. It cost me $90 and about 1 1/2 hours of total time. Oven works better than ever, thanks parts select for the part(s) and diagram(s) ...
Read less
Was this instruction helpful to you?
Thank you for voting!