


Models
>
E36GF76JPS1
E36GF76JPS1 Electrolux Range
Jump to:
Find Part by Name
Keep searches simple, eg. "belt" or "pump".
Diagrams for E36GF76JPS1
Viewing 7 of 7


Manuals & Guides for E36GF76JPS1
Click to downloadInstall
Installation Instructions
(4.71MB)
Specs
Product Specifications Sheet
(0.43MB)
Wiring
Wiring Diagram
(0.29MB)
Keep searches simple, eg. "belt" or "pump".

$84.65
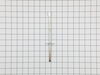
This bake igniter heats up to light the gas in the oven, allowing it to reach and maintain baking temperatures. It’s a common replacement for ovens that won’t heat or take too long to preheat. Always ...
On Order

In Stock
Order now and your part arrives by Aug 3

$53.85
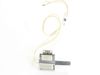
This is an authentic temperature sensor, which works with ranges, wall ovens, microwave oven combos, microwaves and warming drawers.
In Stock
Order now and your part arrives by Aug 3

This part is the igniter/orifice mounting screw for your cooktop or range. It is approximately ½ an inch in length and is made of metal. The mounting screw connects the orifice to the cooktop. If the ...
In Stock
Order now and your part arrives by Aug 3

On Order

$36.92
This orifice is a replacement fuel-delivery component designed to regulate gas flow to a burner. It plays a critical role in maintaining proper flame size and efficiency and is commonly replaced when ...
In Stock
Order now and your part arrives by Aug 3

In Stock
Order now and your part arrives by Aug 3

In Stock
Order now and your part arrives by Aug 3

In Stock
Order now and your part arrives by Aug 3

$77.22
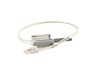
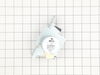
This part sends enough current to the igniter to create a spark to the bottom of the burner cap.
In Stock
Order now and your part arrives by Aug 3

In Stock
Order now and your part arrives by Aug 3

In Stock
Order now and your part arrives by Aug 3
Common Problems and Symptoms for E36GF76JPS1
Viewing 8 of 8Little to no heat when baking
Fixed by these parts
How to fix it
Gas igniter glows, but will not light
Fixed by these parts
How to fix it
Oven is too hot
Fixed by these parts
How to fix it
Oven not heating evenly
Fixed by these parts
How to fix it
Element will not heat
Fixed by these parts
How to fix it
Will Not Start
Fixed by these parts
How to fix it
Door won’t open after self cleaning cycle
Fixed by these parts
How to fix it
Gas smell
Fixed by these parts
How to fix it


Keep searches simple. Use keywords, e.g. "leaking", "pump", "broken" or "fit".
- Customer:
- Debbie from Rockford, MI
- Parts Used:
- 5304534663
- Difficulty Level:
- Easy
- Total Repair Time:
- 15 - 30 mins
- Tools:
- Nutdriver, Screw drivers
Oven wouldn't heat - broiler and burners worked fine-Bake Burner Igniter didn't work
It was the week before Thanksgiving and we didn't know what to do without an oven. I did some research on Google and of all the websites out there, I found a decent price here at Parts Select and ordered it on Friday. I was shocked when FEDEX pulled up to the door on Saturday afternoon. I went online to youtube and found a step by step
... Read more
video specifically for this part. It's posted by the Repair Clinic. http://www.youtube.com/watch?v=cLxKoF16gac. I was able to fix the part and probably saved at least $150.00 for a service call and repair time. The part cost about $90 and I was done in less than 15 minutes. We just got this stove about 2 years ago and I'm thinking maybe we could have saved my old stove since it had the same problem. Great job Parts Select - I got just what I needed and saved a ton of money in the process. Thanks also for their great informative video online. We had a great Thanksgiving and were very thankful for all our hot food fresh from the oven.
Read less
Was this instruction helpful to you?
Thank you for voting!
- Customer:
- Richard from Centennial, CO
- Parts Used:
- 5304528973
- Difficulty Level:
- Really Easy
- Total Repair Time:
- Less than 15 mins
- Tools:
- Nutdriver
Oven wouldn't operated. Error code F9
I called a repair place. They charged $54 to diagnose, (said it needed a new latch motor) then wanted $220 to complete the repair. I checked online prices and did it myself for about 15 minutes work and the latch motor itself ($44?).
Was necessary to uplug the range, pull it away from the wall and remove the back panel sheet m ... Read more etal, then 3 screws that mount the motor. Replace motor, reattach sheet metal. Plug in. Done. Ready to bake cookies.
Was necessary to uplug the range, pull it away from the wall and remove the back panel sheet m ... Read more etal, then 3 screws that mount the motor. Replace motor, reattach sheet metal. Plug in. Done. Ready to bake cookies.
Read less
Was this instruction helpful to you?
Thank you for voting!
- Customer:
- Carol from Houma, LA
- Parts Used:
- 318228310
- Difficulty Level:
- Really Easy
- Total Repair Time:
- Less than 15 mins
- Tools:
- Screw drivers
Lens missing for burner "on" indication
Lifted the oven top, removed the controls cover, slipped the lens into the hole and slid the light holder device onto the lens
Was this instruction helpful to you?
Thank you for voting!