


Models
>
C31113WAVP
C31113WAVP Crosley Range
Jump to:
Find Part by Name
Keep searches simple, eg. "belt" or "pump".
Diagrams for C31113WAVP
Viewing 7 of 7


Keep searches simple, eg. "belt" or "pump".

$19.75
This is a genuine OEM 40-Watt replacement light bulb that is compatible with various types of appliances. It has a frosted glass bulb with a standard metal socket base, making it easy to screw and uns...
In Stock
Order now and your part arrives by Jul 31

$51.43
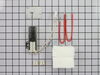
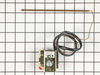
If your gas oven isn’t lighting properly, this flat-style igniter kit might be the fix. It helps open the gas valve and ignite the burner for baking or broiling. It works with many ovens and replaces ...
In Stock
Order now and your part arrives by Jul 31

In Stock
Order now and your part arrives by Jul 31
 – Part Number: W11665456")
$24.00
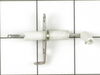
This part includes one range leveling leg, sourced directly from the original manufacturer. The leveling leg is what supports the range and ensures it is sitting level, stable, and at the proper heigh...
In Stock
Order now and your part arrives by Jul 31

This burner cap assembly is sold with the spark electrode. Please note this part has been redesigned and no longer requires a gasket. Sold individually.
In Stock
Order now and your part arrives by Jul 31

$21.82
This is a screw and it is made for multiple appliances in your home. This model is called a sheet metal screw because it has sharp points, and the threads are closer together. This screw is designed t...
In Stock
Order now and your part arrives by Jul 31

$7.60
This is a multi-use screw mostly used in dryers. It has a diameter of #10, length of one inch, and thread size of 16. Remember to follow safety practices and instructions provided in the manufacturer ...
In Stock
Order now and your part arrives by Jul 31

$54.12
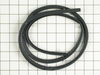
This door seal is fifty-three inches long. It is all black in color and is made of rubber. There are metallic clips sticking out of this seal at various points. These clips help to secure the seal to range doors.
In Stock
Order now and your part arrives by Jul 31

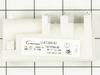
This part may differ in appearance, but functions same as original part. : This part sends enough current to the igniter to create a spark to the bottom of the burner cap.
In Stock
Order now and your part arrives by Jul 31

$21.82
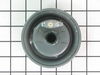
This thermostat knob is two inches in diameter. It is made of plastic, and will accept a 'D' shaped shaft. This white knob has gray lettering along the perimeter denoting the temperature level as well...
In Stock
Order now and your part arrives by Jul 31

In Stock
Order now and your part arrives by Jul 31

$27.28
This burner valve knob is two inches in diameter. It is all white in color and it is made entirely of plastic. This knob will accept a 'D' shaped shaft. There is dark gray lettering along the perimete...
Special Order
Common Problems and Symptoms for C31113WAVP
Viewing 9 of 9Gas igniter glows, but will not light
Fixed by these parts
How to fix it
Will Not Start
Fixed by these parts
How to fix it
Little to no heat when baking
Fixed by these parts
How to fix it
Element will not heat
Fixed by these parts
How to fix it
Oven not heating evenly
Fixed by these parts
How to fix it
Gas smell
Fixed by these parts
How to fix it
Little to no heat when broiling
Fixed by these parts
How to fix it
Oven is too hot
Fixed by these parts
How to fix it
Door won’t close
Fixed by these parts
How to fix it


")

Keep searches simple. Use keywords, e.g. "leaking", "pump", "broken" or "fit".
- Customer:
- James from Ferndale, MI
- Parts Used:
- 12400035
- Difficulty Level:
- A Bit Difficult
- Total Repair Time:
- 15 - 30 mins
- Tools:
- Nutdriver, Screw drivers, Socket set
Oven would not work but the Broiler did
The oven had been working intermittently for a while and after repeated threats of starvation from my spouse I finally took a look even though it was summer and the grill was working fine. The Igniter would glow red when the oven was turned on but the gas would not flow to it no matter what the temperature setting. I searched online and f
... Read more
ound this site that explained it was possible for the igniter to glow but if it was not drawing the correct amperage (because its resistance was too high) then the main brain would not allow the gas valve to open. So I took a look at the broiler and it had the same igniter. I measure the resistance of both of them and the oven igniters resistance was higher (don't rememeber the reading) then I moved the Igniter from the broiler to the oven and the oven worked from there it was just a matter of ordering the part. End of story except for I am still doing all the cooking on the barbecue outside.
Read less
Was this instruction helpful to you?
Thank you for voting!
- Customer:
- Matthew from Brookfield, MA
- Parts Used:
- WP3412D024-26
- Difficulty Level:
- Really Easy
- Total Repair Time:
- Less than 15 mins
- Tools:
- Pliers
A burner wouldn't spark strongly enough to light the gas.
Replacement of these burners is very easy. You just twist the burner counterclockwise a quarter turn and pull it out. (You may need a big wrench if the range is very old.) Once out, just pull the two wires off and push them onto the new burner. Crimp them on with pliers if they're loose -- mine were. Twist the burner back on.
If the ... Read more gasket under the burner has disintegrated, don't worry about it. They don't offer replacements for them because they're not necessary as a safety feature. They were designed to keep overspills from running under the cooktop, but the ridge around the hole is likely higher than you'd ever need.
If the ... Read more gasket under the burner has disintegrated, don't worry about it. They don't offer replacements for them because they're not necessary as a safety feature. They were designed to keep overspills from running under the cooktop, but the ridge around the hole is likely higher than you'd ever need.
Read less
Was this instruction helpful to you?
Thank you for voting!
- Customer:
- roy from East Providence, RI
- Parts Used:
- 74004053
- Difficulty Level:
- Easy
- Total Repair Time:
- 15 - 30 mins
- Tools:
- Screw drivers
gas burner ignitor failure
Lift out sealed burner assembly rear of stove first while careully sliding to rear to disengage ignitor probes.Remove philips head screws from bottom sheet metal housing to expose bottom of burners Remove gas tube assembly screws and move tube away carefully.Unplug wires from ignitor.Remove screws for ignitor .Remove ignitor, I noticed t
... Read more
hat rust and dirt had built up around burner to pan connection.I used my oil filter wrench to turn slightly the burner to remove it from the pan to clean.Reassembled in reverse order.
Read less
Was this instruction helpful to you?
Thank you for voting!