


Models
>
HES5053U9
HES5053U9 Bosch Range
Jump to:
Find Part by Name
Keep searches simple, eg. "belt" or "pump".
Diagrams for HES5053U9
Viewing 5 of 5


Keep searches simple, eg. "belt" or "pump".

$27.28
This 40-watt light bulb has a standard screw-in base and is used in many different appliances. If your current bulb is burnt out or broken you will need to replace it. This light bulb is a genuine OEM...
In Stock
Order now and your part arrives by Apr 12

$86.94
This is used as the "floor" of the oven cabinet.
Note: Does not come with rivets or screws. Must be purchased locally.
On Order

$25.10
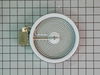
This is a light bulb lens, and it is made for your oven. This part protects the light bulb inside your oven by covering it. The lens is made of glass, and has a 3-inch diameter. Before making this rep...
In Stock
Order now and your part arrives by Apr 12

The 6” radiant cooking element with limiter fits under the glass cooktop and supplies heat to the cooking area. If your element is not heating, you can test the element for continuity with a multimete...
In Stock
Order now and your part arrives by Apr 12

$25.10
This is an anti-tip kit for your range. The kit comes with two installation screws, one metal bracket, and instructions. The kit stops your freestanding range from tipping over due to extra weight on ...
In Stock
Order now and your part arrives by Apr 12

$14.16
Sold Individually. These legs should be adjusted to make your appliance level on uneven flooring.
In Stock
Order now and your part arrives by Apr 12

In Stock
Order now and your part arrives by Apr 12


$25.10
This is a screw for your range or microwave. This part is sold individually. It has a pan head, a pointed tip for use with sheet metal, and an x-shaped drive. This screw is a #8, has 18 threads to the...
In Stock
Order now and your part arrives by Apr 12

In Stock
Order now and your part arrives by Apr 12

In Stock
Order now and your part arrives by Apr 12

In Stock
Order now and your part arrives by Apr 12
Questions and Answers
We're sorry, but our Q&A experts are temporarily unavailable.
Please check back later if you still haven't found the answer you need.
Common Problems and Symptoms for HES5053U9
Viewing 4 of 4Element will not heat
Fixed by these parts

How to fix it
Little to no heat when baking
Fixed by these parts
How to fix it
Door won’t open after self cleaning cycle
Fixed by these parts

How to fix it
Will Not Start
Fixed by these parts
How to fix it


Keep searches simple. Use keywords, e.g. "leaking", "pump", "broken" or "fit".
- Customer:
- Richard from Centennial, CO
- Parts Used:
- 5304528973
- Difficulty Level:
- Really Easy
- Total Repair Time:
- Less than 15 mins
- Tools:
- Nutdriver
Oven wouldn't operated. Error code F9
I called a repair place. They charged $54 to diagnose, (said it needed a new latch motor) then wanted $220 to complete the repair. I checked online prices and did it myself for about 15 minutes work and the latch motor itself ($44?).
Was necessary to uplug the range, pull it away from the wall and remove the back panel sheet m ... Read more etal, then 3 screws that mount the motor. Replace motor, reattach sheet metal. Plug in. Done. Ready to bake cookies.
Was necessary to uplug the range, pull it away from the wall and remove the back panel sheet m ... Read more etal, then 3 screws that mount the motor. Replace motor, reattach sheet metal. Plug in. Done. Ready to bake cookies.
Read less
Was this instruction helpful to you?
Thank you for voting!
- Customer:
- Lori from Winter Haven, FL
- Parts Used:
- 318178110
- Difficulty Level:
- Easy
- Total Repair Time:
- Less than 15 mins
- Tools:
- Pliers, Screw drivers
burned out burner
First we removed two screws under the rim of the range top to open the lid. Lifted the lid and removed the screws from the bracket that holds the elements, Be careful with the clips that hold the element in, if you break them or bend them there aren't any more! Also note which holes they were in, they are marked according to the differ
... Read more
ent sizes of elements. Disconnected the wires, needed needlenose pliers to grip them...connected new element, popped it back in place, replaced bracket, closed top ...Easy peasy!!!
Read less
Was this instruction helpful to you?
Thank you for voting!
- Customer:
- Brian from Panama City Beach, FL
- Parts Used:
- 316112005
- Difficulty Level:
- Really Easy
- Total Repair Time:
- Less than 15 mins
anti-tip bracket not installed
I was selling my home and did not realize that the anti-tip bracket was not originally installed. A home inspection caught the problem and the buyers required that I install one. I could not find the original and obviously the installer never put it in place to begin with. The buyers wanted this resolved within a week so I had to act f
... Read more
ast. I could not find one locally so I found what I needed on your website. It arrived in a couple of days and was easy to install. I used the template provided in the kit and drove the screws through the bracket into the wood plate behind the drywall. Pushed the range back in place and that's it. Couldn't get any easier.
Read less
Was this instruction helpful to you?
Thank you for voting!