


Models
>
2920A
2920A Amana Range
Jump to:
Find Part by Name
Keep searches simple, eg. "belt" or "pump".
Diagrams for 2920A
Viewing 15 of 15


Keep searches simple, eg. "belt" or "pump".

$19.75
This is a genuine OEM 40-Watt replacement light bulb that is compatible with various types of appliances. It has a frosted glass bulb with a standard metal socket base, making it easy to screw and uns...
In Stock
Order now and your part arrives by Jul 26

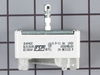
If the large surface burner on your range will not heat up, you may need to replace the switch. This genuine OEM switch is used to control the temperature of the large 8-inch burner, along with turnin...
In Stock
Order now and your part arrives by Jul 26

$25.10
This square chrome drip pan is intended for use with gas ranges. With a 4 inch diameter center hole and 7-3/4 inch sides, this pan is dishwasher safe and comes one to a package.
Special Order

In Stock
Order now and your part arrives by Jul 26

$53.58
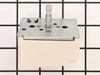
This OEM surface element control switch regulates heat for 6-inch electric burners. It fits Whirlpool, KitchenAid, Maytag, and other compatible ranges. Common signs of failure include no heat, stuck o...
In Stock
Order now and your part arrives by Jul 26

$50.36
This broiler pan and roasting rack set features a two-piece design that allows fat to drain away for cleaner cooking and reduced splatter. Made with a durable, high-heat resistant porcelain finish, it...
In Stock
Order now and your part arrives by Jul 26

This gas burner grate is used for some gas ranges and cooktops. This is a black burner grate with each side measuring almost eight inches.
No Longer Available

$68.99
This stacking kit allows compatible front-load washer and dryer models to be stacked vertically. It is designed to maximize laundry space and can be used on various models. Please use your model numbe...
In Stock
Order now and your part arrives by Jul 26

This is a genuine OEM replacement part. This surface burner ignition switch is commonly used on ranges, wall ovens, cooktops, and microwave oven combos. When the gas burner valve is pressed this is th...
Special Order

This piece of oven door seal has a metal hook on each end. This seal is compatible with the top and the bottom of the oven door window.
No Longer Available

This part sends enough current to the igniter to create a spark to the bottom of the burner cap.
No Longer Available

This top burner knob is a little over two inches in diameter. It has a chrome strip of trim around the perimeter of the knob, as well as white lettering denoting the off, light, and high positions.
No Longer Available
Common Problems and Symptoms for 2920A
Viewing 5 of 5Element will not heat
Fixed by these parts
How to fix it
Will Not Start
Fixed by these parts
How to fix it
Oven is too hot
Fixed by these parts
How to fix it
Will not program
Fixed by these parts
How to fix it
Oven not heating evenly
Fixed by these parts
How to fix it


Keep searches simple. Use keywords, e.g. "leaking", "pump", "broken" or "fit".
- Customer:
- chaz from fairplay, CO
- Parts Used:
- WP3149400
- Difficulty Level:
- Easy
- Total Repair Time:
- 15 - 30 mins
- Tools:
- Screw drivers
the element did not turn compleatly off, the on light stayed on.
removed the screws holding the back metal panel, this exposed the wires to the switch. tested the wires to find that they were live when the switch was in the off position. ordered a new switch. UNPLUGED THE STOVE. removed the knob on the front of the stove. this exposed 2 screws, removed screws and the switch came away from the stove. re
... Read more
moved each wire from the old switch and replaced them in the same position on the new switch. inserted new switch into the stove and attached the 2 screws. replaced back panel and pluged in stove. all tested well
Read less
Was this instruction helpful to you?
Thank you for voting!
- Customer:
- John from Clinton, CT
- Parts Used:
- WP3149400
- Difficulty Level:
- Easy
- Total Repair Time:
- 15 - 30 mins
- Tools:
- Pliers, Screw drivers
Burner would go high without warning
We felt the only possible problem could be the switch assembly. I removed the switch panel, removed the wires from the old switch, one at a time, removed the old switch assembly and installed the new switch assembly. The extended stem did have to be snapped off (per your instructions) and that too was a very simple task.
Was this instruction helpful to you?
Thank you for voting!
- Customer:
- ALTON from ROUND ROCK, TX
- Parts Used:
- WP3149400
- Difficulty Level:
- Easy
- Total Repair Time:
- 15 - 30 mins
- Tools:
- Screw drivers
Left front burner would not adjust heat downward
Pull unit away from wall.
Unplug power
remove topmost four screws from rear metal cover
Pull knob off switch shaft.
Remove two screws holding switch to panel.
Break off shaft of new switch to correct length.
Remove each wire from old switch and attach to Corresponding lug on new switch.
Reattach the new ... Read more switch to the panel and reverse the first four instructions.
Read less
Was this instruction helpful to you?
Thank you for voting!