


Models
>
JVB37H1BB
JVB37H1BB General Electric Range Hood
Jump to:
Find Part by Name
Keep searches simple, eg. "belt" or "pump".
Diagrams for JVB37H1BB
Viewing 2 of 2

Manuals & Guides for JVB37H1BB
Click to downloadKeep searches simple, eg. "belt" or "pump".

This part is the replacement membrane switch for your range hood. It is approximately 4 inches in length, and the part of the switch that you push is black in color. The membrane switch or downdraft v...
No Longer Available


In Stock
Order now and your part arrives by Aug 4

When ordering this part you must order also order the switch membrane and the trim.
No Longer Available


Common Problems and Symptoms for JVB37H1BB
Viewing 1 of 1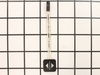
Keep searches simple. Use keywords, e.g. "leaking", "pump", "broken" or "fit".
- Customer:
- Richard from Chardon, OH
- Parts Used:
- WB24X10115
- Difficulty Level:
- Really Easy
- Total Repair Time:
- Less than 15 mins
Downdraft wouldn't work at all..... broken sensor
I pulled up the wires that the membrane switch hooks to and connected the new one with the new sensor pushed them down the opening. Took the sticky paper off the up and down button and stuck it too the indentation where it goes and there you have it as good as new! Works great!
Was this instruction helpful to you?
Thank you for voting!
- Customer:
- Louis from Lorton, VA
- Parts Used:
- WB27X10704, WB24X10115, WB18X10224, WB24X10035
- Difficulty Level:
- Very Difficult
- Total Repair Time:
- More than 2 hours
- Tools:
- Nutdriver, Pliers, Screw drivers, Socket set, Wrench (Adjustable), Wrench set
Raise and lower switch stopped working on downdraft power vent
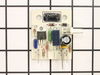
In the process of diagnosing the problem, the circuit board burned out and the fan switch broke. Had a great deal of difficulty removing the unit. Had to disconnect gas line to range top and remove it first before I could remove the downdraft unit. I still had to get some crazy glue to hold down new microswitch on top of the unit. It
... Read more
is finally working fine now.
Read less
Was this instruction helpful to you?
Thank you for voting!
- Customer:
- jeffrey from hickory, NC
- Parts Used:
- WB24X10115
- Difficulty Level:
- Easy
- Total Repair Time:
- Less than 15 mins
- Tools:
- Screw drivers
putting membrane switch in
Received membrane switch quick after I ordered it. Connected switch to downdrafts system in less than 15 minutes. Tested system to make sure it worked. very happy with partsselect shipped quickly after ordering.
Was this instruction helpful to you?
Thank you for voting!