


Models
>
1421-0
1421-0 Briggs and Stratton Pressure Washer
Jump to:
Find Part by Name
Keep searches simple, eg. "belt" or "pump".
Diagrams for 1421-0
Viewing 3 of 3


Keep searches simple, eg. "belt" or "pump".

$6.51
This is a washer for various lawn and garden equipment. It is a flat washer and requires a 5/16-inch bolt size. Washers are positioned under the head of a nut or bolt to strengthen the connection of two or more parts.
On Order

$27.80
This fuel valve with bushing fits a variety of outdoor equipment and allows the fuel to smoothly flow into the gas engine. The bushing part is pressed into the hole provided in the fuel tank and the f...
In Stock
Order now and your part arrives by Apr 2

In Stock
Order now and your part arrives by Apr 2

$6.69
This is a genuine OEM sourced replacement part that is intended to be used with pressure washers from Craftsman. The screen fits into the water inlet tube and is used to prevent debris from the hose f...
In Stock
Order now and your part arrives by Apr 2

$35.76
It is a high-quality item that is supplied by the original equipment for use with Briggs and Stratton, Troy-Bilt and Snapper pressure washers. The kit includes a fitting that allows a user to connect ...
In Stock
Order now and your part arrives by Apr 2

$7.48
This is an authentic replacement part that has been sourced from the original manufacturer to be used with small engines from Snapper, Briggs & Stratton, and Troy-Bilt. The metal square key is used to...
On Order

$28.77
This item is an authentic OEM sourced O-ring kit that replaces worn or damaged O-rings for the gun, hose and wand.Unfortunately, over time o-rings will wear out and they may begin to crack eventually ...
In Stock
Order now and your part arrives by Apr 2

This is an authentic component is sourced directly from the original equipment manufacturer. It is the part that is specially made for use with Briggs and Stratton and Snapper pressure washers. The pu...
Special Order

$9.94
It is a genuine item that is supplied directly from the original equipment manufacturer for use with Briggs and Stratton generators and pressure washers. The purpose of this component is to reduce the...
In Stock
Order now and your part arrives by Apr 2

In Stock
Order now and your part arrives by Apr 2

$62.35
This is an authentic OEM part for use with Craftsman Pressure Washers. The quick connector also is known as the wand connects to the spray gun handle and houses the nozzle that directs the spray strea...
In Stock
Order now and your part arrives by Apr 2

In Stock
Order now and your part arrives by Apr 2
Questions and Answers
We're sorry, but our Q&A experts are temporarily unavailable.
Please check back later if you still haven't found the answer you need.
Common Problems and Symptoms for 1421-0
Viewing 2 of 2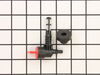

Keep searches simple. Use keywords, e.g. "leaking", "pump", "broken" or "fit".
- Customer:
- Carl from ARCADIA, FL
- Parts Used:
- 192914GS
- Difficulty Level:
- Very Easy
- Total Repair Time:
- 30 - 60 mins
- Tools:
- Nutdriver, Screw drivers, Socket set, Wrench (Adjustable), Wrench set
The copper fitting on the chemical injection broke.
I order the part from this site and received it within a week. the only problem was that spring was missing out of the sealed bag. NO PROBLEM!!! I cut a ball point pen spring to fit and everything works just fine. You just have to remember to put the spring in first, then the ball bearing and then the rubber o-ring.If you put them in back
... Read more
wards you pressure will fed directly into your chemical container!!
Read less
Was this instruction helpful to you?
Thank you for voting!
- Customer:
- James from PICAYUNE, MS
- Parts Used:
- 192980GS
- Difficulty Level:
- Very Easy
- Total Repair Time:
- Less than 15 mins
Dry rotted rubber
Put some dish soap on the rubber, push into the tank hole, slip 1x2 into the handle of the tank and over the new part and pry down pushing it into the hole. Took about 2 minutes.
Was this instruction helpful to you?
Thank you for voting!
- Customer:
- Alan from RADFORD, VA
- Parts Used:
- 192980GS
- Difficulty Level:
- A Bit Difficult
- Total Repair Time:
- 1- 2 hours
- Tools:
- Pliers, Screw drivers
old valve dripped gas when opened on cold sub zero day
old valve easily pulled out with screwdriver and pliers
install difficult due to 40 degree cold temp and bushing didn't want to squeeze into fuel tank hole
install required lots of liquid soap on bushing, which popped into place by using upward prying pressure from 3"X24" plywood braced into under-shelf of gas tank ... Read more r />
used same technique to insert valve upward into bushing
works great!
Read less
Was this instruction helpful to you?
Thank you for voting!