To access the exterior lightbulb, the bottom panel of the microwave will need to be removed. It is secured in place with screws, so will require a Philips screwdriver to remove it. Screw the new light...
This is a charcoal filter for an over-the-range microwave. It is designed to absorb grease before making its way into the vent, which could cause damage or build-up. It also helps to reduce odors whil...
This is a single grease filter for a microwave. Most microwaves have two filters, the other one being the charcoal filter, which is a different filter, sold separately, and has different maintenance i...
This glass cooking tray, also known as a turntable, is a genuine OEM replacement part for your microwave. The clear glass tray measures approximately 12 inches in diameter, and it is the surface that ...
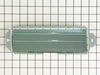
This mounting plate is a genuine OEM part for your microwave. This metal bracket is approximately 30 inches in length and is used to support your microwave when installed under cabinets. Please note t...
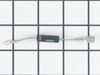
This is an authentic OEM door switch for your microwave. This switch is located behind the front panel, and works by making contact with the door hook, sending a signal that the door is closed and the...
The microwave door interlock switch prevents the microwave from starting if the door is open. If your microwave will not start when the door is closed, or it continues running if the door is opened, t...
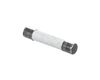
The light socket in your microwave houses the light bulb and connects it to the power source. The light bulb will screw into it, so the light bulb will be held in place. Be very careful when installin...
In Stock
Order now and your part arrives by Jul 5
Questions and Answers
Ask our experts a question about this part and we'll get back to you as soon as possible!
2 questions answered by our experts.
< Prev
1
Next >
Sort by:
Search filter:
Clear Filter
Your search term must have 3 or more characters.
Keep searches simple. Use keywords, e.g. "leaking", "pump", "broken" or "fit".
Sorry, we couldn't find any existing answers that matched. Try using some different or simpler keywords, or submit your new question by using the "Ask a Question" button above!
Alvin
July 30, 2022
Everything works on the display panel, except when you hit the start button, or the add 30 seconds button, the interior light flashes, and the panel displays push start.
For model number WMH73L20AS0
Hello Alvin, thank you for your question. It may be the Panel you touch PS3507985 needs replacing. The other part that is could be is the actual board but it is now discontinued. We have no further information. You are welcome to contact the manufacturer of the part to see if they have recently released a new substitute. Good luck with your repair.
I Have no power to the unit I have replaced the thermal fuse I have checked the door switches and still no power could it be a diode or the Magnetron out.
For model number WMH73L20AS0
Hello Joe, Thank you for your inquiry. Researching your model, it could be the diode or one of the thermostats. We hope this helps you.
The nightmare was that this microwave is installed under the cabinet....in order to get to the light bulb I had to pull out my stove then squeeze into the space between the stove and counter....my old microwave light bult was much easier to change.....Shame on Whirlpool for making this so difficult.....must be a better way to cover the li
... Read moreght bulb so that we do not need a screwdriver to remove the door to get to the light bulb
Ordered top & bottom micro-switches and mounting plate parts. Internet reviews could not find specifics if the issue was due to a top/bottom or combination of micro-switch or mounting plate failure. Pulled the plug. Removed the top vent assembly cover held in by 2 Phillips screws inside the vent. Removed the control panel held in by 1 P
... Read morehillip screw at the top vent assembly area. Lifted control panel upward to release the catch and moved it off to the side - didn't disconnect any leads. Used a Torx bit to remove the door switch mounting plates at the front and pulled the plates through the opening from the control panel. Documented the wire color code connections, the top plate uses 2 micro's with one using both the closed & open contact. Installed the respective micros on the mounting plates and worked backwards with the wiring and removal steps. Once completed, the open/close sensing has worked every time.