


Models
>
MT4078SPQ0
MT4078SPQ0 Whirlpool Microwave
Jump to:
Find Part by Name
Keep searches simple, eg. "belt" or "pump".
Diagrams for MT4078SPQ0
Viewing 6 of 6


Manuals & Guides for MT4078SPQ0
Click to downloadInstall
Installation Instructions
(0.06MB)
Install
Installation Instructions
(0.87MB)
Manual
Owner's Manuals
(0.28MB)
Manual
Owner's Manuals
(1.63MB)
Specs
Product Specifications Sheet
(0.02MB)
Keep searches simple, eg. "belt" or "pump".


$21.82
This is an authentic OEM replacement part. This screw is commonly used in the assembly of refrigerators, microwaves, ice makers, ranges, and smokers. Due to varied uses we recommend you refer to model...
In Stock
Order now and your part arrives by Jul 24

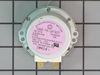
This roller is located underneath the glass turntable. With the help of the motor, this roller helps to rotate the glass tray. This part takes the place of the coupling.
No Longer Available

$93.67
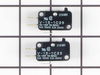
This kit contains 2 switches - 15 Amp - 125/250 Volt with 3/16" terminals.
In Stock
Order now and your part arrives by Jul 24

In Stock
Order now and your part arrives by Jul 24

In Stock
Order now and your part arrives by Jul 24


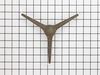
This tray rotates in your microwave ensuring more even temperatures.
No Longer Available

$8.70
This screw is for microwaves.
A qualified technician should install this part if it requires accessing internal components of the microwave or microwave door. High-voltage capacitors can retain a l...
Special Order

Common Problems and Symptoms for MT4078SPQ0
Viewing 4 of 4Tray won’t turn
Fixed by these parts
How to fix it
No heat
Fixed by these parts
How to fix it
Won’t turn on
Fixed by these parts
How to fix it
Doesn’t shut off
Fixed by these parts
How to fix it
Keep searches simple. Use keywords, e.g. "leaking", "pump", "broken" or "fit".
- Customer:
- Robert from Bainbridge Island, WA
- Parts Used:
- 4392027
- Difficulty Level:
- A Bit Difficult
- Total Repair Time:
- 30 - 60 mins
- Tools:
- Pliers, Screw drivers
Microwave worked intermittently depending on how door was closed
Remove top grille (2 screws), undo control panel (1 screw). Tilt down control panel, switches are on the left. There are actually three switches that are involved with the door, two horizontally mounted, one vertically mounted. This would be an EASY REPAIR, but it took me a while to figure out which of the three switches was bad, and a
... Read more
lso took a while to figure out that there is a plastic rod that inserts through the hole in the switch body. Once i figured this out went like a breeze. Lower horizontal switch was the bad one, but since the kit came with two switches i went ahead and replaced the upper horizontal one as well. IT appears that the horizontal switches are probably more likely to fail than the vertical switch based on the position of the switch and force angles. Works great now!
Read less
Was this instruction helpful to you?
Thank you for voting!
- Customer:
- Keith from Georgetown, TX
- Parts Used:
- W10856869
- Difficulty Level:
- Really Easy
- Total Repair Time:
- 15 - 30 mins
- Tools:
- Pliers, Screw drivers
Microwave went dead while in use.
1. removed vent across the top to gain excess to Screw holding control in place. 2. Removed control panel to access Fuse. 3. Remover fuse after pulling plug. 4.Tested fuse for continuity with volt ohm meter noting no continuity.5. Orderd new fuse. 6. receeived new fuse and installed infuse holder.7. plugged microwave plug back in receptic
... Read more
al and tested unit now working OK.Reversed steps 2 & 1 job complete
Read less
Was this instruction helpful to you?
Thank you for voting!
- Customer:
- Robert S. from Stafford, TX
- Parts Used:
- 4392027
- Difficulty Level:
- Really Easy
- Total Repair Time:
- 15 - 30 mins
- Tools:
- Screw drivers
Close the door on the microwave, punch in the # nothing happened
I removed the unit from the wall. Took the cover off. Set the unit on its side. It revealed the working parts. Removed the old micro switches. Put in the new oness. Presto, it worked. Very easy for me.
The parts was delivered almost before my notice they were shipped.
The parts was delivered almost before my notice they were shipped.
Was this instruction helpful to you?
Thank you for voting!