


Models
>
SMH2117S
SMH2117S (XAA-0002) Samsung Microwave
Jump to:
Find Part by Name
Keep searches simple, eg. "belt" or "pump".
Diagrams for SMH2117S
Viewing 3 of 3


Keep searches simple, eg. "belt" or "pump".

$106.16
If you discover that the glass cooking tray in your microwave is damaged, you may have to replace it to operate the microwave properly. The glass cooking tray connects to the turntable of the microwav...
In Stock
Order now and your part arrives by Mar 29
In Stock
Order now and your part arrives by Mar 29

In Stock
Order now and your part arrives by Mar 29

In Stock
Order now and your part arrives by Mar 29

In Stock
Order now and your part arrives by Mar 29

In Stock
Order now and your part arrives by Mar 29

In Stock
Order now and your part arrives by Mar 29

In Stock
Order now and your part arrives by Mar 29

In Stock
Order now and your part arrives by Mar 29

On Order

In Stock
Order now and your part arrives by Mar 29

In Stock
Order now and your part arrives by Mar 29
Questions and Answers
We're sorry, but our Q&A experts are temporarily unavailable.
Please check back later if you still haven't found the answer you need.
- < Prev
- 1
- Next >
Sort by:
Search filter:
Clear Filter
Your search term must have 3 or more characters.
Keep searches simple. Use keywords, e.g. "leaking", "pump", "broken" or "fit".
Sorry, we couldn't find any existing answers that matched.
Try using some different or simpler keywords, or submit your new question by using the "Ask a Question" button above!
Try using some different or simpler keywords, or submit your new question by using the "Ask a Question" button above!
Rob
July 25, 2023
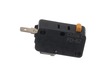
Every time I open the door, the breaker blows? Is it the door switch?
For model number SMH2117S
Hi Rob, thank you for your inquiry. If your circuit breaker gets tripped when you open your microwave door, it is likely related to the door interlock switch. A damaged door interlock switch, part number FIX4131192, may develop a fault when it activates. This fault is then detected by the circuit, which causes the breaker to trip immediately. Good luck with this repair!
1 person found this helpful.
Was this helpful?
Thank you for voting!
Related Parts:

Common Problems and Symptoms for SMH2117S
Viewing 5 of 5No heat
Fixed by these parts


How to fix it
Door not closing properly
Fixed by these parts

How to fix it
Won’t turn on
Fixed by these parts
How to fix it
Doesn’t shut off
Fixed by these parts
How to fix it
Tray won’t turn
Fixed by these parts

How to fix it

Keep searches simple. Use keywords, e.g. "leaking", "pump", "broken" or "fit".
- Customer:
- Ted from Hudson, NH
- Parts Used:
- DE91-70063D
- Difficulty Level:
- Easy
- Total Repair Time:
- 30 - 60 mins
- Tools:
- Pliers, Screw drivers
Buzzing noise, no heating of food
Removed control panel, discharged HV capacitor. Removed old diode, tested to confirm failure. Replaced part. Other than the removal of the panel swapping the part was almost as easy as replacing a light bulb.
Was this instruction helpful to you?
Thank you for voting!
- Customer:
- Lynn from LOUISVILLE, KY
- Parts Used:
- DE66-90106B, DE66-00168B, 3405-001033, 3405-001034
- Difficulty Level:
- Really Easy
- Total Repair Time:
- 15 - 30 mins
- Tools:
- Screw drivers
Microwave would not start when door closed. Sometimes you could push in or jiggle door and it would work for awhile and then it woud stop again. I knew it eas a door switch issue but wasn't certain which of the 3 or the body latch itself.
I removed the body latch assembly and found the bottom micro switch (NC) terminal burnt and loose. I replaced and working perfectly fine now. Easy diagnose and easy repair.
Was this instruction helpful to you?
Thank you for voting!
- Customer:
- louis from PARRISH, FL
- Parts Used:
- DE91-70063D
- Difficulty Level:
- Easy
- Total Repair Time:
- 1- 2 hours
- Tools:
- Pliers, Screw drivers
Microwave stopped working - would not heat up
I removed the outer cover and exposed the inner workings. I watched a video on partselect.com to show how to remove and replace the Diode. I followed the instructions and it was very easy to replace.
Unfortunately, the diode was only part of the issue. I ended up replacing the High Voltage capacitor and Magnetron also. Those w ... Read more ere a little more complicated but still easy to do.
Now the Microwave works just like new! Cost me less than $100 for all parts.
Unfortunately, the diode was only part of the issue. I ended up replacing the High Voltage capacitor and Magnetron also. Those w ... Read more ere a little more complicated but still easy to do.
Now the Microwave works just like new! Cost me less than $100 for all parts.
Read less
Was this instruction helpful to you?
Thank you for voting!