


Models
>
SMH7174BC
SMH7174BC Maytag Microwave
Jump to:
Find Part by Name
Keep searches simple, eg. "belt" or "pump".
Diagrams for SMH7174BC
Viewing 3 of 3


Keep searches simple, eg. "belt" or "pump".

$27.83
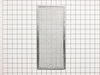
The grease filter in your microwave range hood is used to trap dirt and debris from the air that result while cooking. A clogged and dirty filter can decrease the efficiency of your microwave, can cau...
In Stock
Order now and your part arrives by Aug 1

$92.98
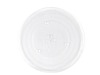
If you discover that the glass cooking tray in your microwave is damaged, you may have to replace it to operate the microwave properly. The glass cooking tray connects to the turntable of the microwav...
In Stock
Order now and your part arrives by Aug 1

In Stock
Order now and your part arrives by Aug 1

In Stock
Order now and your part arrives by Aug 1

In Stock
Order now and your part arrives by Aug 1

In Stock
Order now and your part arrives by Aug 1

In Stock
Order now and your part arrives by Aug 1

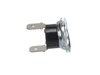
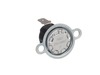
This thermostat (part number DE47-20059B) is for microwaves. Thermostat DE47-20059B is a safety device that shuts off the microwave if it overheats. Because high-voltage capacitors in a microwave can ...
In Stock
Order now and your part arrives by Aug 1

In Stock
Order now and your part arrives by Aug 1

In Stock
Order now and your part arrives by Aug 1

In Stock
Order now and your part arrives by Aug 1

$30.40
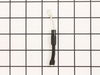
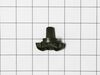
This light socket (part number DE47-00006A) is for microwaves. Light socket DE47-00006A provides power to the light while holding the light bulb in place. Because high-voltage capacitors in a microwav...
In Stock
Order now and your part arrives by Aug 1
Common Problems and Symptoms for SMH7174BC
Viewing 5 of 5No heat
Fixed by these parts
How to fix it
Won’t turn on
Fixed by these parts
How to fix it
Doesn’t shut off
Fixed by these parts
How to fix it
Exhaust fan not working
Fixed by these parts
How to fix it
Tray won’t turn
Fixed by these parts
How to fix it

Keep searches simple. Use keywords, e.g. "leaking", "pump", "broken" or "fit".
- Customer:
- Lori from Salt Lake City, UT
- Parts Used:
- 6802A
- Difficulty Level:
- Really Easy
- Total Repair Time:
- Less than 15 mins
Grease filters were missing from the over-the-stove microwave
Why a tenant would remove and discard the grease filters without replacing them is beyond me! But, I removed the filters from the package and slid them into place. Two minutes tops. I would like to add that I ordered these on Thursday afternoon, and I had them on Saturday; awesome customer service!
Was this instruction helpful to you?
Thank you for voting!
- Customer:
- Lisa from PARADISE, PA
- Parts Used:
- WPR9800486
- Difficulty Level:
- Easy
- Total Repair Time:
- 15 - 30 mins
- Tools:
- Pliers, Screw drivers
no heat
I looked up the #1 reason for no heat for my microwave on the site , and using my model number found that 92% of the time it was the Black Sleeve Diode. Ordered the $15 part, and installed it within 30 minutes. Most of the time was used for removing the built in microwave and removing the cover. Replaced the diode by finding it on the
... Read more
diagram that I printed from this site (free). Very relieved that we don't need to have our custom cabinetry re-sized to accommodate a new microwave. Thank you!
Read less
Was this instruction helpful to you?
Thank you for voting!
- Customer:
- david from WASHINGTON, DC
- Parts Used:
- 3405-001033, 3405-001034
- Difficulty Level:
- Easy
- Total Repair Time:
- 30 - 60 mins
- Tools:
- Screw drivers
microwave ran with the door open
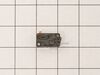
First I read through the customer comments, reviews, questions, etc. at Parts Select, which is always a good bet. Then I put "samsung microwave door switch replacement" into youtube and watched some videos. They don't even have to be for Samsung. From what I can tell, many of the appliance companies use the same design and the same jun
... Read more
k parts, so watching a GE video is almost the same for example. Watch some videos to familiarize yourself with the steps. There are maybe six to disassemble and install the new part. I replaced all three switches. They are not expensive and to replace 3 is only 5% more work than to replace just one; you have to take the microwave apart in either case. UNPLUG THE MICROWAVE FROM THE WALL. Start taking it apart. I use my phone to take a picture of any thing I remove, unscrew or disconnect, especially wires, BEFORE I disconnect them. Thee pictures serve as a reference when I go to reconnect and reassemble. If I am uncertain then I check the picture. Good luck!
Read less
Was this instruction helpful to you?
Thank you for voting!