


Models
>
KHMS145KSS1
KHMS145KSS1 KitchenAid Microwave
Jump to:
Find Part by Name
Keep searches simple, eg. "belt" or "pump".
Diagrams for KHMS145KSS1
Viewing 6 of 6


Keep searches simple, eg. "belt" or "pump".

This glass cooking tray, also known as a turntable, is a genuine OEM replacement part for your microwave. The clear glass tray measures approximately 12 inches in diameter, and it is the surface that ...
No Longer Available

$27.83
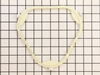
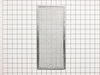
The grease filter in your microwave range hood is used to trap dirt and debris from the air that result while cooking. A clogged and dirty filter can decrease the efficiency of your microwave, can cau...
In Stock
Order now and your part arrives by Aug 3

$27.83
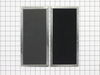
This is a package of 2 filters. The charcoal filter is used in microwaves to remove food odors from the air. If your filter is damaged or strong odors are coming from your microwave, it is best to rep...
In Stock
Order now and your part arrives by Aug 3

In Stock
Order now and your part arrives by Aug 3

In Stock
Order now and your part arrives by Aug 3

In Stock
Order now and your part arrives by Aug 3

Special Order

$37.49
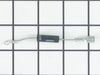
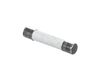
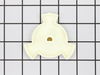
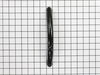
This part protects the microwave by shutting it off if there is an electrical surge.
In Stock
Order now and your part arrives by Aug 3

In Stock
Order now and your part arrives by Aug 3

In Stock
Order now and your part arrives by Aug 3


In Stock
Order now and your part arrives by Aug 3
Common Problems and Symptoms for KHMS145KSS1
Viewing 6 of 6No heat
Fixed by these parts
How to fix it
Won’t turn on
Fixed by these parts
How to fix it
Tray won’t turn
Fixed by these parts

How to fix it
Noisy
Fixed by these parts
How to fix it
Exhaust fan not working
Fixed by these parts
How to fix it
Door not closing properly
Fixed by these parts
How to fix it


Keep searches simple. Use keywords, e.g. "leaking", "pump", "broken" or "fit".
Dirty Grease Filter
Slide grease filter about 1/2 inch to right (or left) using the d-ring attached to one side and then pull down and out. Push charcoal filter frame slightly to rear and pry down from front. Install new charcoal and grease filters by reversing process. No tools - 5-minutes max!!
Was this instruction helpful to you?
Thank you for voting!
- Customer:
- Deborah from Baltimore, MD
- Parts Used:
- 4393799
- Difficulty Level:
- Really Easy
- Total Repair Time:
- Less than 15 mins
broken glass turntable
No repair- just replaced glass turntable.
Right part I needed with first try
Right part I needed with first try
Was this instruction helpful to you?
Thank you for voting!
replace charcoal filters and grease screens and clean top exit ports
Removed old grease screens by sliding sideways and then pulling out of the grooves. (helps to have rubber gloves as the grease is slippery). Put pressure on the back of the charcoal filter rim and allow side closest to you to drop down slightly so you can get a fine flatblade screwdriver under and pop the filter out of the holder. Work
... Read more
s same on both sides. Install new charcoal filters after cleaning the holder edges with soap and water and drying. Make sure charcoal filter is in the second set of holder grooves and snap in place. Replace new grease filters with the pull tabs down and facing the center. Slide the grease filter into the holder grooves a little further back than normal and (using the pull tabs) pull the filter back the other way until flush with the opening and in place. The top exit ports are removed by taking out 4 screws;however, two of them are attached to spring clips on the underside and it is easy to break off the tiny plastic ridges underneath. The other screws come out easily and the entire exit port piece can be removed and cleaned. To reinstall just snap exit port back in place and replace screws. If you have broken off the slender plastic ridges you can sometimes turn the screww a partial turn and engage what is left; if not you may have to put some rubber grommets or pieces to support the bottom and keep pressure on the exit port piece which is not locked by only two screws.
Read less
Was this instruction helpful to you?
Thank you for voting!