


Models
>
JMC2430WB00
JMC2430WB00 Jenn-Air Microwave
Jump to:
Find Part by Name
Keep searches simple, eg. "belt" or "pump".
Diagrams for JMC2430WB00
Viewing 6 of 6


Keep searches simple, eg. "belt" or "pump".

$73.24
This is a genuine OEM replacement turntable tray for your microwave. The tray rotates while the microwave is operating, to help your food heat evenly. If your tray has become chipped, cracked, or comp...
In Stock
Order now and your part arrives by Jul 23

In Stock
Order now and your part arrives by Jul 23

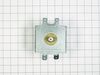
$48.21
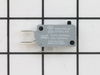
This door interlock switch ensures your microwave operates only when the door is securely closed. It communicates the door’s position to the control board, helping prevent accidental use. It’s often r...
In Stock
Order now and your part arrives by Jul 23

In Stock
Order now and your part arrives by Jul 23

$27.28
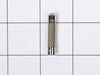
This part is the replacement halogen light bulb for your range. The bulb is 10 watts and 12 volts. The halogen lamp lights up the inside of the oven you can see the cooktop more effectively in darknes...
In Stock
Order now and your part arrives by Jul 23

$54.12
This roller is located underneath the glass turntable. With the help of the motor, this roller helps to rotate the glass tray. This part takes the place of the coupling.
In Stock
Order now and your part arrives by Jul 23

In Stock
Order now and your part arrives by Jul 23

In Stock
Order now and your part arrives by Jul 23

In Stock
Order now and your part arrives by Jul 23

Special Order

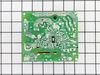
$256.08
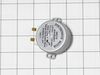
The inverter acts like the brain for the microwave. It sends high voltage to the magnetron to produce heat.
In Stock
Order now and your part arrives by Jul 23

$78.55
This enamel-coated baking tray is made for convection microwaves and helps with baking, roasting, and broiling. It replaces a worn or damaged tray and restores a clean, sturdy surface for cooking. As ...
In Stock
Order now and your part arrives by Jul 23
Common Problems and Symptoms for JMC2430WB00
Viewing 5 of 5Tray won’t turn
Fixed by these parts
How to fix it
Won’t turn on
Fixed by these parts
How to fix it
No heat
Fixed by these parts
How to fix it
Noisy
Fixed by these parts
How to fix it
Door not closing properly
Fixed by these parts
How to fix it
Keep searches simple. Use keywords, e.g. "leaking", "pump", "broken" or "fit".
- Customer:
- Peet from LAKE OSWEGO, OR
- Parts Used:
- W11724411
- Difficulty Level:
- Very Difficult
- Total Repair Time:
- More than 2 hours
- Tools:
- Pliers, Screw drivers
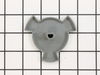
The ceramic bracket holding the conventional heating element at the top of the microwave oven broke for the second time
Part No. PS11766760
Ignore the other repair comments on this page!!! The new replacement part can no longer be put into place as simply as the original bracket. This is a r3eplacement part with a modified design. Significant parts of the microwave (MW) must be dismantled in order to provide access for insertion of the new part. Th ... Read more is is confirmed by notes at other web sites which provide this part. My approach also required cutting/drilling holes into sheet metal panels.
Kitchenaid/Whirlpool must have realized that the original part is inherently weak at the point at which it is supported at the ceiling of the MW. The replacement part is a good option from a strength standpoint, but a horrible one for ease of insertion. The original is a single ceramic piece. The replacement part includes a metal clip which holds the top stem of the ceramic bracket from the top ("roof") side of the MW. Getting at the top of the MW cavity is the difficult part. One needs to pull the entire built in oven from its location and remove at least the control panel from the front of the unit.
It took me 3-4 hours one day to see how to install the replacement part. I failed since I unexpectedly found that there are two sheet metal panels above the MW cavity which need to be removed in order to access the slot through which the bracket stem must be inserted. Maybe somebody else can think of a way to remove the metal panels, but I could not do it so I put the MW back together again.
After this failure I considered trying to repair the original part again (this was the second time it had broken). The first repair broke when the conventional heating element was used in the MW. This option might again be an interim solution so I went back to trying to install the new replacement part.
This time it took over 3 hours to remove the control panel, several wiring units, a transformer, and several side and top sheet metal panels. Each removal step was preceded with a photograph of the item to be removed so that everything could be put back as they were originally located. After all of this work it was determined that the MW would have to virtually be totally dismantled in order to access the bracket slot at the top of the MW cavity. There were simply too many items on top of the sheet metal panels to allow for bending the panels up to access the necessary slot in the oven ceiling.
Fortunately, my wife asked why I didn't consider drilling through the existing sheet metal panels at the top of the MW. Had she suggested that earlier in the dismantling, it would have saved hours of work.
After reassembling the side panels I drilled access holes through the two sheet metal panels over the top of the MW oven. Certainly one needs to be careful in measuring the location for such holes. The holes were to be rectangular, developed by drilling multiple holes around the perimeters of the final "holes." The two sheet metal panels are about 3/4" apart and the lower panel is about 3/4" above the MW oven cavity. After drilling out the holes (about 1/2" x 1") I successfully found the desired slot in the oven ceiling. Then the drill cuttings needed to be cleaned out with a vacuum cleaner - including inside the MW oven.
Inserting the replacement part was not trivial. One needs to hold the ceramic part in the oven, with the heating element in its proper place on the bracket, and then simultaneously place the metal clip onto the stem which has been inserted through the slot at the top of the MW oven. Long tweezers are handy for putting the clip into place. Then the fun begins. Somehow the metal clip must be pushed down onto the ceramic stem. This is a trial and error task with various long blunt tools used to try and push the clip down while not pushing it off to the side. Somehow I got the clip onto the stem and the part was finally in place.
Another hour (+) to re-assemble the MW and push the oven back into the cabinet and the job was finally done.
btw, the only reason it was relatively easy to pull the oven out of the cabinet (and push it back in) was that we have two office chairs at home (without arms) which come up to about the right height for having the oven sit on the chairs. Adding some 2x4's on the seats of the chairs brought it to exactly the right height. The wheels on the chairs also helped. Given the weight of the oven, removing and replacing the oven unit is not a trivial task and one needs to be careful at all times.
There were several observations I made about the new replacement part which also "froze me in my tracks" early in this project. That is why I kept thinking of ways in which to repair the original part more effectively than I had done previously. The problem is that the ceramic section of the replacement part is not the same size as the original. It holds the heating element higher against the ceiling of the microwave and the horizontal section which holds the heating element is shor
Read less
Was this instruction helpful to you?
Thank you for voting!
- Customer:
- Liza from Monterey, CA
- Parts Used:
- W11373838
- Difficulty Level:
- Really Easy
- Total Repair Time:
- Less than 15 mins
Microwave glass turntable when pop
After popping the last few kernals of popcorn, we hear a different kind of pop sound come from our microwave oven. When we looking inside, we found that the glass turntable had broken unevenly in half. Although we didn't understand why it had happned, we did know we'd be without the use of the microwave without a new one. After less th
... Read more
an 10 minutes surfing online, I had found the correct part on PartSelect.com and had arranged to have it shipped to me by speedy delivery. Once it arrived, I just popped the new turntable into the microwave and used the box to dispose of the broken one. It could not have been easier and it saved me the cost of a service call and likely further delay.
Read less
Was this instruction helpful to you?
Thank you for voting!
- Customer:
- Jerry from Woodinville, WA
- Parts Used:
- W11724411
- Difficulty Level:
- Really Easy
- Total Repair Time:
- Less than 15 mins
Ceramic part holding up the heating element fell and broke.
Easiest repair I've made in years. Didn't even need a tool.
One end slides into a hole in the ceiling of the microwave/convection over, move the heating element into place and turn the mounting bracket and you're done.
One end slides into a hole in the ceiling of the microwave/convection over, move the heating element into place and turn the mounting bracket and you're done.
Was this instruction helpful to you?
Thank you for voting!