


Models
>
PEB9159DJ2WW
PEB9159DJ2WW General Electric Microwave
Jump to:
Find Part by Name
Keep searches simple, eg. "belt" or "pump".
Diagrams for PEB9159DJ2WW
Viewing 4 of 4


Keep searches simple, eg. "belt" or "pump".

$135.18
This 13.5-inch tempered glass turntable tray helps ensure even heating in your microwave. It fits securely on the rotating support thanks to three grooves underneath and is compatible with many GE and...
In Stock
Order now and your part arrives by Mar 28

$56.24
This 20A, 125V fast-blow glass fuse protects your microwave from power surges and electrical faults. It fits select models from GE, Hotpoint, and Frigidaire and measures approximately 6x30mm. Replace ...
In Stock
Order now and your part arrives by Mar 28

$33.20
This waveguide cover protects the microwave’s internal components by shielding the magnetron from moisture, grease, and food splatters, helping prevent sparking and ensuring efficient heating. Made fr...
In Stock
Order now and your part arrives by Mar 28

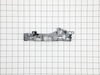
The door interlock switch bracket houses and supports the door switches.
In Stock
Order now and your part arrives by Mar 28
 – Part Number: WB24X10146")
$53.58
This door interlock switch stops the microwave from running when the door is open. It replaces older versions and helps restore safe, reliable operation. Installation requires unplugging the appliance...
In Stock
Order now and your part arrives by Mar 28

In Stock
Order now and your part arrives by Mar 28

In Stock
Order now and your part arrives by Mar 28

$60.49
This turntable motor is for microwaves.
The turntable motor rotates the glass tray inside the microwave oven.
Because high-voltage capacitors in a microwave can retain a lethal electrical charge...
In Stock
Order now and your part arrives by Mar 28

The turntable motor coupler connects the turntable motor to the turntable tray to rotate the tray.
In Stock
Order now and your part arrives by Mar 28

In Stock
Order now and your part arrives by Mar 28

Special Order

This control board regulates key microwave functions including heating, timing, and user input. It controls the magnetron, turntable, and display, ensuring smooth operation. Common signs of failure in...
In Stock
Order now and your part arrives by Mar 28
Questions and Answers
We're sorry, but our Q&A experts are temporarily unavailable.
Please check back later if you still haven't found the answer you need.
Common Problems and Symptoms for PEB9159DJ2WW
Viewing 5 of 5Door stuck closed
Fixed by these parts

How to fix it
Won’t turn on
Fixed by these parts

How to fix it
Touchpad does not respond
Fixed by these parts

How to fix it
Noisy
Fixed by these parts
How to fix it
Sparking
Fixed by these parts
How to fix it
Keep searches simple. Use keywords, e.g. "leaking", "pump", "broken" or "fit".
- Customer:
- Henry from NORWALK, CT
- Parts Used:
- WB10X27080, WB14X10049
- Difficulty Level:
- Easy
- Total Repair Time:
- 30 - 60 mins
- Tools:
- Screw drivers
Microwave door was hard to open
1. Take out the case by unscrew 8 screws on the back and side of the case
2. Take out the control panel by unscrew 1 screw on the top and slide up
3. Take out the latch by unscrew 2 screws, and slide out 3 electric switches that clipped on the latch
4. Clip the switches onto the new latch
5. Slide in lever switch into ... Read more latch
6. Put back the latch
7. Put back the control panel
8. Put back the case
Read less
Was this instruction helpful to you?
Thank you for voting!
- Customer:
- Jay from WESLEY CHAPEL, FL
- Parts Used:
- WB14X10049
- Difficulty Level:
- Really Easy
- Total Repair Time:
- 1- 2 hours
- Tools:
- Screw drivers
Door locks. Not opening.
Slide a Butter knife at left side by open push knob door will open. Then open all screws from top cover push cover top side front way then door locks Bracket have 3 microswitch pulls out switches mark them top medium and bottom. Remove 3 screws holding brackets will come out. On bottom see a Cam has 1/4” holes can holding Saft broken then
... Read more
install new door lock bracket install microswitch put 3screw and slide Cam on saft . I put a small screw on saft to hold cam on place. There was no screw . That’s why cam saft was broke. Put top cover tight all the screws and door lock fixed.
Read less
Was this instruction helpful to you?
Thank you for voting!
- Customer:
- Jason from KIRKLAND, WA
- Parts Used:
- WB39X10034
- Difficulty Level:
- Really Easy
- Total Repair Time:
- Less than 15 mins
Installed waveguide
Inserted the waveguide into the slots on the side of microwave.
Was this instruction helpful to you?
Thank you for voting!