


Models
>
CVM1750SH1SS
CVM1750SH1SS General Electric Microwave
Jump to:
Find Part by Name
Keep searches simple, eg. "belt" or "pump".
Diagrams for CVM1750SH1SS
Viewing 7 of 7


Keep searches simple, eg. "belt" or "pump".

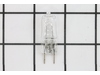
$20.72
This ceramic microwave fuse is just over an inch in length. It is white in the center, and metal on both ends. This is a 20-amp fuse, and is used to power your microwave. If the touch pad on the micro...
In Stock
Order now and your part arrives by Jul 23

$57.95
This replacement microwave grease filter features multiple layers of aluminum that work together to capture grease and minimize odors. By preventing debris from entering the recirculation system, it h...
In Stock
Order now and your part arrives by Jul 23

In Stock
Order now and your part arrives by Jul 23

In Stock
Order now and your part arrives by Jul 23

On Order

In Stock
Order now and your part arrives by Jul 23

$57.30
The rotating ring in your microwave rests under the microwave plate, and allows it to rotate when the microwave is running. It is a round plastic ring with 3 wheels spaced out around the perimeter. If...
In Stock
Order now and your part arrives by Jul 23

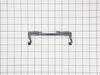
$15.26
This is the replacement damper bracket for your microwave. It is made of plastic and is approximately 11 inches wide and 3 inches long. The damper bracket attaches to the outer cabinet and directs air...
In Stock
Order now and your part arrives by Jul 23

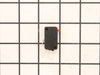
$37.49
This switch monitor interlock helps your microwave detect when the door is properly closed. If it’s damaged, the microwave may not start. Replacing it restores safe operation and is a quick fix with basic tools.
In Stock
Order now and your part arrives by Jul 23

$39.95
This diode cable is a replacement electrical component designed to regulate current flow within an appliance circuit. It helps protect sensitive components and is commonly replaced when electrical fau...
In Stock
Order now and your part arrives by Jul 23

$24.00
This vent damper is a manufacturer-approved replacement part for your above-range microwave. This part helps vent air from the microwave to the exterior of your home, and helps keep exterior wind out ...
In Stock
Order now and your part arrives by Jul 23

In Stock
Order now and your part arrives by Jul 23
Common Problems and Symptoms for CVM1750SH1SS
Viewing 6 of 6Won’t turn on
Fixed by these parts

How to fix it
No heat
Fixed by these parts
How to fix it
Touchpad does not respond
Fixed by these parts
How to fix it
Doesn’t shut off
Fixed by these parts
How to fix it
Tray won’t turn
Fixed by these parts


How to fix it
Door not closing properly
Fixed by these parts
How to fix it


Keep searches simple. Use keywords, e.g. "leaking", "pump", "broken" or "fit".
- Customer:
- Kim from Cliffside Park, NJ
- Parts Used:
- WB27X10928
- Difficulty Level:
- Really Easy
- Total Repair Time:
- 15 - 30 mins
- Tools:
- Screw drivers
Microwave completely stopped working
Turned out the issue was easily solved by replacing a single, inexpensive fuse.
First off, UNPLUG THE MICROWAVE.
The fuse is located under the plastic grill at the top of the microwave. It's held on by two screws. Once you've removed the screws and taken off the plastic grill, you go to the right side of the mic ... Read more rowave and remove another screw that holds a small metal grill in place. Removing the small metal grill is probably the toughest part of this repair. You kind of have to rock it back and forth a bit to get it to release. Once that's off, you can get to the fuse. I removed the burnt out one with a pair of needle nose pliers. I also put a small piece of cardboard under the fuse when I did this so I didn't accidentally drop it into the innards of the microwave. I did the same thing when I replaced the new fuse. I then plugged the appliance back in and made sure it worked. Once that was confirmed, I replaced both grills.
Read less
Was this instruction helpful to you?
Thank you for voting!
- Customer:
- Ralph from Brandon, FL
- Parts Used:
- WB27X10928
- Difficulty Level:
- Easy
- Total Repair Time:
- Less than 15 mins
- Tools:
- Pliers, Screw drivers
I diagnosed the problem incorrectly: based on a previous repair.
The old fuse is perfectly good. The new ones arrived within a day.
Was this instruction helpful to you?
Thank you for voting!
- Customer:
- Michael from Ridgefield, CT
- Parts Used:
- WB24X10047
- Difficulty Level:
- Really Easy
- Total Repair Time:
- Less than 15 mins
- Tools:
- Screw drivers
Microwave would turn on and count down, but not heating and not rotate turntable. Pressing door up would occasionally start heat.
First I disconnected the power and opened the door. Then I removed the top screws holding the top vent louvers, then removed the screw at the top of the touch pad. The touch pad removes by sliding up slightly then tilting top out. I unscrewed two screws holding the door latch assembly. Press the tab to remove and replace switch. Reco
... Read more
nnect wires, reseat latch mount by placing top bracket tab in place first, allign and secure with screws. Reseat touch pad by placing bottom tabs in first, tilt forward and press up to seat top tabs, secure with top screw. Secure vent louver screws, plug in and watch your microwave work again.
Read less
Was this instruction helpful to you?
Thank you for voting!