


Models
>
JVM1630BK01
JVM1630BK01 General Electric Microwave
Jump to:
Find Part by Name
Keep searches simple, eg. "belt" or "pump".
Diagrams for JVM1630BK01
Viewing 1 of 1
Manuals & Guides for JVM1630BK01
Click to downloadKeep searches simple, eg. "belt" or "pump".

$24.00
This 40-Watt 130-Volt lightbulb is a genuine OEM replacement for your microwave. The bulb is used either inside the microwave and turns on when the door is open, or the appliance is running. Or it can...
In Stock
Order now and your part arrives by Jul 30

In Stock
Order now and your part arrives by Jul 30

$46.07
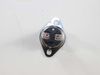
This thermostat activates the cooling fan to prevent overheating. Shutdowns or nonfunctional fans may indicate a failing thermostat.
In Stock
Order now and your part arrives by Jul 30

In Stock
Order now and your part arrives by Jul 30

In Stock
Order now and your part arrives by Jul 30

$55.18
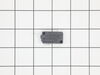
The door latch housing encloses the door switches and door latch.
In Stock
Order now and your part arrives by Jul 30
 – Part Number: WB24X10146")
$53.58
This door interlock switch stops the microwave from running when the door is open. It replaces older versions and helps restore safe, reliable operation. Installation requires unplugging the appliance...
In Stock
Order now and your part arrives by Jul 30

The door interlock switch prevents the microwave from starting when the door is open.
In Stock
Order now and your part arrives by Jul 30

In Stock
Order now and your part arrives by Jul 30

$60.49
This turntable motor is for microwaves.
The turntable motor rotates the glass tray inside the microwave oven.
Because high-voltage capacitors in a microwave can retain a lethal electrical charge...
In Stock
Order now and your part arrives by Jul 30


Special Order
Common Problems and Symptoms for JVM1630BK01
Viewing 1 of 1
Keep searches simple. Use keywords, e.g. "leaking", "pump", "broken" or "fit".
- Customer:
- william from san antonio, TX
- Parts Used:
- WB36X10003
- Difficulty Level:
- A Bit Difficult
- Total Repair Time:
- 15 - 30 mins
- Tools:
- Pliers, Screw drivers
bulb had broken off in base that was still screwed into socket
At first I tried to use pliers to unscrew the base,very uncomfortable working position,upside down and backwards(the microwave is installed over the range top)very limited space for your body and arms to manuver and you really cant see the base,all of this took place after the breaker was turned off ofcourse,finally figured out that you c
... Read more
an drop the entire bottom housing of the microwave by unscrewing 6 screws and the light sockets are easily accessable once you lower it,take out 1 retaining screw ,remove the entire socket and unscrewed the broken base and replaced the bulbs,I said bulbs,there is no sense in having to replace another bulb in who knows how long since only one had burned out but they were both the same age
Read less
Was this instruction helpful to you?
Thank you for voting!
- Customer:
- LUCY from BALLWIN, MO
- Parts Used:
- WB36X10003
- Difficulty Level:
- Really Easy
- Total Repair Time:
- Less than 15 mins
- Tools:
- Screw drivers
Changing the bulb that illuminates the cooktop
Loosen screw holding glass cover plate in place over bulb. Glass cover plate will swing down. Unscrew bad bulb, replace with good bulb, reset glass cover and tighten screw.
Was this instruction helpful to you?
Thank you for voting!
- Customer:
- Charles from CLAYTON, NJ
- Parts Used:
- WB06X10610
- Difficulty Level:
- Really Easy
- Total Repair Time:
- 30 - 60 mins
- Tools:
- Screw drivers
Tripping circuit breaker, broken micro switch locking pin
1. Unplug unit
2. Open door, remove two screws above the top trim piece, slide and remove trim.
3. Remove screw behind control board and top left corner, then release from position.
3b. Unplug all wire terminations and set control panel aside.
4. Remove two screws securing latch board, lift and rotate board ... Read more out of position, remove three micro switches, xfer monitor switch actuator from lower pin in old board and insert in new. Install new door switches and reverse procedure to complete repair.
Note 1. Take care to located new latch board so holding tabs line up, pass through frame, and openings for door tangs line up with openings in frame before securing with screws.
Note 2. A long magnetic screwdriver is helpful.
Read less
Was this instruction helpful to you?
Thank you for voting!