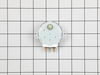
This aluminum filter helps keep your microwave’s exhaust system clean by catching grease while you cook. It’s about 7-7/8 inches wide and 5-7/8 inches deep, so be sure to measure your old one before o...
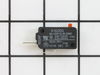
The relay switch may also be known as the door micro switch and is a part for your microwave. The function of this part is to monitor the door latch and communicate whether the door latch is open or c...
Ask our experts a question about this part and we'll get back to you as soon as possible!
2 questions answered by our experts.
< Prev
1
Next >
Sort by:
Search filter:
Clear Filter
Your search term must have 3 or more characters.
Keep searches simple. Use keywords, e.g. "leaking", "pump", "broken" or "fit".
Sorry, we couldn't find any existing answers that matched. Try using some different or simpler keywords, or submit your new question by using the "Ask a Question" button above!
Brian
March 6, 2023
The handle on my microwave is loose (top screw) and i can’t find a spot to access it to tighten it. I looked in the manual and have inspected the door.
For model number PLMV169DCD
Hi Brian, thank you for your inquiry. Please follow the instructions to solve the issue.
Be sure to unplug the power cord or shut off the power supply. Open the door and use a Phillips-head screwdriver to unthread the two screws securing the front vent. You can use a putty knife to help pry off the vent. With the vent removed, you can lift off the door. Set the door down on a towel or blanket. Use a putty knife to help detach the inner door trim. Unthread the four screws securing the inner door assembly. You can use a large flat-head screwdriver to help tighten the inner door assembly from the outer door panel with the inner door assembly removed, realigning the inner door assembly, and snapping it into position. Now you can tighten the loose top screw of the handle. Re-thread the screws, align and snap the trim into place. Reinstall the door assembly by inserting the hinge pins into the holes in the hinges. Reinstall the front vent by aligning the top edge first, then pressing the bottom edge into place. Thread the two screws to secure them, plug the power cord back in, or restore the power supply, and your microwave oven should be ready for use. We hope this solves your problem!
Was this helpful?
Thank you for voting!
Kenneth
March 19, 2025
Some of the number keys are pressed but don’t respond. 6,7,8 do not respond.
For model number PLMV169DCD
Hi Kenneth,
Thank you for your question. If some of the numbers on the touchpad, part number FIX979935, do not respond when you touch them, they may be worn. Try using a hair dryer on a low heat setting and gently press the buttons to see if you can get them to work again. If this does not resolve the issue, you will need to replace the touchpad. We hope this helps!
I first removed the top plate above the microwave door (3 screws), then I removed the plate containing the buttons and clock. The microwave has 3 relay switches and they are in a little holder. The holder was too difficult to remove so I just removed the bottom switch and replaced. The microwave started right up.
Removed the 3 screws to drop the lower panel and, removeed the turn table plate and ring. Then removed the 2 screws holding the motor, the 2 wires attached to the motor and removed the old motor.Replaced the new motor in the reverse order. DO NOT FORGET TO UNPLUG THE MICROWAVE FIRST.
was told buy a repair person to check the door micro switches as it was a common problem. removed the top plastic air grill to get access to the screw that holds in place the control cover. After unplugging the unit, i took out the (2) screws that held in the switches and removed them (3). One switch was a bit melted so i tested it with a
... Read more 12 volt battery and it was bad. Ordered a new one from Part select and got it fast . Works great .