


Models
>
EI30SM55JSC
EI30SM55JSC Electrolux Microwave
Jump to:
Find Part by Name
Keep searches simple, eg. "belt" or "pump".
Diagrams for EI30SM55JSC
Viewing 4 of 4


Manuals & Guides for EI30SM55JSC
Click to downloadInstall
Installation Instructions
(1.89MB)
Install
Installation Instructions
(5.17MB)
Manual
Owner's Manuals
(0.89MB)
Wiring
Wiring Diagram
(0.71MB)
Keep searches simple, eg. "belt" or "pump".

$48.35
This aluminum filter helps keep your microwave’s exhaust system clean by catching grease while you cook. It’s about 7-7/8 inches wide and 5-7/8 inches deep, so be sure to measure your old one before o...
In Stock
Order now and your part arrives by Aug 6

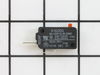
$71.47
The relay switch may also be known as the door micro switch and is a part for your microwave. The function of this part is to monitor the door latch and communicate whether the door latch is open or c...
In Stock
Order now and your part arrives by Aug 6

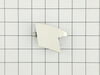
The door handle end cap attaches to the lower part of the door handle to cover the ends of the handle. The end cap is approximately 2 1/2” by 2” and is stainless in color. This is the lower end cap on...
In Stock
Order now and your part arrives by Aug 6

In Stock
Order now and your part arrives by Aug 6

This upper handle end cap is designed to cover and secure the end of the microwave door handle for a clean, finished appearance. Made from durable stainless steel, it clips firmly into place to provid...
In Stock
Order now and your part arrives by Aug 6

Special Order

In Stock
Order now and your part arrives by Aug 6

In Stock
Order now and your part arrives by Aug 6


Special Order


Common Problems and Symptoms for EI30SM55JSC
Viewing 4 of 4No heat
Fixed by these parts
How to fix it
Won’t turn on
Fixed by these parts
How to fix it
Door not closing properly
Fixed by these parts
How to fix it
Tray won’t turn
Fixed by these parts
How to fix it
Keep searches simple. Use keywords, e.g. "leaking", "pump", "broken" or "fit".
- Customer:
- Tim from Chicago, IL
- Parts Used:
- 5304493153
- Difficulty Level:
- Easy
- Total Repair Time:
- 30 - 60 mins
- Tools:
- Screw drivers
Timer would run but the microwave won't start
I first removed the top plate above the microwave door (3 screws), then I removed the plate containing the buttons and clock. The microwave has 3 relay switches and they are in a little holder. The holder was too difficult to remove so I just removed the bottom switch and replaced. The microwave started right up.
Was this instruction helpful to you?
Thank you for voting!
- Customer:
- Steve from Moorhead, MN
- Parts Used:
- 5304493153
- Difficulty Level:
- Easy
- Total Repair Time:
- Less than 15 mins
- Tools:
- Pliers, Screw drivers
microwave wouldn't turn on but timer worked.
was told buy a repair person to check the door micro switches as it was a common problem. removed the top plastic air grill to get access to the screw that holds in place the control cover. After unplugging the unit, i took out the (2) screws that held in the switches and removed them (3). One switch was a bit melted so i tested it with a
... Read more
12 volt battery and it was bad. Ordered a new one from Part select and got it fast . Works great .
Read less
Was this instruction helpful to you?
Thank you for voting!
- Customer:
- Betty from Kimball, TN
- Parts Used:
- 5304493153
- Difficulty Level:
- Easy
- Total Repair Time:
- 15 - 30 mins
- Tools:
- Pliers, Screw drivers
Microwave would count down but not run
After unplugging the unit remove the control face buy removing the screws. All three door switchs are on a bracket on the left. Remove the two screws holding the bracket in place and pull out. Disconnect the wires from the three switches and test each switch indivually to determine the bad one. I used a multimeter set on ohms.Replace the
... Read more
bad switch with the new one and replace all the wires. Reassemble the unit and you are good to go.
Read less
Was this instruction helpful to you?
Thank you for voting!