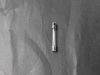
This front rack support helps stabilize and securely position a rack within the appliance. Its sturdy design ensures proper alignment and safe support during loading and unloading.
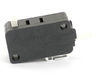
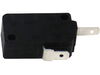
This switch is a replacement electrical component designed to control power or operational states. It is commonly replaced when activation becomes unreliable, intermittent, or fails completely.
This switch controls specific operational modes within the appliance. Faulty switches can cause inconsistent performance, failure to activate functions, or intermittent operation. Replacement restores...
This turntable supports smooth rotation during operation to promote even performance. Designed for stability and durability, it helps ensure consistent results and reliable movement.
This Bosch grill grid provides a stable, evenly heated surface for grilling and roasting inside your microwave, enhancing cooking performance and cleanup convenience. Crafted from durable metal, it fi...
Ask our experts a question about this part and we'll get back to you as soon as possible!
1 question answered by our experts.
< Prev
1
Next >
Sort by:
Search filter:
Clear Filter
Your search term must have 3 or more characters.
Keep searches simple. Use keywords, e.g. "leaking", "pump", "broken" or "fit".
Sorry, we couldn't find any existing answers that matched. Try using some different or simpler keywords, or submit your new question by using the "Ask a Question" button above!
Rebecca
May 26, 2022
Microwave will not turn on just hums
For model number HMV8053U
Hi Rebecca,
Thank you for your question. If your microwave makes humming noise and will not turn on, the magnetron, which is used to generate heat, may no longer be working correctly and may need to be replaced. If the microwave hums when it is not in use, you may also have a defective door switch. You will need to verify which part is causing the issue. We have included some links that you may reference on how to check these parts and some others as well. For safety reasons, since the microwave capacitor can still store electricity even when the microwave is unplugged, it is usually advised that you discharge the capacitor before any attempt at repair. We have included a link on how to do so. Once you have determined the part you need, please feel free to call customer service. We are open 7 days a week and anyone will be happy to assist you. We look forward to hearing from you!
Unplug microwave. Removed 2 screws from the top of the microwave to remove the top plastic strip carefully because the tabs can break off. Remove one screw above the control panel and one screw underneath the control panel. The control panel should come out. Take a picture of the wiring connections to help identify how to put it back toge
... Read morether. Carefully disconnect each wire set using a needle nose plier if needed. There are 3 sets of wires that go to the 3 door switches. After the control panel is removed there are 2 or three screws to remove that hold the door latch mechanism. With the door open, entirely remove the latch mechanism. Pay attention to the 3 switches, one has a different number on it and the other two have the same number but differ by being normally closed and normally open. You can test them or just replace them. Note I ordered the 3 switches by part number but got 1 switch that was incorrect and was the same as the other one. There is a plastic tab that needs to be depressed at the bottom of the switch casing in order to get the switch out. The problem with my microwave ended up being the lever was worn visibly by door misalignment with the latch. One of the screws holding the latch in position was missing. The door was not consistently activating the lever and the bottom switch. Replaced the latch, lever and two of the 3 switches, even though they didn’t need it. Check door alignment with latch. Reassemble.
Replaced fuse and switches.This is an undercabinet microwave. The fuse is located in top right but there is no access from the front of the microwave necessitating complete removal of the microwave from the cabinets and then taking the microwave cover off. This is a terrible design, Instead, I cut the vent grate on the top
... Read moreright front of the microwave to access the fuse. replaced the fuse. Switches were relatively easy to replace...being careful to not pull wires out of connectors or breaking small plastic tongs and clips. Microwave is still blowing fuses though. door alignment may be off. Again, terrible design and lousy product quality.