


Models
>
HMV8051U
HMV8051U (01) Bosch Microwave
Jump to:
Find Part by Name
Keep searches simple, eg. "belt" or "pump".
Diagrams for HMV8051U
Viewing 6 of 6


Keep searches simple, eg. "belt" or "pump".

In Stock
Order now and your part arrives by Aug 3

$9.85
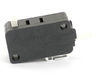
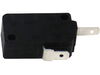
This switch is a replacement electrical component designed to control power or operational states. It is commonly replaced when activation becomes unreliable, intermittent, or fails completely.
In Stock
Order now and your part arrives by Aug 3

$9.85
This switch controls specific operational modes within the appliance. Faulty switches can cause inconsistent performance, failure to activate functions, or intermittent operation. Replacement restores...
In Stock
Order now and your part arrives by Aug 3

In Stock
Order now and your part arrives by Aug 3

$73.66
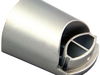
Engineered for durability and a clean finish, this stainless steel microwave door handle provides a reliable grip and restores the original functionality of your appliance. Manufactured to OEM specifi...
In Stock
Order now and your part arrives by Aug 3

In Stock
Order now and your part arrives by Aug 3

In Stock
Order now and your part arrives by Aug 3

In Stock
Order now and your part arrives by Aug 3

In Stock
Order now and your part arrives by Aug 3

$56.24
This glass dish tray provides a stable surface for heating or cooking while allowing even heat distribution. Made from durable, heat-resistant glass, it is replaced when cracked, chipped, or missing t...
On Order

In Stock
Order now and your part arrives by Aug 3

In Stock
Order now and your part arrives by Aug 3
Common Problems and Symptoms for HMV8051U
Viewing 2 of 2Won’t turn on
Fixed by these parts
How to fix it
Door not closing properly
Fixed by these parts
How to fix it

Keep searches simple. Use keywords, e.g. "leaking", "pump", "broken" or "fit".
Intermittently, when closing the microwave door it would break the circuit at the breaker box
Unplug microwave. Removed 2 screws from the top of the microwave to remove the top plastic strip carefully because the tabs can break off. Remove one screw above the control panel and one screw underneath the control panel. The control panel should come out. Take a picture of the wiring connections to help identify how to put it back toge
... Read more
ther. Carefully disconnect each wire set using a needle nose plier if needed. There are 3 sets of wires that go to the 3 door switches. After the control panel is removed there are 2 or three screws to remove that hold the door latch mechanism. With the door open, entirely remove the latch mechanism. Pay attention to the 3 switches, one has a different number on it and the other two have the same number but differ by being normally closed and normally open. You can test them or just replace them. Note I ordered the 3 switches by part number but got 1 switch that was incorrect and was the same as the other one. There is a plastic tab that needs to be depressed at the bottom of the switch casing in order to get the switch out. The problem with my microwave ended up being the lever was worn visibly by door misalignment with the latch. One of the screws holding the latch in position was missing. The door was not consistently activating the lever and the bottom switch. Replaced the latch, lever and two of the 3 switches, even though they didn’t need it. Check door alignment with latch. Reassemble.
Read less
Was this instruction helpful to you?
Thank you for voting!
- Customer:
- John from DURANGO, CO
- Parts Used:
- 00617262
- Difficulty Level:
- Really Easy
- Total Repair Time:
- Less than 15 mins
- Tools:
- Screw drivers
Replace door handle support
The door just lifts off of the Microwave and then I popped the plastic frame off of the inside of the door with a flat head screwdriver. Next I unscrewed the metal frame with a phillips screwdriver and then the old broken support. Once I put the new handle support on with the handle then just put the 2 frame parts back on & replace the do
... Read more
or to the microwave. It's easy and there are youtube videos if you have a problem
Read less
Was this instruction helpful to you?
Thank you for voting!
- Customer:
- STEPHEN from SAN MATEO, CA
- Parts Used:
- 00617229
- Difficulty Level:
- A Bit Difficult
- Total Repair Time:
- 15 - 30 mins
- Tools:
- Pliers, Screw drivers
Fuse Blows when door is opened
Replaced fuse and switches.This is an undercabinet microwave.
The fuse is located in top right but there is no access from the front of the microwave necessitating complete removal of the microwave from the cabinets and then taking the microwave cover off.
This is a terrible design,
Instead, I cut the vent grate on the top ... Read more right front of the microwave to access the fuse.
replaced the fuse.
Switches were relatively easy to replace...being careful to not pull wires out of connectors or breaking small plastic tongs and clips.
Microwave is still blowing fuses though. door alignment may be off.
Again, terrible design and lousy product quality.
Read less
Was this instruction helpful to you?
Thank you for voting!