


Models
>
MR6699GB
MR6699GB Amana Microwave
Jump to:
Find Part by Name
Keep searches simple, eg. "belt" or "pump".
Diagrams for MR6699GB
Viewing 3 of 3


Keep searches simple, eg. "belt" or "pump".

$92.98
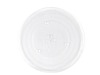
If you discover that the glass cooking tray in your microwave is damaged, you may have to replace it to operate the microwave properly. The glass cooking tray connects to the turntable of the microwav...
In Stock
Order now and your part arrives by Jul 23

In Stock
Order now and your part arrives by Jul 23

In Stock
Order now and your part arrives by Jul 23

In Stock
Order now and your part arrives by Jul 23

In Stock
Order now and your part arrives by Jul 23

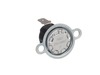
This thermostat (part number DE47-20059B) is for microwaves. Thermostat DE47-20059B is a safety device that shuts off the microwave if it overheats. Because high-voltage capacitors in a microwave can ...
In Stock
Order now and your part arrives by Jul 23

$53.21
The turntable tray support holds the turntable tray while allowing the tray to rotate.
In Stock
Order now and your part arrives by Jul 23

In Stock
Order now and your part arrives by Jul 23

In Stock
Order now and your part arrives by Jul 23

$30.40
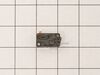
This light socket (part number DE47-00006A) is for microwaves. Light socket DE47-00006A provides power to the light while holding the light bulb in place. Because high-voltage capacitors in a microwav...
In Stock
Order now and your part arrives by Jul 23


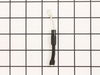
This light bulb is three inches long. It is forty watt light bulb that is used with microwaves.
No Longer Available
Common Problems and Symptoms for MR6699GB
Viewing 4 of 4No heat
Fixed by these parts
How to fix it
Doesn’t shut off
Fixed by these parts
How to fix it
Won’t turn on
Fixed by these parts
How to fix it
Tray won’t turn
Fixed by these parts
How to fix it

Keep searches simple. Use keywords, e.g. "leaking", "pump", "broken" or "fit".
- Customer:
- Lisa from PARADISE, PA
- Parts Used:
- WPR9800486
- Difficulty Level:
- Easy
- Total Repair Time:
- 15 - 30 mins
- Tools:
- Pliers, Screw drivers
no heat
I looked up the #1 reason for no heat for my microwave on the site , and using my model number found that 92% of the time it was the Black Sleeve Diode. Ordered the $15 part, and installed it within 30 minutes. Most of the time was used for removing the built in microwave and removing the cover. Replaced the diode by finding it on the
... Read more
diagram that I printed from this site (free). Very relieved that we don't need to have our custom cabinetry re-sized to accommodate a new microwave. Thank you!
Read less
Was this instruction helpful to you?
Thank you for voting!
- Customer:
- John from SANTA CLARA, CA
- Parts Used:
- WPR9800486
- Difficulty Level:
- Really Easy
- Total Repair Time:
- 30 - 60 mins
- Tools:
- Screw drivers
No heat
Removed case,
Discharged HV capacitor and removed cooling fan.
Unscrewed ground end of HV diode and unplugged from HV capacitor.
Installed new diode by reversing the order. In my case, the problem was the magnetron was bad, so I replaced it as well.
Discharged HV capacitor and removed cooling fan.
Unscrewed ground end of HV diode and unplugged from HV capacitor.
Installed new diode by reversing the order. In my case, the problem was the magnetron was bad, so I replaced it as well.
Was this instruction helpful to you?
Thank you for voting!
- Customer:
- ron from AKRON, OH
- Parts Used:
- DE67-40063A
- Difficulty Level:
- Really Easy
- Total Repair Time:
- Less than 15 mins
- Tools:
- Screw drivers
Glass covering cook top lamp was broken
By removing one phillips headed screw, a metal frame pivoted down for easy replacement of glass plate.
Was this instruction helpful to you?
Thank you for voting!