


Models
>
MVH-920
MVH-920 (P7664702M) Amana Microwave
Jump to:
Find Part by Name
Keep searches simple, eg. "belt" or "pump".
Diagrams for MVH-920
Viewing 7 of 7


Keep searches simple, eg. "belt" or "pump".

$5.54
This is a ceramic fuse for a microwave. It is just over 1 inch long. This fuse is 20 amps and 250 volts. This part powers your microwave. If your appliance is not heating properly, or is not turning o...
In Stock
Order now and your part arrives by Apr 6

In Stock
Order now and your part arrives by Apr 6


In Stock
Order now and your part arrives by Apr 6

Special Order

$21.82
This rivet is an inch and a half long. It is used for many washing machines, microwaves, refrigerators, dryers, and ranges. Use of this rivet requires a rivet tool.
In Stock
Order now and your part arrives by Apr 6
 – Part Number: WP3147265")
On Order

In Stock
Order now and your part arrives by Apr 6

$21.82
This is a genuine OEM replacement part. This nut is used in a number of appliances. Most often it can be found in the assembly of ranges, air conditioners, cook tops, washers, microwave oven combos, r...
Special Order


In Stock
Order now and your part arrives by Apr 6

This gasket is gray and is made of a spongy material. This gasket is used for many air conditioners. It will come to you at the length you specify: one foot, two feet, whatever you require. When order...
No Longer Available
Questions and Answers
We're sorry, but our Q&A experts are temporarily unavailable.
Please check back later if you still haven't found the answer you need.
Common Problems and Symptoms for MVH-920
Viewing 2 of 2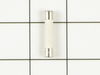

Keep searches simple. Use keywords, e.g. "leaking", "pump", "broken" or "fit".
- Customer:
- tad from tamarack, MN
- Parts Used:
- WPM0805101
- Difficulty Level:
- Really Easy
- Total Repair Time:
- Less than 15 mins
- Tools:
- Pliers, Screw drivers
microwave oven blew fuse
First I removed upper front grill by removing two Philips head screws on top and pulling off. This exposed the Philips head screw which holds control panel in place. After removing screw I pushed up on panel and it came off to expose fuse. With needle nose pliers I removed old fuse and again with pliers held new fuse in position. With th
... Read more
e help of a bladed screwdriver, I pushed new fuse into holder, then replaced panel, screw and grill. This took less than 15 minutes even as one of the wires on control panel pulled out of connection and took some time to locate where to reconnect, otherwise was an easy fix
.
.
Read less
Was this instruction helpful to you?
Thank you for voting!
- Customer:
- Jeffrey from Marietta, GA
- Parts Used:
- WP95292
- Difficulty Level:
- Really Easy
- Total Repair Time:
- Less than 15 mins
- Tools:
- Screw drivers
Light Bulb burned out
Removed the two screws that hold the back glass in place. Rotated old bulb out of it's lamp fixture and replaced it with the new bulb. Replaced glass and reinstalled the screws.
The hardest part was finding the bulb ... a very unique 18W flourescent. I wasted a couple of hours trying to locate it locally at my regular suppliers. Th ... Read more e order at PatsSelect was easy and direct and the bulb was on my doorstep 3 days later .. an exact fit. Thanks guys.
The hardest part was finding the bulb ... a very unique 18W flourescent. I wasted a couple of hours trying to locate it locally at my regular suppliers. Th ... Read more e order at PatsSelect was easy and direct and the bulb was on my doorstep 3 days later .. an exact fit. Thanks guys.
Read less
Was this instruction helpful to you?
Thank you for voting!
- Customer:
- Al from Abbeville, AL
- Parts Used:
- WP3147265
- Difficulty Level:
- Really Easy
- Total Repair Time:
- Less than 15 mins
- Tools:
- Pliers, Screw drivers
The switch on the exhaust fan for the grill part of the stove went bad. I found the part on your site easily , ordered it and got it within 4 days.
I simply looked at the new switch , to see how it fastened in the stove. It had plastic clips that were easily depressed to allow the swithch to be removed. I removed it , (after turning the circuit breaker off to the stove) removed the three wires , and replace them on the new switch and simply pushed it in the space. It snapped in place
... Read more
, and the job was done . Works great!
Read less
Was this instruction helpful to you?
Thank you for voting!