


Models
>
GSC309PVB00
GSC309PVB00 Whirlpool Microwave Oven Combo
Jump to:
Find Part by Name
Keep searches simple, eg. "belt" or "pump".
Diagrams for GSC309PVB00
Viewing 10 of 10


 Diagram and Parts List for Whirlpool Microwave Oven Combo")


Manuals & Guides for GSC309PVB00
Click to downloadInstall
Installation Instructions
(1.59MB)
Manual
Owner's Manuals
(6.61MB)
Manual
Owner's Manuals
(4.76MB)
Keep searches simple, eg. "belt" or "pump".

$105.26
The glass panel on the door of your range allows you to see your food as it is being cooked in the oven. If it has become damaged, broken, or so grimy that it is beyond cleaning, it should be replaced...
In Stock
Order now and your part arrives by Jul 23

$73.24
This is a genuine OEM replacement turntable tray for your microwave. The tray rotates while the microwave is operating, to help your food heat evenly. If your tray has become chipped, cracked, or comp...
In Stock
Order now and your part arrives by Jul 23

$83.81
This chrome oven rack is a genuine replacement component designed to fit a variety of standard ovens. Measuring approximately 24.76 inches wide by 15.78 inches deep, it provides a stable surface for b...
In Stock
Order now and your part arrives by Jul 23

$21.82
This is a screw and it is made for multiple appliances in your home. This model is called a sheet metal screw because it has sharp points, and the threads are closer together. This screw is designed t...
In Stock
Order now and your part arrives by Jul 23

$24.15
This 18 ml bottle of white appliance touch-up paint is used to cover scratches or marks on your appliance. The white touch-up paint can be used on refrigerators, microwaves, ranges, clothes dryers, an...
In Stock
Order now and your part arrives by Jul 23

$73.24
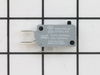
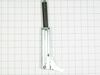
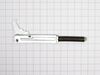
This temperature sensor detects the temperature within the oven cavity.
In Stock
Order now and your part arrives by Jul 23

$53.58
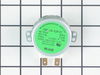
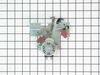
This part establishes and maintains the internal temperature of the oven cavity.
In Stock
Order now and your part arrives by Jul 23

$190.15
Exterior portion only. This is NOT the entire door assembly.
In Stock
Order now and your part arrives by Jul 23

$49.29
This is a replacement light bulb to illuminate the inside of your oven. It is 25 watts and 120 volts. Please wear gloves during replacement if your existing bulb is shattered. Consider ordering a spar...
In Stock
Order now and your part arrives by Jul 23

In Stock
Order now and your part arrives by Jul 23
 – Part Number: W11675844")
$46.07
This part is the replacement door gasket for your oven. It is now made of black rubber and is sold individually. The door gasket runs along the circumference of the oven door and creates a seal that i...
In Stock
Order now and your part arrives by Jul 23

In Stock
Order now and your part arrives by Jul 23
Common Problems and Symptoms for GSC309PVB00
Viewing 12 of 12Little to no heat when baking
Fixed by these parts


How to fix it
Element will not heat
Fixed by these parts
How to fix it
Oven is too hot
Fixed by these parts
How to fix it
Will Not Start
Fixed by these parts

How to fix it
Oven not heating evenly
Fixed by these parts
How to fix it
Tray won’t turn
Fixed by these parts


How to fix it
Won’t turn on
Fixed by these parts
How to fix it
Door not closing properly
Fixed by these parts

How to fix it
Door won’t close
Fixed by these parts
How to fix it
Door won’t open after self cleaning cycle
Fixed by these parts
How to fix it
No heat
Fixed by these parts
How to fix it
Little to no heat when broiling
Fixed by these parts

How to fix it


")


Keep searches simple. Use keywords, e.g. "leaking", "pump", "broken" or "fit".
- Customer:
- Robert from Wildwood, MO
- Parts Used:
- WP4449259
- Difficulty Level:
- Easy
- Total Repair Time:
- 30 - 60 mins
- Tools:
- Screw drivers
Broke the glass panel inside the oven door -- dropped a baking dish on the glass!
Easily removed the door from the oven by releasing clips attached to the door hinge -- very nicely engineered. Removed about 6 philips head screws to allow the door assembly to be taken apart for access to the glass. Lifted out the broken glass, cleaned the inside of the door, installed the new glass, reassembled the door (a two minute
... Read more
project), and reattached the door to the oven. Cleaning the inside of the door took longer than the actual repair!
Read less
Was this instruction helpful to you?
Thank you for voting!
- Customer:
- Frederick from St. Louis, MO
- Parts Used:
- WP9759243
- Difficulty Level:
- Easy
- Total Repair Time:
- 15 - 30 mins
- Tools:
- Nutdriver, Pliers
No heat after cleaning oven
This built-in oven was slid out of it's space and set on a box. I removed the back cover with nut driver and located the safety overload device. removed nuts and used pliers to remove wires and replace them. The power must be off to do this repair.Replaced the cover and slid back into place. This could be a lot more difficult if your pow
... Read more
er cord or gas line is not long enough to make it out of your wall space. Or of your oven is attached well to the frame.
Read less
Was this instruction helpful to you?
Thank you for voting!
- Customer:
- Ian from Shoreview, MN
- Parts Used:
- W10200754
- Difficulty Level:
- A Bit Difficult
- Total Repair Time:
- 15 - 30 mins
- Tools:
- Screw drivers
Front glass broke on the oven door
The glass broke after I took the oven door off to tighten the handle which had become lose.....There are 4 screws and one of th 4 had come out , hence the lose handle....So I tightened the 4 screws which were in a metal bracket only to find out under all the foil wrap was glass, and by tightning the screws they fractured the glass into a
... Read more
million little shards of glass...who knew the glass was the full size of the door, and who knew the metal bracket was over top of the glass... too much presurre and the glass explodes. So what should have been an easy re-tighten job cost me alot of time and money.rather than tighten the 4 screws down too hard and break the glass agin, I gentley tightened and used lock tight glue so the screws would not come out again.....Hope that saves someone the problems i had to go through.
Read less
Was this instruction helpful to you?
Thank you for voting!