


Models
>
RM235PXL0
RM235PXL0 Whirlpool Microwave Oven Combo
Jump to:
Find Part by Name
Keep searches simple, eg. "belt" or "pump".
Diagrams for RM235PXL0
Viewing 9 of 9


Manuals & Guides for RM235PXL0
Click to downloadKeep searches simple, eg. "belt" or "pump".

$19.75
This is a genuine OEM 40-Watt replacement light bulb that is compatible with various types of appliances. It has a frosted glass bulb with a standard metal socket base, making it easy to screw and uns...
In Stock
Order now and your part arrives by Jul 30

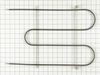
$78.27
The bake element is found in the bottom of your oven, and is responsible for providing the heat for cooking. If your oven is not coming up to temperature, the temperature fluctuates, or it is not heat...
In Stock
Order now and your part arrives by Jul 30

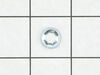
$7.60
This is a multi-use screw and can be used on a variety of appliances. The measurements of the screw are: 8/18 x 3/8. *Please note: the screw is sold individually. Refer to the manual provided by the m...
In Stock
Order now and your part arrives by Jul 30

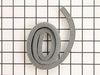
$24.00
This oven control knob is a genuine OEM replacement part for your range. The control knob is made of black plastic and fits onto a double flat shaft. This part is used to control the oven temperature,...
In Stock
Order now and your part arrives by Jul 30

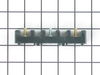
This genuine OEM part is a lint trap housing seal for your dryer. This part is used to form an airtight seal at the back of the dryer drum and the lint duct. The foam seal is approximately 28 inches i...
In Stock
Order now and your part arrives by Jul 30

This is a multi-use cover screw. It fits appliances such as dryers, ranges, washers, dishwashers, refrigerators, air conditioners, washer dryer combos, freezers, wall ovens, microwaves, dehumidifiers,...
In Stock
Order now and your part arrives by Jul 30

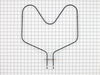
$83.52
This broil element is found on the roof of the oven and has push-on terminals.
In Stock
Order now and your part arrives by Jul 30

$50.36
This broiler pan and roasting rack set features a two-piece design that allows fat to drain away for cleaner cooking and reduced splatter. Made with a durable, high-heat resistant porcelain finish, it...
In Stock
Order now and your part arrives by Jul 30


In Stock
Order now and your part arrives by Jul 30

In Stock
Order now and your part arrives by Jul 30

In Stock
Order now and your part arrives by Jul 30
Common Problems and Symptoms for RM235PXL0
Viewing 10 of 10Little to no heat when baking
Fixed by these parts
How to fix it
Element will not heat
Fixed by these parts
How to fix it
Oven not heating evenly
Fixed by these parts
How to fix it
Little to no heat when broiling
Fixed by these parts
How to fix it
Noisy
Fixed by these parts
How to fix it
Will Not Start
Fixed by these parts
How to fix it
Oven is too hot
Fixed by these parts
How to fix it
Not Heating
Fixed by these parts
How to fix it
Too hot
Fixed by these parts
How to fix it
Door won’t close
Fixed by these parts
How to fix it


Keep searches simple. Use keywords, e.g. "leaking", "pump", "broken" or "fit".
- Customer:
- Bradley from Lexington, OK
- Parts Used:
- WP308180
- Difficulty Level:
- Easy
- Total Repair Time:
- 15 - 30 mins
- Tools:
- Pliers, Screw drivers
lower back element stopped working
I got the model number and ordered a replacement element from partselect, was shipped quickly and I installed it in about 30 minutes, it now works great
Was this instruction helpful to you?
Thank you for voting!
- Customer:
- Richard from Pattonsburg, MO
- Parts Used:
- WP308180
- Difficulty Level:
- Really Easy
- Total Repair Time:
- Less than 15 mins
- Tools:
- Pliers, Screw drivers
Oven stopped heating.....
Removed the oven racks....
Removed the two screws holding element in place...
Disconnected spade lug connectors from old heating element.
Connected spade lug connectors to new heating element.
Reinstalled screws.....replaced oven racks....mission acomplished!
Removed the two screws holding element in place...
Disconnected spade lug connectors from old heating element.
Connected spade lug connectors to new heating element.
Reinstalled screws.....replaced oven racks....mission acomplished!
Was this instruction helpful to you?
Thank you for voting!
- Customer:
- Harry from Charlotte, NC
- Parts Used:
- WP308180
- Difficulty Level:
- Easy
- Total Repair Time:
- 15 - 30 mins
- Tools:
- Pliers, Screw drivers
The bake element stopped working.
First I cut off the power to the stove and double-checked to make sure no current was flowing to the unit. There were two screws attaching the bake element plate to the oven. I unscrewed the two screws and carefully pulled the bake element away from the oven exposing the contact wires. I carefully loosened the wire contacts from the bake
... Read more
element, slid the bake element off the contacts and then slid the new bake element onto the wire contacts. I gently clamped the contacts onto the bake element, pushed the wires back into the back of the oven and screwed back the bake element plate onto the interior of the oven. I turned on the power to test my work and I was done.
Read less
Was this instruction helpful to you?
Thank you for voting!