


Models
>
KBHV109PMT00
KBHV109PMT00 KitchenAid Microwave Oven Combo
Jump to:
Find Part by Name
Keep searches simple, eg. "belt" or "pump".
Diagrams for KBHV109PMT00
Viewing 6 of 6


Manuals & Guides for KBHV109PMT00
Click to downloadInstall
Installation Instructions
(0.32MB)
Install
Installation Instructions
(2.35MB)
Manual
Owner's Manuals
(2.68MB)
Specs
Product Specifications Sheet
(0.06MB)
Keep searches simple, eg. "belt" or "pump".

$73.24
This is a genuine OEM replacement turntable tray for your microwave. The tray rotates while the microwave is operating, to help your food heat evenly. If your tray has become chipped, cracked, or comp...
In Stock
Order now and your part arrives by Jul 20

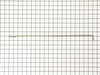
This is to be used with Stainless Steel models.
In Stock
Order now and your part arrives by Jul 20

In Stock
Order now and your part arrives by Jul 20

In Stock
Order now and your part arrives by Jul 20

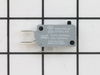
$48.21
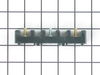
This door interlock switch ensures your microwave operates only when the door is securely closed. It communicates the door’s position to the control board, helping prevent accidental use. It’s often r...
In Stock
Order now and your part arrives by Jul 20

In Stock
Order now and your part arrives by Jul 20

$7.60
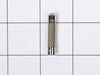
Follow appropriate safety practices when installing your range screw. Sold individually.
In Stock
Order now and your part arrives by Jul 20

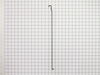
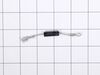
NOTE: This spring is not to be used on stainless steel models. Use with black, white or bisque models only. Stainless models need a stronger spring. For Stainless models use PS11742585.
In Stock
Order now and your part arrives by Jul 20


In Stock
Order now and your part arrives by Jul 20

In Stock
Order now and your part arrives by Jul 20

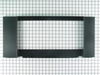
$149.72
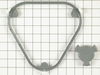
Designed to hold the microwave door securely, this frame helps ensure proper sealing and safe operation. It’s a direct replacement for damaged or worn frames and should be installed by a professional ...
In Stock
Order now and your part arrives by Jul 20
Common Problems and Symptoms for KBHV109PMT00
Viewing 6 of 6Door not closing properly
Fixed by these parts
How to fix it
Won’t turn on
Fixed by these parts
How to fix it
Tray won’t turn
Fixed by these parts

How to fix it
No heat
Fixed by these parts
How to fix it
Will Not Start
Fixed by these parts
How to fix it
Element will not heat
Fixed by these parts
How to fix it

Keep searches simple. Use keywords, e.g. "leaking", "pump", "broken" or "fit".
- Customer:
- Lance from Angels Camp, CA
- Parts Used:
- WPW10440740, WP4452396, WP4451009
- Difficulty Level:
- A Bit Difficult
- Total Repair Time:
- More than 2 hours
- Tools:
- Screw drivers
Light out and Door spring broken
Remove side deco strips to remove screws that hold to cabinet. Pull microwave out and set on saw horses (power cable should be long enough to do this). Remove screws to top cover and lift enough to remove all connectors from the front panel pcb. Remove grounding wires from next top lid. Remove connectors from transformer on rigt side and
... Read more
the two connectionss at the rear fan assy. Remove top cover/vent assy. Remove the next top cover to get access to the light bulb assy. Use a cloth or kleenex while handling the new bulb as you replace it. The clip thta holds the bulb is easily released and use reverse procedure when assembling. For springs those can be replaced without removing the microwave from the cabinet. Remove the 2 screws that hold the door together accessed from the inside of the door at top. Pull door up to release from the clip at the bottom. Remove the broken spring and replace with new one. Use a screwdriver to help twist the torsion spring to clip into place. Replace door assy in reverse order.
Read less
Was this instruction helpful to you?
Thank you for voting!
- Customer:
- Liza from Monterey, CA
- Parts Used:
- W11373838
- Difficulty Level:
- Really Easy
- Total Repair Time:
- Less than 15 mins
Microwave glass turntable when pop
After popping the last few kernals of popcorn, we hear a different kind of pop sound come from our microwave oven. When we looking inside, we found that the glass turntable had broken unevenly in half. Although we didn't understand why it had happned, we did know we'd be without the use of the microwave without a new one. After less th
... Read more
an 10 minutes surfing online, I had found the correct part on PartSelect.com and had arranged to have it shipped to me by speedy delivery. Once it arrived, I just popped the new turntable into the microwave and used the box to dispose of the broken one. It could not have been easier and it saved me the cost of a service call and likely further delay.
Read less
Was this instruction helpful to you?
Thank you for voting!
- Customer:
- Perry from Farmingdale, NY
- Parts Used:
- WP4452396
- Difficulty Level:
- A Bit Difficult
- Total Repair Time:
- 15 - 30 mins
- Tools:
- Screw drivers
Tension spring replacement
Here's a 21st century tip for all repairs: Get out your cell phone and take pictures of the steps as you go so you'll always have a reference if you forget something.
The replacement of the tension spring is easy. Getting there is the hard part. First, you need to remove the grill between the oven and microwave doors. There are ... Read more 2 screw in the center and one on each end. Then just pull it away from the oven. This allows access to the the two clips that hold the bottom of the door on.
Next, remove the 2 u-shaped clips on the bottom of the door on both sides. 1 screw each. The bottom of the door will be loose, so be careful on the next step.
Open the door. Clamping the outer part of the door and the inner part with one hand, remove the 2 screws on the the inside of the door cover. They are closest to you at 10 and 2 o'clock. The outer door trim will now come off. Put it aside and close the door. On the bottom of the door frame, locate and remove 2 more screws about 6 inches from the ends and the inside plastic cover will be free to remove.
Now you will be able to remove the broken tension spring by lifting and threading it out of the groove it sits in. Replace with the new tension spring by threading the looped side into that groove first and criss-crossing it over the other tension spring. Then locate the hole on the opposite hinge and slide it in place. This will lock it in. Reverse the procedure for putting the door back together as you did removing it. You may want to get someone to help you hold the door open considering the new spring will snap it shut without the weight of the door on it. After you reassemble the door, replace the vent grill between the doors and you're done.
Read less
Was this instruction helpful to you?
Thank you for voting!