


Models
>
38FB-42TXW
38FB-42TXW Magic Chef Range
Jump to:
Find Part by Name
Keep searches simple, eg. "belt" or "pump".
Diagrams for 38FB-42TXW
Viewing 3 of 3


Keep searches simple, eg. "belt" or "pump".

$11.98
This chrome drip bowl is an OEM approved replacement part sourced directly from the manufacturer. Drip bowls are a part for your cooktop, positioned underneath the burner to catch spills. This drip bo...
In Stock
Order now and your part arrives by Apr 9

$8.70
This chrome drip bowl is an OEM approved replacement part designed for use with various models of electric ranges and cooktops. This drip bowl fits under 6-inch burner elements and has a diameter of a...
In Stock
Order now and your part arrives by Apr 9

$18.54
This is a genuine OEM 40-Watt replacement light bulb that is compatible with various types of appliances. It has a frosted glass bulb with a standard metal socket base, making it easy to screw and uns...
In Stock
Order now and your part arrives by Apr 9

$43.92
This is a factory-certified oven sensor kit with two harness adapters. Its purpose is to sense the temperature inside the oven. Replacing this part can fix an oven that is not reaching the proper temp...
In Stock
Order now and your part arrives by Apr 9

The manufacturer suggests replacing the receptacle at the same time.
In Stock
Order now and your part arrives by Apr 9

$36.42
This temperature sensor detects the temperature within the oven cavity.
In Stock
Order now and your part arrives by Apr 9

$27.83
It provides a way of connecting individual electrical wires and offers protection of the device from electrical surges (voltages and/or currents).
In Stock
Order now and your part arrives by Apr 9

In Stock
Order now and your part arrives by Apr 9

In Stock
Order now and your part arrives by Apr 9

In Stock
Order now and your part arrives by Apr 9
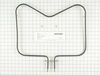
 – Part Number: WPY04000041")
This spade style bake element with push on wire terminals is 15 inches long and 19 inches wide. The depth of the terminals is three inches.
In Stock
Order now and your part arrives by Apr 9

Questions and Answers
We're sorry, but our Q&A experts are temporarily unavailable.
Please check back later if you still haven't found the answer you need.
Common Problems and Symptoms for 38FB-42TXW
Viewing 11 of 11Little to no heat when baking
Fixed by these parts


How to fix it
Element will not heat
Fixed by these parts


How to fix it
Oven not heating evenly
Fixed by these parts
How to fix it
Oven is too hot
Fixed by these parts
How to fix it
Will Not Start
Fixed by these parts
How to fix it
Touchpad does not respond
Fixed by these parts
How to fix it
Will not program
Fixed by these parts
How to fix it
Gas igniter glows, but will not light
Fixed by these parts
How to fix it
Door won’t close
Fixed by these parts

How to fix it
Door won’t open after self cleaning cycle
Fixed by these parts
How to fix it
Little to no heat when broiling
Fixed by these parts
How to fix it


Keep searches simple. Use keywords, e.g. "leaking", "pump", "broken" or "fit".
- Customer:
- Donna from Dallas, TX
- Parts Used:
- WPW10196405, WPW10196406
- Difficulty Level:
- Really Easy
- Total Repair Time:
- Less than 15 mins
Drip bowls were burned and tacky
First I removed the old bowls and replaced them with the new.
Was this instruction helpful to you?
Thank you for voting!
- Customer:
- John from Chester, VT
- Parts Used:
- WPW10196405, WPW10196406
- Difficulty Level:
- Really Easy
- Total Repair Time:
- Less than 15 mins
Drip bowls needed to be replaced
took old bowls out, put new bowls in, took a coffee break
Was this instruction helpful to you?
Thank you for voting!
- Customer:
- george from birmingham, AL
- Parts Used:
- 12001655
- Difficulty Level:
- Easy
- Total Repair Time:
- 15 - 30 mins
- Tools:
- Screw drivers
F1 code - gas over would not heat.
Repair tech checked oven and said the control panel was bad and needed to be replaced. The new control panel would cost over $450.00! I found that the oven sensor was bad and replaced it for $30.00. The old oven sensor had failed following a self cleaning cycle. I found that the wires coming out of it were burnt.
Replacing ... Read more the oven sensor was very easy. I removed the back panels 6 screws to gain access to the sensor's connection. I then removed the 2 screw that hold the sensor in place inside the oven and pulled the old sensor out through the oven. I reversed this process to place the new sensor in the oven.
Replacing ... Read more the oven sensor was very easy. I removed the back panels 6 screws to gain access to the sensor's connection. I then removed the 2 screw that hold the sensor in place inside the oven and pulled the old sensor out through the oven. I reversed this process to place the new sensor in the oven.
Read less
Was this instruction helpful to you?
Thank you for voting!