


Models
>
LMV1683SB
LMV1683SB (CBKELGA) LG Microwave
Jump to:
Find Part by Name
Keep searches simple, eg. "belt" or "pump".
Diagrams for LMV1683SB
Viewing 7 of 7


Manuals & Guides for LMV1683SB
Click to downloadKeep searches simple, eg. "belt" or "pump".

On Order

In Stock
Order now and your part arrives by Apr 10

$51.43
This glass tray offers a smooth, durable surface for holding items while allowing easy visibility and cleaning. Designed for everyday use, it supports organized storage. Replacing a cracked tray resto...
On Order

$25.10
This is the replacement charcoal filter for your microwave. It is approximately 8 inches by 5 inches. The charcoal filter removes cooking odors from the air that circulate through the microwave vent. ...
On Order

On Order

Special Order

In Stock
Order now and your part arrives by Apr 10

$17.44
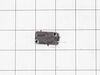
This bracket holds the metal or plastic flapper that closes off the exhaust duct when the fan is not running and opens when the fan turns on. If the exhaust fan on your microwave does not appear to be...
On Order

$14.16
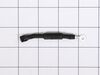
The locker, or door latch assembly fits to the inside of the microwave door, and keeps the door closed. If the door on your microwave oven doesn’t appear to close properly, you may have a problem with...
In Stock
Order now and your part arrives by Apr 10

$14.16
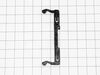
This metal vent damper door closes off the exhaust duct when the fan is not running to stop outside air from entering the microwave unit, and opens when the fan turns on to allow air to vent away from...
In Stock
Order now and your part arrives by Apr 10

$29.98
This mounting plate is a manufacturer-approved replacement part for your microwave. The mounting plate, or bracket, secures your above-range microwave in place against the wall. To conduct this repair...
On Order

$27.83
This turntable assembly, also known as a rotating ring, is a genuine OEM replacement part for your microwave. It is brown in color and about 10 inches in diameter. This part supports the glass turntab...
In Stock
Order now and your part arrives by Apr 10
Questions and Answers
We're sorry, but our Q&A experts are temporarily unavailable.
Please check back later if you still haven't found the answer you need.
Common Problems and Symptoms for LMV1683SB
Viewing 5 of 5No heat
Fixed by these parts

How to fix it
Door not closing properly
Fixed by these parts

How to fix it
Won’t turn on
Fixed by these parts
How to fix it
Tray won’t turn
Fixed by these parts


How to fix it
Doesn’t shut off
Fixed by these parts
How to fix it
Keep searches simple. Use keywords, e.g. "leaking", "pump", "broken" or "fit".
- Customer:
- Joshua from WHITE LAKE, MI
- Parts Used:
- 6600W1K001D, 6600W1K001C
- Difficulty Level:
- Very Easy
- Total Repair Time:
- 15 - 30 mins
- Tools:
- Screw drivers
Microwave would not rotate or heat up food.
After watching a few youtube videos, I used a phillips SD to take controll pannel off to access the switches that sense when microwave door is closed. Swapped out all 3 switched and mocrowave works like new. $20 fix (shipping included)
Was this instruction helpful to you?
Thank you for voting!
- Customer:
- Mike from PINEY FLATS, TN
- Parts Used:
- 3550W1A126D, 5893W3A002D
- Difficulty Level:
- Really Easy
- Total Repair Time:
- Less than 15 mins
- Tools:
- Pliers
The fan cover in top of the cooking area was burned.
The original cover was burned and actually caught on fire. Research informed me that food can splatter and stick to the cover. The particle will get hot enough to ignite the plastic cover. I ordered the cover and included the fan since it was so cheap, Replacement was super easy. Done in 10 minutes and made my wife happy. She was ready to
... Read more
buy a new microwave because she thought something was wrong with ours but food splatter was the cause. Parts were less than $10 + $6 shipping. Keep the inside of the microwave clean!!
Read less
Was this instruction helpful to you?
Thank you for voting!
- Customer:
- Jimmy from OZARK, MO
- Parts Used:
- 3501W1A019D
- Difficulty Level:
- Easy
- Total Repair Time:
- 30 - 60 mins
- Tools:
- Pliers, Screw drivers
One of the switches in a component that door activates when shut.
I replaced the whole component with all three switches in it even though only one switch was bad . Taking out one switch out of the holder unit would probably have damaged the unit that was holding the switches. Easy install and it works great again .
Was this instruction helpful to you?
Thank you for voting!