


Models
>
11060222510
11060222510 Kenmore Dryer
Jump to:
Find Part by Name
Keep searches simple, eg. "belt" or "pump".
Diagrams for 11060222510
Viewing 4 of 4


Keep searches simple, eg. "belt" or "pump".

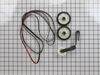
$36.42
This is an authentic drum support roller kit for 29-inch-wide dryers. It includes 1 belt, 2 roller wheels and an idler pulley. The parts in this kit allow the dryer to tumble properly by supporting th...
In Stock
Order now and your part arrives by Apr 9

$15.26
This multi rib belt is an OEM replacement part for a dryer. It attaches to the drum, idler pulley, and motor pulley, and is responsible for spinning the drum. Over time, the belt can become frayed, br...
In Stock
Order now and your part arrives by Apr 9

$6.51
It is important for your dryer to be properly leveled, as an unleveled one can cause excessive vibration and noise when operating, may not drain properly, and can cause excessive wear on various parts...
In Stock
Order now and your part arrives by Apr 9

$99.14
This drive motor operates the dryer by turning the drive belt which spins the drum and will fit most Whirlpool incorporated dryer brands before 1996. If the motor has shorted out, it will no longer tu...
In Stock
Order now and your part arrives by Apr 9

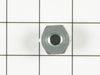
$7.60
This is a multi-use screw and can be used on a variety of appliances. The measurements of the screw are: 8/18 x 3/8. *Please note: the screw is sold individually. Refer to the manual provided by the m...
In Stock
Order now and your part arrives by Apr 9

$22.91
If your dryer door keeps popping open or won’t latch, this door catch might be the fix you need. It’s a small part, but it plays a big role in keeping your dryer running smoothly. Just swap out the ol...
In Stock
Order now and your part arrives by Apr 9

$11.98
This 18 ml bottle of white appliance touch-up paint is used to cover scratches or marks on your appliance. The white touch-up paint can be used on refrigerators, microwaves, ranges, clothes dryers, an...
In Stock
Order now and your part arrives by Apr 9

$55.18
This is a genuine OEM replacement door gasket for your dryer. The gasket, also known as a door seal, is used to provide an airtight seal when the dryer door is closed. If the gasket has failed it can ...
In Stock
Order now and your part arrives by Apr 9

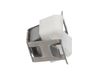
$41.78
Hearing squealing or grinding from your dryer? The motor pulley might be the culprit. This part helps the drum spin by supporting the belt where it connects to the motor. It’s a genuine replacement an...
In Stock
Order now and your part arrives by Apr 9

This is a multi-use cover screw. It fits appliances such as dryers, ranges, washers, dishwashers, refrigerators, air conditioners, washer dryer combos, freezers, wall ovens, microwaves, dehumidifiers,...
In Stock
Order now and your part arrives by Apr 9

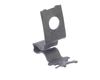
$16.35
This part is the replacement single front panel clip for your dryer. It is made of metal and is approximately 2 inches long and ¾ inch wide. The front panel retainer clip is what holds the front panel...
In Stock
Order now and your part arrives by Apr 9

This insert is sold individually. Knob not included. Knob is sold separately.
In Stock
Order now and your part arrives by Apr 9
Questions and Answers
We're sorry, but our Q&A experts are temporarily unavailable.
Please check back later if you still haven't found the answer you need.
Common Problems and Symptoms for 11060222510
Viewing 13 of 13Noisy
Fixed by these parts


How to fix it
Drum Not Spinning
Fixed by these parts
How to fix it
Door won’t close
Fixed by these parts

How to fix it
Won’t Start
Fixed by these parts
How to fix it
Door Pops Open
Fixed by these parts
How to fix it
Heat stays on after drum has stopped
Fixed by these parts
How to fix it
Marks left on clothes
Fixed by these parts

How to fix it
Timer Not Working
Fixed by these parts


How to fix it
Not Heating
Fixed by these parts
How to fix it
Running With Door Open
Fixed by these parts
How to fix it
Too hot
Fixed by these parts
How to fix it
Will Not Start
Fixed by these parts
How to fix it
Touchpad does not respond
Fixed by these parts
How to fix it


Keep searches simple. Use keywords, e.g. "leaking", "pump", "broken" or "fit".
- Customer:
- DENNIS from ALTOONA, FL
- Parts Used:
- 4392065
- Difficulty Level:
- A Bit Difficult
- Total Repair Time:
- 1- 2 hours
- Tools:
- Nutdriver, Screw drivers
Broken drive belt
Grow a second set of hands. Always unplug any appliance. Remove lint screen. remove two screws (philips Head). I took a wooden shim lightly tapped w/hammer to pop front of dryer top free. Mine worked on hinges and just flipped back til it rested against the wall. Removed two 5/16 screws inside holding face on carefully raise face section
... Read more
off the support clips at either side on the bottom. Pull drum out (I have the large style drum commercial size [approx.). Clean the inside free of all lint (known to be fire hazard). Sling new belt around drum. Get newly grown set of hands to hold drum in place. Pinch belt to fit between tensioner, lift tensioner and place belt around motor pulley. Spin drum couple times to make certain belt isn't twisted. Reverse dismantle proccess to put back together. Replace all parts that come with kit, you'll feel better knowing you got a new dryer, almost.
Read less
Was this instruction helpful to you?
Thank you for voting!
- Customer:
- Michael from San Antonio, TX
- Parts Used:
- 341241
- Difficulty Level:
- Easy
- Total Repair Time:
- 30 - 60 mins
- Tools:
- Screw drivers, Wrench set
broken tumbler belt
1. Removed the screws from the lint catcher
2. Removed the bolts from upper rear of dryer
3. Pried off the dryer top from the front (it rests on rear hinges)
4. Disconnected dryer door wiring
5. Removed bolt from inside upper front corners; removed front panel (be careful: the edges are sharp and the tumbler will fall ... Read more when it loses support)
6. Removed broken belt and lint from interior parts; removed tensioner (which had fallen out of place). Note: The newer models have a tensioner pulley; my older model had a smooth semicircle that was confusing at first glance
7. Flipped dryer onto its back (for easier reinsertion of new belt and tumbler)
8. Placed new belt on tumbler; reinserted tumbler
9. Inserted new belt through tensioner, inserted tensioner "legs" into grooves on floor. Note: The belt will pull the tensioner upright when it's inserted properly (which isn't obvious at first)
10. Made sure belt and tumbler seal were properly installed
11. Replaced parts in reverse order
The process took over an hour because I couldn't figure out how to insert the belt through the tensioner. The trick is to insert the folded belt through the tensioner and onto the motor pulley. If I had to do it again, it would take about 30 minutes (including cleaning lint)
Read less
Was this instruction helpful to you?
Thank you for voting!
- Customer:
- James from Moscow, IA
- Parts Used:
- 279827
- Difficulty Level:
- Easy
- Total Repair Time:
- 30 - 60 mins
- Tools:
- Nutdriver, Screw drivers
Make humming noise when pressing start button. Would not start
After looking on the website for advice I walked throught the simple steps of disassembling the front, removing the drum, removed the back, disconnected the wire harness. Then removed the blower housing in the back. The blower, mounted on the back side of the motor was very tight. I used a pipe wrench wedged in place and help by my 10
... Read more
year old Grand-daughter while I used an adjustable wrench to turn the shaft on the front of the motor. Spun the blower off, removed the two clips holding the motor. Then reversed the process when I received the new motor. Care should be taken to avoid damaging the blower fan if a lot of pressure is required.
Read less
Was this instruction helpful to you?
Thank you for voting!