


Models
>
JGRP436WP00
JGRP436WP00 Jenn-Air Range
Jump to:
Find Part by Name
Keep searches simple, eg. "belt" or "pump".
Diagrams for JGRP436WP00
Viewing 8 of 8


Keep searches simple, eg. "belt" or "pump".

$21.82
This is a screw and it is made for multiple appliances in your home. This model is called a sheet metal screw because it has sharp points, and the threads are closer together. This screw is designed t...
In Stock
Order now and your part arrives by Apr 19

$7.60
This is a multi-use screw and can be used on a variety of appliances. The measurements of the screw are: 8/18 x 3/8. *Please note: the screw is sold individually. Refer to the manual provided by the m...
In Stock
Order now and your part arrives by Apr 19

$73.24
This temperature sensor detects the temperature within the oven cavity.
In Stock
Order now and your part arrives by Apr 19

$11.98
This kit contains 4 grate feet for a range. These are the feet to fit your burner grates so the burner will not scratch your cooktop. The are black in color and made of rubber. These feet are fitted w...
In Stock
Order now and your part arrives by Apr 19

In Stock
Order now and your part arrives by Apr 19

$49.29
This is a replacement light bulb to illuminate the inside of your oven. It is 25 watts and 120 volts. Please wear gloves during replacement if your existing bulb is shattered. Consider ordering a spar...
In Stock
Order now and your part arrives by Apr 19

In Stock
Order now and your part arrives by Apr 19

In Stock
Order now and your part arrives by Apr 19

Special Order

In Stock
Order now and your part arrives by Apr 19

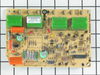
$230.43
This is the part that substitutes for the spark module and also the transformer. It is now all in one board.
In Stock
Order now and your part arrives by Apr 19

In Stock
Order now and your part arrives by Apr 19
Questions and Answers
We're sorry, but our Q&A experts are temporarily unavailable.
Please check back later if you still haven't found the answer you need.
Common Problems and Symptoms for JGRP436WP00
Viewing 7 of 7Oven is too hot
Fixed by these parts

How to fix it
Little to no heat when baking
Fixed by these parts
How to fix it
Will Not Start
Fixed by these parts

How to fix it
Oven not heating evenly
Fixed by these parts
How to fix it
Element will not heat
Fixed by these parts
How to fix it
Lid or door won’t close
Fixed by these parts
How to fix it
Will not program
Fixed by these parts
How to fix it


Keep searches simple. Use keywords, e.g. "leaking", "pump", "broken" or "fit".
- Customer:
- HERBERT from ISELIN, NJ
- Parts Used:
- WPW10331686
- Difficulty Level:
- A Bit Difficult
- Total Repair Time:
- 30 - 60 mins
- Tools:
- Screw drivers, Wrench (Adjustable)
stove will not start no spark or gas
part did not fix the problem, may be gas regulater ,well if you are changing this part,not to bad .remove the knobs bottom screws and two side screws front cover flips up and off ,the ignition control is in front of you right side ,remove the one screw that is looking at and everything slides out .i turned off the gas and elec and removed
... Read more
the gas line and carefully laid the stove on it back.made it easier ,good luck
Read less
Was this instruction helpful to you?
Thank you for voting!
- Customer:
- Kent from Seattle, WA
- Parts Used:
- WP9755542
- Difficulty Level:
- Really Easy
- Total Repair Time:
- Less than 15 mins
faulty meat probe
Not a repair. Just needed to replace the meat probe sensor for the programmable oven. Quick and easy purchase and very fast delivery took care of the problem. I was back in business.
Was this instruction helpful to you?
Thank you for voting!
- Customer:
- Doris from NEW JOHSONVLE, TN
- Parts Used:
- WPW10169757
- Difficulty Level:
- Really Easy
- Total Repair Time:
- Less than 15 mins
- Tools:
- Screw drivers
Replace KitchenAid oven light bulbs
Pull the end of the lens nearest the oven door out of the oven wall. Because our oven is several years old and the bulbs had not been previously changed, I could not pull the lens out with my hand, so used two small screwdriver under the metal tabs which hold the lens in place, the metal holder came out with the lens. Once the lens is r
... Read more
emoved, simply pull out the old bulb and, either while wearing surgical gloves or holding the bulb with a cloth (do NOT allow bare skin to touch the bulb or you will be replacing it again sooner rather than later), push the new bulb's pins into the socket. The lens then is simply pushed back into place.
Read less
Was this instruction helpful to you?
Thank you for voting!