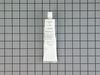
This 18 ml bottle of white appliance touch-up paint is used to cover scratches or marks on your appliance. The white touch-up paint can be used on refrigerators, microwaves, ranges, clothes dryers, an...
Want cleaner, better-tasting water from your fridge or ice maker? This water filter does the trick by removing unwanted particles and keeping your water fresh. It’s a genuine replacement part and supe...
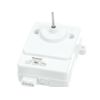
This is a light switch for your refrigerator. It activates when the door of your appliance is opened, and it will turn the light inside on and off. You will need to replace this part is if your light ...
This temperature sensor monitors the ice bin in select refrigerators to help regulate ice production. It sends temperature readings to the control board, preventing overfilling or melting. Compatible ...
This fan motor is most times used with frost-free refrigerators with a condenser coil. When the compressor runs, so does this fan, circulating air through the refrigerator grille, cooling the compress...
The water distributor tube distributes water from the reservoir to the evaporator plate.
In Stock
Order now and your part arrives by Jun 26
Questions and Answers
Ask our experts a question about this part and we'll get back to you as soon as possible!
1 question answered by our experts.
< Prev
1
Next >
Sort by:
Search filter:
Clear Filter
Your search term must have 3 or more characters.
Keep searches simple. Use keywords, e.g. "leaking", "pump", "broken" or "fit".
Sorry, we couldn't find any existing answers that matched. Try using some different or simpler keywords, or submit your new question by using the "Ask a Question" button above!
Michael
January 30, 2023
How do you clean the ice maker when the clean light comes on
For model number KUIC15POZP2
Hello Michael, thank you for reaching out to Fix. You may need to follow these steps to clean the ice maker:
1. Press the On/Off button.
2. Wait 5 to 10 minutes for the ice to fall into the storage bin. Remove all ice from the storage bin.
3. Unscrew the drain cap from the bottom of the water pan located inside the storage bin as shown. Allow the water to drain completely.
4. Replace the drain cap securely on the water pan. If the drain cap is loose, water will empty from the water pan and you will have either thin ice or no ice.
5. Read and follow all handling information on the cleaner bottle before completing the steps below. Use one 16 oz (473 mL) bottle of approved ice maker cleaner.
6. Pour one bottle of solution into the water pan. Fill the bottle twice with tap water and pour it into the water pan.
7. Press the Clean button. See the “Using the Controls” section. The Clean button will blink, indicating that the cleaning cycle is in process. When the Cleaning Complete light is illuminated (approximately 70 minutes), the cleaning cycle is complete. During the cleaning cycle, the system will both clean and rinse itself.
8. After the cleaning cycle is complete, remove the drain cap from the water pan. Look for any cleaning solution left in the water pan. If the cleaning solution drains from the water pan, you should run the clean cycle again. Be sure to refill the water pan with cleaner before starting the clean cycle again. Be sure to replace the drain cap securely on the water pan. If the drain cap is loose, water will empty from the water pan and you will have either thin ice or no ice. NOTE: Severe scale buildup may require repeated cleaning with a fresh quantity of cleaning solution.
9. Press the On/Off button to resume ice production.
We hope that helps!
Was this helpful?
Thank you for voting!
Ask a Question
Ask our experts a question on this part and we'll respond as soon as we can.
The water filled on startup (actually over-filled, which was a clue). After that water was used to make ice, no new water came in so the recirculation pump just made whining noises in the mostly empty reservoir. Since water could come in (on start up) I reasoned it wasn't the water inlet valve, and everything else suggested the ice maker
... Read more was getting inaccurate info about how much water was in the reservoir. Turns out, the water recirculation pump has a water level sensor built in. So while the pump itself still functioned, the water level sensor inside had gone bad. Replacing the pump fixed the issue. There are videos online that show how to accomplish that, but it was pretty straight-forward. The dis-assembly was sometimes irritating because it's hard to see and maneuver around inside. It'll help if you put the machine closer to eye level. Pay close attention to videos that show the disassembly because there are a couple of tabs that are hard to find.
This product comes in a bottle with a brush like Liquid Paper. It goes on incredibly easy. A second coat might be needed. I wanted to prevent rust from setting in so I covered the scratches and dings. The paint is a little brighter since my washer is 10 years old but it still looks great.