


Models
>
DBXR453ET5AA
DBXR453ET5AA General Electric Dryer
Jump to:
Find Part by Name
Keep searches simple, eg. "belt" or "pump".
Diagrams for DBXR453ET5AA
Viewing 5 of 5


Keep searches simple, eg. "belt" or "pump".

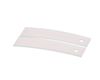
This single drum bearing slide attaches to the outer-most side of the bearing. This part is also sometimes referred to as a drum slide, drum glide, or drum pad. It provides support to the front of the...
In Stock
Order now and your part arrives by Apr 9

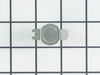
This part is the replacement high-limit thermostat or safety thermostat for your dryer. The high-limit thermostat is found on the upper right-hand side of the heater housing, and it cuts off power to ...
In Stock
Order now and your part arrives by Apr 9

$17.44
This durable fastening nut secures internal components such as panels, brackets, or control housings. When worn or missing, the appliance may rattle, vibrate, or shift out of alignment. Replacing the ...
In Stock
Order now and your part arrives by Apr 9

In Stock
Order now and your part arrives by Apr 9

$129.64
This is considered a high limit thermostat. Rating - L210 This thermostat acts as a safety mechanism that keeps the dryer from overheating. Once the dryer temperature reaches a certain point, this pie...
In Stock
Order now and your part arrives by Apr 9

In Stock
Order now and your part arrives by Apr 9

Special Order
Special Order
Questions and Answers
We're sorry, but our Q&A experts are temporarily unavailable.
Please check back later if you still haven't found the answer you need.
Common Problems and Symptoms for DBXR453ET5AA
Viewing 4 of 4Noisy
Fixed by these parts

How to fix it
Marks left on clothes
Fixed by these parts
How to fix it
Too hot
Fixed by these parts

How to fix it
Drum Not Spinning
Fixed by these parts
How to fix it


Keep searches simple. Use keywords, e.g. "leaking", "pump", "broken" or "fit".
- Customer:
- Stephen from Mechanicsville, VA
- Parts Used:
- WE4M216
- Difficulty Level:
- Easy
- Total Repair Time:
- 15 - 30 mins
- Tools:
- Screw drivers
dryer was cutting off completely.
The problem was intermittent. It only happened when the unit was first started. After it was restarted it usually worked until the load was dry. I looked at the schematics and saw that only the hi-temp therostat and the motor overload could stop the dryer completely. I put my volt meter on the hi-temp thermostat and ran the dryer. Wh
... Read more
en the dryer stopped I realized the hi-temp therm. was tripping. I read the web site help for this symptom and the suggestion was the bias therm.
I replaced it and the unit worked.
I replaced it and the unit worked.
Read less
Was this instruction helpful to you?
Thank you for voting!
- Customer:
- Heidi from Newfield, NJ
- Parts Used:
- WE4M216
- Difficulty Level:
- A Bit Difficult
- Total Repair Time:
- 15 - 30 mins
- Tools:
- Screw drivers
Dryer wouldn't heat up
I wanted to fix the cheapest possible problem first which was the thermostat.
Got the dryer apart and it was the wrong thermostat for the dryer, which was good news! I looked in inside floor of the dryer cabinet and saw alot of tiny "springs". Couldn't figure how they got there.
Turned out they were coils from t ... Read more he heating element. Must have burnt out and fell free from the element. So I ordered that and replaced it.
I want to say that I'm in NJ and I ordered that thermostat and got it in ONE DAY! Thought that was too good to be true but when I ordered the heating element THAT CAME IN ONE DAY!
I don't know what kind of people work in the shipping department but they are awesome! You really made the difference on this job.
So did the info on your website. I've never even seen a dryer apart before. It was a piece of cake thanks to you guys. You just saved me about $500.
Read less
Was this instruction helpful to you?
Thank you for voting!
- Customer:
- Al from Elmhurst, IL
- Parts Used:
- WE03X37318
- Difficulty Level:
- Really Easy
- Total Repair Time:
- 15 - 30 mins
- Tools:
- Screw drivers
The Front Drum Glides wore out
I first unplugged the unit, opened the top, disconnected and took off the control panel, took off the front panel to determine the source of the squeaking noise coming from the Dryer. I saw that 3 of the 4 Front Drum Glides were gone and the drum had worn away significant amounts of plastic from the Top Bearing Assembly. I purchased the
... Read more
Top Bearing Assembly and a set of 4 Front Drum Glides. Disassembled the damaged parts and reassembled with the new replacement parts. The reassembly took less than 20 minutes. I plugged in the Dryer and viola! It works as good as new.
Read less
Was this instruction helpful to you?
Thank you for voting!