


Models
>
PFDS450GLWW
PFDS450GLWW General Electric Dryer
Jump to:
Find Part by Name
Keep searches simple, eg. "belt" or "pump".
Keep searches simple, eg. "belt" or "pump".

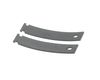
This single drum bearing slide is an OEM approved replacement part for dryers. It can also be known as a bearing drum slide, pad, or glide. The slides attach to the inner most slots on the front beari...
In Stock
Order now and your part arrives by Apr 11
Questions and Answers
We're sorry, but our Q&A experts are temporarily unavailable.
Please check back later if you still haven't found the answer you need.
Common Problems and Symptoms for PFDS450GLWW
Viewing 3 of 3Noisy
Fixed by these parts
How to fix it
Marks left on clothes
Fixed by these parts
How to fix it
Drum Not Spinning
Fixed by these parts
How to fix it

Keep searches simple. Use keywords, e.g. "leaking", "pump", "broken" or "fit".
- Customer:
- David from Littleton, CO
- Parts Used:
- WE03X37317
- Difficulty Level:
- Easy
- Total Repair Time:
- 15 - 30 mins
- Tools:
- Screw drivers
Dryer starts squeaking while operating
Open the dryer door and remove the two screws in the top of the door opening that hold the top of the dryer on, and then remove the dryer top. On the inside of the dryer, there are two screws that hold the front of the dryer on. Remove one screw from each side of the dryer near the top, and the front of the dryer will fall away. The d
... Read more
rum slides are visible when you lean the front panel of the dryer out away from the drum. You can replace the drum slides without even removing the front of the dryer completely. Pull out the old drum slides and insert the new slides. Lift the drum slighly from the inside through the dryer door as you tilt the front back into place. Reinsert the screws holding the front of the dryer on and tighten. BE CAREFUL not to drop the screws or you may have to disassemble the dryer to get at the dropped screws. Reinstall the top of the dryer. It is a difficult fit which requres inserting into 3 tabs and sliding the top into place. Check that the top is flush before inserting and tightening the screws in the top of the door opening.
Read less
Was this instruction helpful to you?
Thank you for voting!
- Customer:
- Bill from COMSTOCK PARK, MI
- Parts Used:
- WE03X37317
- Difficulty Level:
- Really Easy
- Total Repair Time:
- 15 - 30 mins
- Tools:
- Screw drivers
Squealing as drum rotated
Removed the star bit screws on the top of the control panel then removed the front by opening the door and removing the screws in the upper corners of the door jam. I then removed the top which exposed the drum slides. NOTE: This model requires 4 drum slides and NOT two as specified in the video.
Was this instruction helpful to you?
Thank you for voting!
- Customer:
- Carol from Simpsonville, SC
- Parts Used:
- WE03X37317
- Difficulty Level:
- Really Easy
- Total Repair Time:
- Less than 15 mins
- Tools:
- Screw drivers
Rubbing noise while dryer was running
Removed too of dryer and placed the parts on. Runs like a brand new one. Thanks so much!
Was this instruction helpful to you?
Thank you for voting!