


Models
>
GTMP520ED4WW
GTMP520ED4WW General Electric Dryer
Jump to:
Find Part by Name
Keep searches simple, eg. "belt" or "pump".
Diagrams for GTMP520ED4WW
Viewing 7 of 7


Keep searches simple, eg. "belt" or "pump".

$54.47
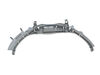
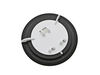
Located on the inside of the dryer front panel, the front drum bearing helps your appliance to operate as quietly as possible. It allows the front of the drum to glide smoothly on the felt seal of the...
In Stock
Order now and your part arrives by Apr 11

$54.12
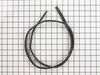
This 89.5-inch drive belt is for dryers. It has a 4-rib design on the inside for a better grip. If comparing the size of your current belt to the new one, keep in mind that a small amount of stretchin...
In Stock
Order now and your part arrives by Apr 11

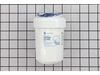
This is an OEM replacement water filter for your refrigerator. The manufacturer suggests replacing this filter every 6 months or 300 gallons of water. If not replaced regularly, you will risk contamin...
In Stock
Order now and your part arrives by Apr 11

$87.35
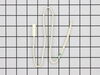
If the ice maker in your fridge is noisy or no longer dispensing ice, there may be an issue with the auger in the ice bucket. The auger works by spinning to pull and dispense ice from the bin down the...
In Stock
Order now and your part arrives by Apr 11

$43.55
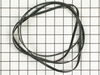
This is a duct felt seal for a dryer. The duct felt seal allows the front-load dryer drum to glide smoothly on the front panel. Your dryer will not function properly if the drum felt seal is compromis...
In Stock
Order now and your part arrives by Apr 11

$31.05
The temperature sensor, also referred to as a thermistor, is used to monitor the refrigerator and freezer internal temperatures. The sensor is a small capsule like device that is protected by a white ...
In Stock
Order now and your part arrives by Apr 11

$85.97
This double inlet water valve has quick connections. This valve has 1/4 and 5/16 John Guest fittings for the outlet lines and a 1/4 compression fitting for the inlet line.
In Stock
Order now and your part arrives by Apr 11

$40.39
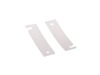
This is an OEM clear plastic module shelf insert (door shelf trim), which is the part of the door shelf bin that snaps onto the front to keep items contained securely on the shelf. This is the shelf i...
In Stock
Order now and your part arrives by Apr 11

$14.16
The evaporator fan grommet is used to provide a cushion between the fan motor and the motor mounting bracket in your freezer. This genuine OEM part is about one inch in diameter and is red in color. I...
In Stock
Order now and your part arrives by Apr 11

$25.18
If the lightbulb inside your dryer drum has burned out, this is an authentic OEM replacement. It is a 10W, 120V bulb that is sold individually. The bulb turns on when the dryer door is open and should...
In Stock
Order now and your part arrives by Apr 11

This is a genuine OEM replacement door flap for the ice maker in your refrigerator. This part goes by many different names, including door recess assembly, ice door assembly, dispenser door, ice chute...
In Stock
Order now and your part arrives by Apr 11

The dispenser door solenoid is the part that controls the flapper door on your ice maker, allowing it to open and close when dispensing ice. If your ice maker is not dispensing ice or water, the door ...
In Stock
Order now and your part arrives by Apr 11
Questions and Answers
We're sorry, but our Q&A experts are temporarily unavailable.
Please check back later if you still haven't found the answer you need.
Common Problems and Symptoms for GTMP520ED4WW
Viewing 35 of 35Noisy
Fixed by these parts
How to fix it
Leaking
Fixed by these parts


How to fix it
Not dispensing water
Fixed by these parts

How to fix it
Ice maker won’t dispense ice
Fixed by these parts

How to fix it
Fridge too warm
Fixed by these parts


How to fix it
Ice maker not making ice
Fixed by these parts
How to fix it
Freezer section too warm
Fixed by these parts
How to fix it
Light not working
Fixed by these parts


How to fix it
Drum Not Spinning
Fixed by these parts
How to fix it
Marks left on clothes
Fixed by these parts
How to fix it
Freezer not defrosting
Fixed by these parts

How to fix it
Fridge too cold
Fixed by these parts
How to fix it
Door won’t close
Fixed by these parts


How to fix it
Ice maker dispenses too little ice
Fixed by these parts
How to fix it
Door Sweating
Fixed by these parts
How to fix it
Frost buildup
Fixed by these parts
How to fix it
Door won’t open or close
Fixed by these parts

How to fix it
Fridge and Freezer are too warm
Fixed by these parts

How to fix it
Too warm
Fixed by these parts
How to fix it
Won’t Start
Fixed by these parts

How to fix it
Ice maker dispenses too much ice
Fixed by these parts

How to fix it
Fridge runs too long
Fixed by these parts
How to fix it
Freezer too cold
Fixed by these parts
How to fix it
Not Heating
Fixed by these parts

How to fix it
Will Not Start
Fixed by these parts
How to fix it
Clicking sound
Fixed by these parts


How to fix it
Doesn’t stop running
Fixed by these parts
How to fix it
Engine revs but auger will not turn
Fixed by these parts
How to fix it
Too cold
Fixed by these parts
How to fix it
Door Pops Open
Fixed by these parts
How to fix it
Touchpad does not respond
Fixed by these parts
How to fix it
Too hot
Fixed by these parts
How to fix it
Heat stays on after drum has stopped
Fixed by these parts
How to fix it
Leaks water
Fixed by these parts
How to fix it
Engine runs but cutters do not turn
Fixed by these parts
How to fix it

")


")

Keep searches simple. Use keywords, e.g. "leaking", "pump", "broken" or "fit".
- Customer:
- ralph from bristow, VA
- Parts Used:
- WR57X33326
- Difficulty Level:
- Really Easy
- Total Repair Time:
- Less than 15 mins
- Tools:
- Nutdriver, Screw drivers, Socket set
Refrigertor water dispenser not working BUT ice machine is working
The very first symptom here is important! The door water dispenser is not working but the ice macine is working. You may only have a frozen water tube in the door so do the following before diagnosing that your solenoid valve is bad: 1) the tube usually runs under the front of the refrigerator and usually has a quick disconnect. Undo t
... Read more
he connection and press the dispenser. If water comes out of the tube you have a frozen or blocked tube in the door. 2) Immediately adjust the temperature in the freezer and warm the freezer compartment as much as you can without destroying the freezer contents. Wait 24 hours. This will usually unfreeze the line. Do not waste your time with a hair dryer. NOW, if this doesn't work and you are convinced you need to order and replace the solenoid, follow these steps. Assemble your tools first. I needed a good ratchet set and a screwdriver. A shop towel is helpful for spilled water. A light is handy. Pull out the refreigerator to gain access to the rear of the unit. Unplug the power and close the water valve (older homes, you may need to actually shut the house water supply). Remove the screws which hold the cover over the lower half of the refrigerator. On the left you will see the solenoid. It's always good to see that your new part matches the one you feel needs replaced. They may not match perfectly due to changing design but they should be very similar. One screw holds this part in place and access is very simple. Now simply unplug the electrical connections. In my case, one blue "blade" type connection (powering the water) and one red "blade" type connection powering the ice maker. They are not the same size and this coupled with the coloring means you will not accidently switch them. pull the tubes clear of the solenoid. This is simple and needs no explantion. Grab your new solenoid and reattach both the electrical and water lines (two, remember, ice maker and drink dispencer). Replace the single screw. Re-attach the rear, lower refrigerator cover and go to the front of the unit to check the water. You can listen carefully and hear the power engage from the new part bringing you water. Clean up, replace the refrigerator back to its place and look really tired when your wife sees that you worked "so hard"! You probably saved at least $50-$80 from a service call which can now be used to take the family to dinner after your "exhausting" 15 minute workout of removing about 10 screws and wheeling the unit in and out of place. Writing this article took longer! My 4 year old worked harder holding the flash light!
Read less
Was this instruction helpful to you?
Thank you for voting!
- Customer:
- Tim from Newport News, VA
- Parts Used:
- WR29X43990
- Difficulty Level:
- A Bit Difficult
- Total Repair Time:
- 30 - 60 mins
- Tools:
- Pliers, Screw drivers
Plastic Auger blades broke in ice tray
I used a digital camera and photographed the assembled unit and the metal blades before I started the repair. Then, I removed the top screw on the clear shield. Flip over ice tray and removed two Phillips screws on bottom. Exterior plastic white cover comes off next. The cover sides have hard push-in white plastic tabs. Push them in; pry
... Read more
up top cover with small flathead screwdriver. Slide white top cover up and you will now see the metal blades and assembly. Auger is held in place with a metal c-clip and washer on the end. Use flat head screwdriver to pry off c-clip. Then you will see a nylon round slotted nut. The threads are reverse, use pliers and loosen nut. It is not that tight but pliers are needed. Then it all is loose and ready for removal. I slid all the blades off at one time and kept them stacked together. Slide out auger and clear flat shield cover. Install new auger, clear shield, and metal blade stack. When you put it all back together take a look at the long metal J-hook on the bottom make sure it is in the slot before you make everything tight. Failing to do this will prevent cubed ice from dispensing.
It is not that hard to do the repair it just takes some patience and paying attention to details.
It is not that hard to do the repair it just takes some patience and paying attention to details.
Read less
Was this instruction helpful to you?
Thank you for voting!
- Customer:
- michele from North Smithfield, RI
- Parts Used:
- WR55X10025
- Difficulty Level:
- Really Easy
- Total Repair Time:
- 15 - 30 mins
- Tools:
- Pliers
my refigerator was warm but the freezer was cold and working correcttly
I went to a GE repair center to explain my problem, the service center reccomended that I have a techinician come out o look at it. $75.00 for the visit and what ever labor and materials wuld cost.
I went on line to see if there were others having this same problem and found that there were many with the same problem.
... Read more />After reading some of the ways that people found out what was wrong ...it became a matter of three components, the timer, heater or thermostat.
I tried the most common component and the less expensive one first , the thermostat switch I installed it very easily snipping two wires and attaching the news using wire nuts I used the diagram on this website to pinpoint the component and there has not been a problem since.
Read less
Was this instruction helpful to you?
Thank you for voting!