


Models
>
6309A
6309A Frigidaire Washer
Jump to:
Find Part by Name
Keep searches simple, eg. "belt" or "pump".
Diagrams for 6309A
Viewing 12 of 12


Keep searches simple, eg. "belt" or "pump".

$105.88
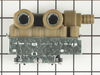
This water inlet valve assembly is designed for use in washing machines and regulates the flow of both hot and cold water into the appliance during wash cycles. It ensures the correct amount of water ...
In Stock
Order now and your part arrives by Apr 9

$25.10
This is a screw and it is used with a variety of home appliances. It is less than 1/2 an inch long, and is #8-18 x 3/8. This part is a pan head, sheet metal, screw. It is made of metal.
In Stock
Order now and your part arrives by Apr 9

In Stock
Order now and your part arrives by Apr 9


In Stock
Order now and your part arrives by Apr 9


Special Order


In Stock
Order now and your part arrives by Apr 9

Special Order

Special Order

Special Order
Questions and Answers
We're sorry, but our Q&A experts are temporarily unavailable.
Please check back later if you still haven't found the answer you need.
Common Problems and Symptoms for 6309A
Viewing 3 of 3Leaking
Fixed by these parts

How to fix it
No hot or cold water
Fixed by these parts
How to fix it
Burning smell
Fixed by these parts

How to fix it

Keep searches simple. Use keywords, e.g. "leaking", "pump", "broken" or "fit".
- Customer:
- alvaro from east hampton, NY
- Parts Used:
- 134190200
- Difficulty Level:
- Really Easy
- Total Repair Time:
- Less than 15 mins
- Tools:
- Pliers, Screw drivers
Washer Continued To Fill To Point Of Overflow
First I removed the top panel held by four screws at rear of panel, pulling the panel foward and up. Then disconnected the power and water connections. Then I removed the two screws holding the flow valve to the washer rear panel,pulled the valve foward ,removed the two electric connectors, pinched the water clamp with pliers and remo
... Read more
ved the water connection to the valve. Then replaced with the new valve followed the above steps in reverse order, finishing up by re placing the water connections and power. Then checked fo proper replacenent and leaks before replacing top panel.
Read less
Was this instruction helpful to you?
Thank you for voting!
- Customer:
- Mark from Pittsburgh, PA
- Parts Used:
- 134190200
- Difficulty Level:
- Really Easy
- Total Repair Time:
- 15 - 30 mins
- Tools:
- Pliers, Screw drivers
No Cold Water
Checked problem on-line and discovered it was the water inlet valve. Matched the part on part select. Com. Finding the part was very easy. Part select had a grid behind the picture to help determine the size and pictures from all sides. Removing the old part, matching it, and replacement took a total of 30 minutes. I now have cl
... Read more
ean clothes.
Read less
Was this instruction helpful to you?
Thank you for voting!
- Customer:
- Kenneth from Baltimore, MD
- Parts Used:
- 144667
- Difficulty Level:
- A Bit Difficult
- Total Repair Time:
- 30 - 60 mins
- Tools:
- Screw drivers
belt worn causing machine to make all kinds of noise
pull up on top ,take two screws loose on front panel(pull off) vaccum old debri out,pull tension pulley back pull old belt off,holding tension pulley put new belt on .put front panel back on and snap top back down to secure.
working perfectly nice and quite !!!
working perfectly nice and quite !!!
Was this instruction helpful to you?
Thank you for voting!