


Models
>
LC600DXW-1
LC600DXW-1 Frigidaire Washer
Jump to:
Find Part by Name
Keep searches simple, eg. "belt" or "pump".
Keep searches simple, eg. "belt" or "pump".

$105.88
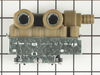
This water inlet valve assembly is designed for use in washing machines and regulates the flow of both hot and cold water into the appliance during wash cycles. It ensures the correct amount of water ...
In Stock
Order now and your part arrives by Apr 10

In Stock
Order now and your part arrives by Apr 10

This OEM water inlet valve regulates hot and cold water flow into the washer tub during cycles. It’s a dependable replacement for a faulty valve and helps maintain proper water levels and temperatures...
In Stock
Order now and your part arrives by Apr 10

$86.19
This water inlet valve attaches the water lines to the back of your appliance. The attaching solenoids on the valve open and close according to the desired temperature, or amount of water needed.
In Stock
Order now and your part arrives by Apr 10


Special Order

In Stock
Order now and your part arrives by Apr 10

Special Order
Questions and Answers
We're sorry, but our Q&A experts are temporarily unavailable.
Please check back later if you still haven't found the answer you need.
Common Problems and Symptoms for LC600DXW-1
Viewing 4 of 4Leaking
Fixed by these parts

How to fix it
No hot or cold water
Fixed by these parts

How to fix it
Water Filling Issues
Fixed by these parts
How to fix it
Burning smell
Fixed by these parts

How to fix it


Keep searches simple. Use keywords, e.g. "leaking", "pump", "broken" or "fit".
- Customer:
- alvaro from east hampton, NY
- Parts Used:
- 134190200
- Difficulty Level:
- Really Easy
- Total Repair Time:
- Less than 15 mins
- Tools:
- Pliers, Screw drivers
Washer Continued To Fill To Point Of Overflow
First I removed the top panel held by four screws at rear of panel, pulling the panel foward and up. Then disconnected the power and water connections. Then I removed the two screws holding the flow valve to the washer rear panel,pulled the valve foward ,removed the two electric connectors, pinched the water clamp with pliers and remo
... Read more
ved the water connection to the valve. Then replaced with the new valve followed the above steps in reverse order, finishing up by re placing the water connections and power. Then checked fo proper replacenent and leaks before replacing top panel.
Read less
Was this instruction helpful to you?
Thank you for voting!
- Customer:
- Julie from Lancaster, OH
- Parts Used:
- 134371220
- Difficulty Level:
- A Bit Difficult
- Total Repair Time:
- 30 - 60 mins
- Tools:
- Pliers, Screw drivers, Socket set
Valve dispener would spray water all over inside of washer.
My husband made the repair. First, he had to remove the dryer off of the top of the washer since it's a stacking unit. Disconnect water lines. Next he removed two screws from the back of the washer that allows you to remove the lid. Now unsnap a trim piece that is on the back surrounding the water connections and an exhaust port. Rea
... Read more
ch inside the washer, turn the exhaust port unlocking it and pushing out the back of the washer as far as you can to get it out of the way. Disconnect the electrical lines from the valve dispenser. Remove the two screws that fasten the valve dispenser to the washer. Install the new dispenser and reassemble.
Read less
Was this instruction helpful to you?
Thank you for voting!
- Customer:
- william from goldsboro, NC
- Parts Used:
- 134211400
- Difficulty Level:
- Easy
- Total Repair Time:
- 15 - 30 mins
- Tools:
- Pliers, Screw drivers
the cold water would not stop from draining into the wash tub
unscrew the top from the back. lift it up. Support the top and then unplugged the old valve, unscrewed it took the drain hose off it and presto the old came right out. align the new one was a little tricky and attached the drain hose and tightened the screw hook up the wires reattach the top and I was done. 30/45 minutes. I was really sur
... Read more
prized that the part I ordered was the same one I took out. Thanks for being there.
Read less
Was this instruction helpful to you?
Thank you for voting!