


Models
>
DUFM454WDB01
DUFM454WDB01 Whirlpool Freezer
Jump to:
Find Part by Name
Keep searches simple, eg. "belt" or "pump".
Diagrams for DUFM454WDB01
Viewing 5 of 5


 Diagram and Parts List for Whirlpool Freezer")

Keep searches simple, eg. "belt" or "pump".

In Stock
Order now and your part arrives by Mar 26

In Stock
Order now and your part arrives by Mar 26

In Stock
Order now and your part arrives by Mar 26

$79.90
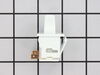
This part is both the start relay and the overload. The start relay boosts the compressor, and then shuts off as soon as the motor gets up to speed and the overload provides extra protection against e...
In Stock
Order now and your part arrives by Mar 26

In Stock
Order now and your part arrives by Mar 26

In Stock
Order now and your part arrives by Mar 26

In Stock
Order now and your part arrives by Mar 26

In Stock
Order now and your part arrives by Mar 26

In Stock
Order now and your part arrives by Mar 26

On Order

Special Order

$349.76
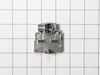
This is the mechanics (motor/engine) of the cooling system. It kicks in whenever the thermostat demands cooling. ***NOTE: This part needs to be installed by a trained professional in appliance repa...
In Stock
Order now and your part arrives by Mar 26
Questions and Answers
We're sorry, but our Q&A experts are temporarily unavailable.
Please check back later if you still haven't found the answer you need.
Common Problems and Symptoms for DUFM454WDB01
Viewing 6 of 6Light not working
Fixed by these parts

How to fix it
Will Not Start
Fixed by these parts

How to fix it
Fridge too warm
Fixed by these parts
How to fix it
Freezer section too warm
Fixed by these parts
How to fix it
Clicking sound
Fixed by these parts
How to fix it
Fridge and Freezer are too warm
Fixed by these parts
How to fix it


Keep searches simple. Use keywords, e.g. "leaking", "pump", "broken" or "fit".
- Customer:
- Clint from Rayville, MO
- Parts Used:
- W11384469
- Difficulty Level:
- Really Easy
- Total Repair Time:
- Less than 15 mins
- Tools:
- Screw drivers
Lights inside refrigerator not working
I used a flat-head screwdriver to pop out the old light rocker switch. Then, I unplugged the wires, plugged them into the new light rocker switch, and then popped the new switch into the hole. That's it! Lights began working again.
Was this instruction helpful to you?
Thank you for voting!
- Customer:
- Anna from Lincoln, RI
- Parts Used:
- WPW10189190
- Difficulty Level:
- Easy
- Total Repair Time:
- Less than 15 mins
- Tools:
- Screw drivers
Our Refrigerator and freezer stopped working
I had read on a fix it site that the start device for the compressor on this particular model was known to fail after 3-5 years. When we received the part it looked like something that just plugged into the compressor. My husband unscrewed the panel in the back of the fridge and saw the part on the compressor. He first removed the thre
... Read more
e wires that it was connected to, and the wires were inside a plug so all he had to do was remove the plug from the start device. He then removed the old start device from the compressor. Plugged in the wire plug into the new start device, and pushed in the new start device into the compressor. There was also another black part plugged into the old start device that he plugged inot the new start device that connected to the compressor. Our freezer and refrigerator starting working. Within a couple of hours our freezer had made ice.
Read less
Was this instruction helpful to you?
Thank you for voting!
- Customer:
- DANIEL from MINNEAPOLIS, MN
- Parts Used:
- 4387478
- Difficulty Level:
- Easy
- Total Repair Time:
- Less than 15 mins
- Tools:
- Screw drivers
Light Would Not Go On In The Refrigerator
First I removed the old lightbulb from the socket and replaced it with a new one to confirm that the bulb was not the problem. I then pryed the socket out with a flat-head screwdriver. I could tell that the socket was anchored in its hole with clips so it was relatively easy to pry it out. Once the socket was out, I disconnected the le
... Read more
ad wires and ordered a replacement socket kit from Partselect. When the new one arrived, I reconnected the lead wires to it, snapped it back into its hole, screwed in a new lightbulb, and presto!! The light was back on with no further problem. Thank you, Partselect!! A $15.00 part saved me what probably would have been at least a $100. service call and heaven knows what the technician would have told me I needed!!!
Read less
Was this instruction helpful to you?
Thank you for voting!