


Models
>
WFU1150EW1
WFU1150EW1 Westinghouse Freezer
Jump to:
Find Part by Name
Keep searches simple, eg. "belt" or "pump".
Diagrams for WFU1150EW1
Viewing 4 of 4


Manuals & Guides for WFU1150EW1
Click to downloadKeep searches simple, eg. "belt" or "pump".

$32.79
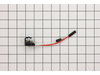
If you have frost building up in your freezer, or the temperature in your fridge is running too warm, there may be an issue with the defrost thermostat. This thermostat sits on the top of the evaporat...
In Stock
Order now and your part arrives by Aug 1

$49.45
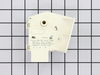
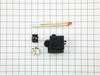
If your refrigerator is not maintaining a consistent temperature, or there is frost building up, you may need to replace the defrost timer. The 120V defrost timer is a genuine OEM part that acts like ...
In Stock
Order now and your part arrives by Aug 1
 – Part Number: 297309000")
$61.68
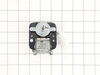
The 115-volt evaporator fan motor is in the back of the freezer section and circulates air over the coils. These coils will convert the heat into cool air, which is then circulated. If your freezer is...
In Stock
Order now and your part arrives by Aug 1

In Stock
Order now and your part arrives by Aug 1

In Stock
Order now and your part arrives by Aug 1

This is an adjustable foot for your freezer, refrigerator, and dryer. This part supports your unit by screwing into one of the bottom four corners, and adjusting the height of your machine. If your ap...
In Stock
Order now and your part arrives by Aug 1

$25.10
This 18 ml bottle of white appliance touch up paint is a little over two inches tall. It can be used for refrigerators, microwaves, ranges, clothes dryers, and freezers.
In Stock
Order now and your part arrives by Aug 1

$20.01
This multi-use screw fits various appliances and tools such as, freezers, refrigerators, wall ovens, washers, ranges, dishwashers, dryers, microwave oven combos, combos, wine and beverage coolers. *Pl...
In Stock
Order now and your part arrives by Aug 1

$142.90
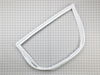
This white door gasket is used to seal the freezer door when closed to keep the cool air inside and the room air out.
In Stock
Order now and your part arrives by Aug 1

$20.01
This hinge bearing supports smooth door movement while maintaining proper alignment. Reduced friction helps prevent wear and ensures easy opening and closing. Replacing a worn bearing restores smooth ...
In Stock
Order now and your part arrives by Aug 1

In Stock
Order now and your part arrives by Aug 1

In Stock
Order now and your part arrives by Aug 1
Common Problems and Symptoms for WFU1150EW1
Viewing 12 of 12Too warm
Fixed by these parts
How to fix it
Frost buildup
Fixed by these parts
How to fix it
Fridge too warm
Fixed by these parts

How to fix it
Noisy
Fixed by these parts
How to fix it
Doesn’t stop running
Fixed by these parts
How to fix it
Won’t start
Fixed by these parts
How to fix it
Freezer not defrosting
Fixed by these parts
How to fix it
Freezer section too warm
Fixed by these parts
How to fix it
Will Not Start
Fixed by these parts
How to fix it
Fridge runs too long
Fixed by these parts
How to fix it
Freezer too cold
Fixed by these parts
How to fix it
Too cold
Fixed by these parts
How to fix it

")


Keep searches simple. Use keywords, e.g. "leaking", "pump", "broken" or "fit".
- Customer:
- Wayne from Forest Hill, MD
- Parts Used:
- 5304518034
- Difficulty Level:
- Easy
- Total Repair Time:
- Less than 15 mins
- Tools:
- Screw drivers
Temp alarm sounding and food on top shelves partially thawed
After silencing the alarm, it seemed to be running as normal without any unusual noises, but food was starting to thaw from the top shelf on down and condensation was dripping from the roof. We were able to place most of the food in 2 large ice chests and then the rest in the freezer compartments of 2 fridges we have in the house. I the
... Read more
n turned down the temp dial to the coldest setting and let it run for an hour or so; no change.
After researching on the internet, it sounded like our symptoms could be pointing to a defrost timer issue. I pulled the freezer away from the wall, located the timer and used a large screwdriver to slowly advance it. While doing this, at one point I could hear the compressor kick in. I pushed the quick freeze button and let it run for a while. When I checked it in a few hours, the alarm light had gone out and water that I had placed inside was frozen. We took a chance and put the food we placed in the ice chests back in the freezer. Everything was fine several hours later.
I ordered a new defrost timer, it arrived in a couple of days, and replaced the old one with it in a matter of minutes by disconnecting the wire harness from the old timer, removing the 2 screws holding it onto the bracket, screwing the new timer to the bracket, reconnecting the wires harness, and done. It's been a week or so and no problems.
Read less
Was this instruction helpful to you?
Thank you for voting!
- Customer:
- Cindy from Woodinville, WA
- Parts Used:
- 5304507202
- Difficulty Level:
- Easy
- Total Repair Time:
- 30 - 60 mins
- Tools:
- Screw drivers
ice was accumulating around door
Removed all of the screws around the door and then removed the old gasket and fitted new gasket into place and replaced the screws
Was this instruction helpful to you?
Thank you for voting!
- Customer:
- don from stony point, NY
- Parts Used:
- 5304518034
- Difficulty Level:
- Really Easy
- Total Repair Time:
- Less than 15 mins
- Tools:
- Screw drivers
freezer was stuck in defrost mode - - stayed at 30 degrees
slid freezer away from wall - - bottom left hand corner was the frost timer - - removed two philip head screws - - unpluged timer and installed new timer - - turned timer past first click to a little past second click (freeze cycle) - - slid freezer back FINISHED - - YOU GUYS ARE THE BEST WITH YOUR WEB PAGE AND HELP!!!!! Next day freeze
... Read more
r was at 0
Read less
Was this instruction helpful to you?
Thank you for voting!