


Models
>
106727240
106727240 Kenmore Freezer
Jump to:
Find Part by Name
Keep searches simple, eg. "belt" or "pump".
Keep searches simple, eg. "belt" or "pump".

$19.75
This is a genuine OEM 40-Watt replacement light bulb that is compatible with various types of appliances. It has a frosted glass bulb with a standard metal socket base, making it easy to screw and uns...
In Stock
Order now and your part arrives by Jul 30

$35.34
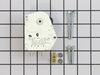
The defrost timer works on a predetermined schedule, to alternate between the cooling cycle and the defrost heater in your freezer. When the heating circuit is activated, it melts any ice that has for...
In Stock
Order now and your part arrives by Jul 30

$71.11
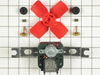
The evaporator is found in the back of the freezer. This kit comes with two mounting grommets, two sleeves (not to be used on porcelain models), two #8 mounting screws, and a push-on fan blade.
NOT...
In Stock
Order now and your part arrives by Jul 30

In Stock
Order now and your part arrives by Jul 30

In Stock
Order now and your part arrives by Jul 30

On Order

In Stock
Order now and your part arrives by Jul 30

In Stock
Order now and your part arrives by Jul 30

$17.44
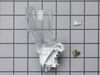
This is an OEM part sourced directly from the manufacturer. This leveling leg is commonly used with refrigerators, dryers, freezers, ranges, cooktops, and microwaves. This leveling leg ensure that you...
Special Order

In Stock
Order now and your part arrives by Jul 30

Special Order

In Stock
Order now and your part arrives by Jul 30
Common Problems and Symptoms for 106727240
Viewing 15 of 15Fridge too warm
Fixed by these parts
How to fix it
Freezer not defrosting
Fixed by these parts
How to fix it
Noisy
Fixed by these parts
How to fix it
Freezer section too warm
Fixed by these parts
How to fix it
Leaking
Fixed by these parts
How to fix it
Will Not Start
Fixed by these parts
How to fix it
Light not working
Fixed by these parts
How to fix it
Fridge and Freezer are too warm
Fixed by these parts
How to fix it
Fridge runs too long
Fixed by these parts
How to fix it
Frost buildup
Fixed by these parts
How to fix it
Freezer too cold
Fixed by these parts
How to fix it
Fridge too cold
Fixed by these parts
How to fix it
Too warm
Fixed by these parts
How to fix it
Door won’t open or close
Fixed by these parts
How to fix it
Won’t start
Fixed by these parts
How to fix it


Keep searches simple. Use keywords, e.g. "leaking", "pump", "broken" or "fit".
- Customer:
- Michael from Churchville, NY
- Parts Used:
- 482731
- Difficulty Level:
- Easy
- Total Repair Time:
- 15 - 30 mins
- Tools:
- Nutdriver, Screw drivers
Unit very noisy and freezer too warm
First I removed the racks in the freezer. The rack supports on the sides lift off without tools. The evaporator cover is at the back of the freezer. 4 phillips head screws. The cover lifts up then forward to expose the evaporator, evaporator fan and duct. The duct is held by 3 hex head screws. The evaporator fan is attached to the duct wi
... Read more
th a wiring pigtail to a plug. Unplug the fan and remove the duct. The fan is held by 2 hexhead screws. The new fan is put in place and assembly is simply the reverse of disassembly. The unit is quiet and cools properly now. The new part fit perfectly.
Read less
Was this instruction helpful to you?
Thank you for voting!
- Customer:
- LES from MADERA, CA
- Parts Used:
- W10822278
- Difficulty Level:
- Really Easy
- Total Repair Time:
- 30 - 60 mins
- Tools:
- Nutdriver, Screw drivers
Defrost timer was faulty. Required a mild tap to restart
Trouble shot the electrical circuit per the electrical schematic and zeroed in when I noted the Defrost Timer circuit was open. When I tapped on the bottom of the timer it began functioning normally (for a few days). Ordered a new Defrost Timer Kit and along with the installation instruction, I watched the on-line video. It was very help
... Read more
ful!!
After installation was complete, I plugged the Refrigerator into the electrical outlet and.......nothing happened! Hmmm!
Removed the Defrost Time Kit and inspected it for any damage and found none. Then I placed a flathead screwdriver to the manual advance knob and slightly rotate the gear mechanism. I heard a distance "click”. I believe the Timer was in the ‘defrost’ mode when received.
I reinstalled the timer, verified the wiring connections and this time plugged the Refrigerator into the electrical outlet and ….. it worked!!!
I unplugged the refrigerator, finished the installation per the instructions, plugged the unit in and monitored it for a few hours (just in case). That was a week ago and the Refrigerator is working like new.
The instructions were written in a manner which required re-reading a few times as they could be a bit vague. The video was what really helped and I appreciate PartSelect adding it to the instructions.
Read less
Was this instruction helpful to you?
Thank you for voting!
- Customer:
- Robert from Bradenton, FL
- Parts Used:
- W10822278
- Difficulty Level:
- Really Easy
- Total Repair Time:
- Less than 15 mins
- Tools:
- Pliers, Screw drivers
Freezer Iced up, dripping water into refrigerator below
De-iced the refrigerator. Removed two screws from the thermostat panel on the upper refrigerator section. Tilted it down, removed two speed nuts holding the timer, unplugged the timer plug. Determined from the instruction sheet (easy to follow) what time delay function is used, based on wire colors, placed the jumper on the correct ter
... Read more
minal on the new timer. Plugged it in, replaced the speed nuts and screws. The timer fit perfect, works just like it is supposed to, quick easy job.
Read less
Was this instruction helpful to you?
Thank you for voting!