


Models
>
1068263510
1068263510 Kenmore Freezer
Jump to:
Find Part by Name
Keep searches simple, eg. "belt" or "pump".
Keep searches simple, eg. "belt" or "pump".

$9.79
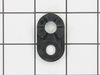
This is a refrigerator or freezer lower door closing cam. This part includes the door cam only, but you will need a new mounting screw to complete this repair, and it is sold separately. Door cams are...
In Stock
Order now and your part arrives by Aug 2

$22.91
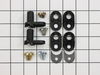
This door closing cam kit is intended for use with the bottom of refrigerator and freezer door hinges. The cam helps with the closing of the doors and to keep them slightly in position when opened.
In Stock
Order now and your part arrives by Aug 2

$24.15
This 18 ml bottle of white appliance touch-up paint is used to cover scratches or marks on your appliance. The white touch-up paint can be used on refrigerators, microwaves, ranges, clothes dryers, an...
In Stock
Order now and your part arrives by Aug 2

This is a multi-use cover screw. It fits appliances such as dryers, ranges, washers, dishwashers, refrigerators, air conditioners, washer dryer combos, freezers, wall ovens, microwaves, dehumidifiers,...
In Stock
Order now and your part arrives by Aug 2

In Stock
Order now and your part arrives by Aug 2

In Stock
Order now and your part arrives by Aug 2

On Order

In Stock
Order now and your part arrives by Aug 2

In Stock
Order now and your part arrives by Aug 2

In Stock
Order now and your part arrives by Aug 2

Sold individually. The size of this screw is 1/4" hex head and 10-12 x 1/2".
In Stock
Order now and your part arrives by Aug 2

$17.44
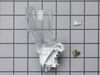
This is an OEM part sourced directly from the manufacturer. This leveling leg is commonly used with refrigerators, dryers, freezers, ranges, cooktops, and microwaves. This leveling leg ensure that you...
Special Order
Common Problems and Symptoms for 1068263510
Viewing 8 of 8Door won’t open or close
Fixed by these parts
How to fix it
Clicking sound
Fixed by these parts
How to fix it
Light not working
Fixed by these parts
How to fix it
Fridge too warm
Fixed by these parts
How to fix it
Door Sweating
Fixed by these parts
How to fix it
Noisy
Fixed by these parts
How to fix it
Frost buildup
Fixed by these parts
How to fix it
Fridge runs too long
Fixed by these parts
How to fix it


Keep searches simple. Use keywords, e.g. "leaking", "pump", "broken" or "fit".
- Customer:
- Thomas from San Clemente, CA
- Parts Used:
- 4318165
- Difficulty Level:
- Really Easy
- Total Repair Time:
- Less than 15 mins
- Tools:
- Nutdriver, Screw drivers
The door would not close properly. The CAM had broken.
The repair was very simple.
1. Remove the food from the door shelves.
2.Remove the door by first removing the three screws holding the hinge at the top of the refrigerator.
3. Lift door off of the bottom hinge.
4.Replace bottom CAM on bottom hinge (one screw)
5. Replace top CAM and sh ... Read more im on door (one screw)
6. I put a little grease on the cam to make it slide better.
7. Place door on bottom hinge. Remount top hinge.
8. Done and works better than new.
Read less
Was this instruction helpful to you?
Thank you for voting!
- Customer:
- DANIEL from MINNEAPOLIS, MN
- Parts Used:
- 4387478
- Difficulty Level:
- Easy
- Total Repair Time:
- Less than 15 mins
- Tools:
- Screw drivers
Light Would Not Go On In The Refrigerator
First I removed the old lightbulb from the socket and replaced it with a new one to confirm that the bulb was not the problem. I then pryed the socket out with a flat-head screwdriver. I could tell that the socket was anchored in its hole with clips so it was relatively easy to pry it out. Once the socket was out, I disconnected the le
... Read more
ad wires and ordered a replacement socket kit from Partselect. When the new one arrived, I reconnected the lead wires to it, snapped it back into its hole, screwed in a new lightbulb, and presto!! The light was back on with no further problem. Thank you, Partselect!! A $15.00 part saved me what probably would have been at least a $100. service call and heaven knows what the technician would have told me I needed!!!
Read less
Was this instruction helpful to you?
Thank you for voting!
- Customer:
- Gary from Huntington, WV
- Parts Used:
- 4318165
- Difficulty Level:
- Easy
- Total Repair Time:
- 30 - 60 mins
- Tools:
- Nutdriver, Screw drivers
Main Door wouldn't self-close
After removing all the food items from the door, I popped the plastic cover off of the hinge assembly located on the top of the door. With a fine point Sharpie pen , I marked the outline of around the hinge assembly so I could return it to original position. I then loosened each of the 3 bolts holding the hinge on just enough to allow
... Read more
me to clear the pin of the hinge out of the hole in the door. Once the top was free of the hinge, I lifted the door off of the bottom hinge/pin assembly. My cam parts on the bottom hinge and door were either broken and/or partially missing. I removed the broken and worn pieces by removing each of the screws holding the top and bottom (of the bottom hinge assembly) cam pieces and installed the new ones using same screws. I then reversed the steps and slid the bottom of the door back onto the bottom hinge assembly and then lifted the top hinge enough to allow the hinge pin to slid back into the hole on top of the door. Positioned the hinge so it matched the outline and tightened the 3 bolts. I checked the closing and made a slight adjustment to door as one of the shelves was hitting the interior as it tried to close. I did this by loosening the 3 bolts and pushing the door up and to the right (this door was on the right side of refrigerator). Tightened the bolts and reinstalled the hinge cover.
Pretty easy. My door cams were a little different so I didn't use all the parts in the kit. My shims were metal and did not move when I replace the cams so I didn't use anything in this repair except the 2 lower cam parts. I also put some grease/vaseline on the cams to lubricate them.
I figure the plastic cams just wore out over the years and all the heavy junk we put in the door shelves. I lived with this problem about 2 years before it donned on me that it was probably just a plastic piece or two that was broken or worn out.
Read less
Was this instruction helpful to you?
Thank you for voting!